While planning our 3-week North Island adventure, one hike stood above the rest — the Tongariro Alpine Crossing. Known as New Zealand’s most famous day hike and frequently listed among the best in the world, I was eager to find out whether it really deserved that title.
This 20.2-kilometer trek through New Zealand’s oldest national park takes you across ancient lava flows, past steaming volcanic vents, and around turquoise crater lakes. You’ll traverse terrain that shifts from moon-like desert to alpine tundra and native forest—all in a single day.
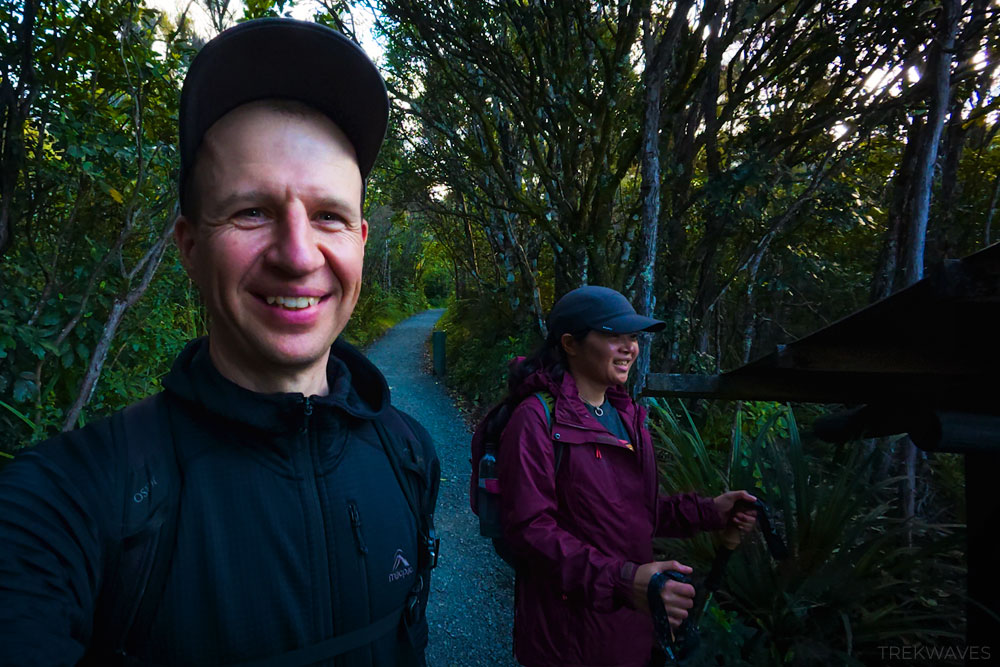
I’ve completed the crossing and documented the entire experience in this YouTube video. Now, I’m breaking down everything you need to know in this comprehensive guide—from the actual costs and transportation logistics to essential gear, trail breakdown, weather considerations, and cultural significance.
Whether you’re planning your own North Island trip or wondering if you’re ready for this challenge, here’s your complete guide.
Tongariro Alpine Crossing Trail Overview
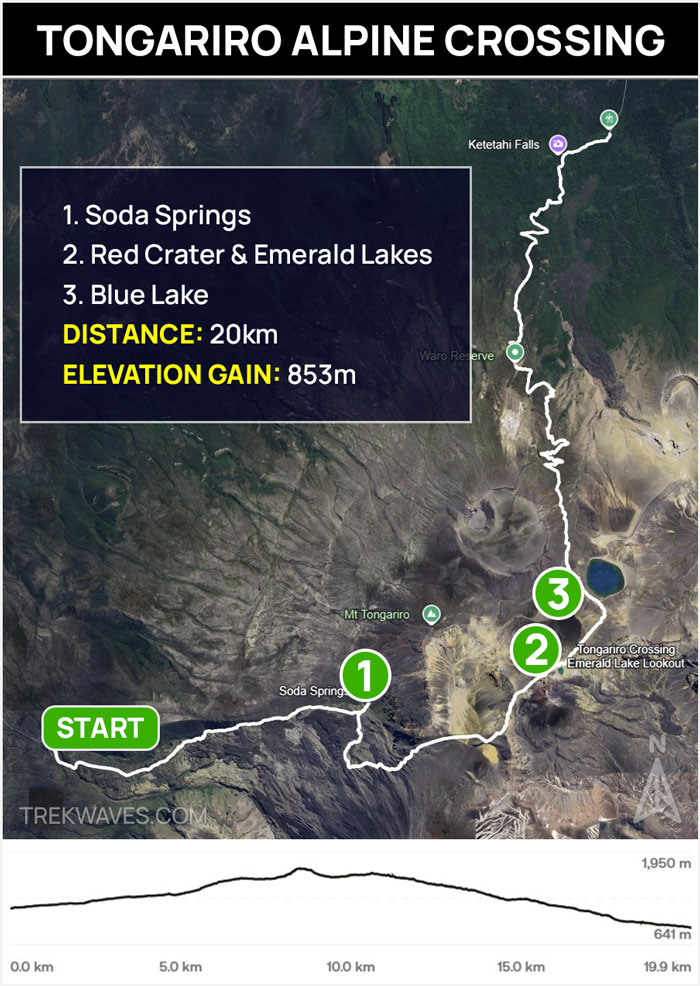
Here’s a snapshot of the Tongariro Alpine Crossing length and the most important trail details:
- Distance: 20.2 km (point-to-point, not a loop)
- Elevation gain: 853 m
- Duration: 6-8 hours in summer, 8-9 hours in winter
- Highest point: Red Crater at 1,886m
- Annual hikers: ~125,000-150,000
- Trail Start: Mangatepopo Carpark
- Trail End: Ketetahi Carpark
The Tongariro Alpine Crossing runs from Mangatepopo to Ketetahi, meaning transport logistics need to be planned in advance. Below is a trail map and elevation profile showing the full route:
Best Time to Hike the Tongariro Alpine Crossing
Choosing the right time to hike the Tongariro Alpine Crossing has a huge impact on crowds, weather, and overall experience. While the trail is accessible for much of the year, conditions vary significantly by season.
Summer (November-April)
This time offers the most reliable conditions, with the track usually open and no specialist gear required. That said, timing within summer matters.
Peak season (December–March) brings the longest days and most predictable weather, but also heavy crowds. January and February can see 1,500+ hikers per day, fully booked shuttles, and congested viewpoints. If hiking during this period, book well ahead and start as early as possible.
Shoulder months (November & April) are often the best overall choice, offering fewer crowds and excellent scenery, though with slightly less predictable weather. March is another solid option, balancing reliability with reduced congestion.
We hiked the crossing in early November, which proved to be a perfect choice. Crowds were almost 10 times lower than peak season, yet shuttle services were fully operational and conditions were stable.
Snow still capped the peaks, adding contrast to the volcanic landscape, and iconic viewpoints like the Emerald Lakes were very enjoyable without any queues.
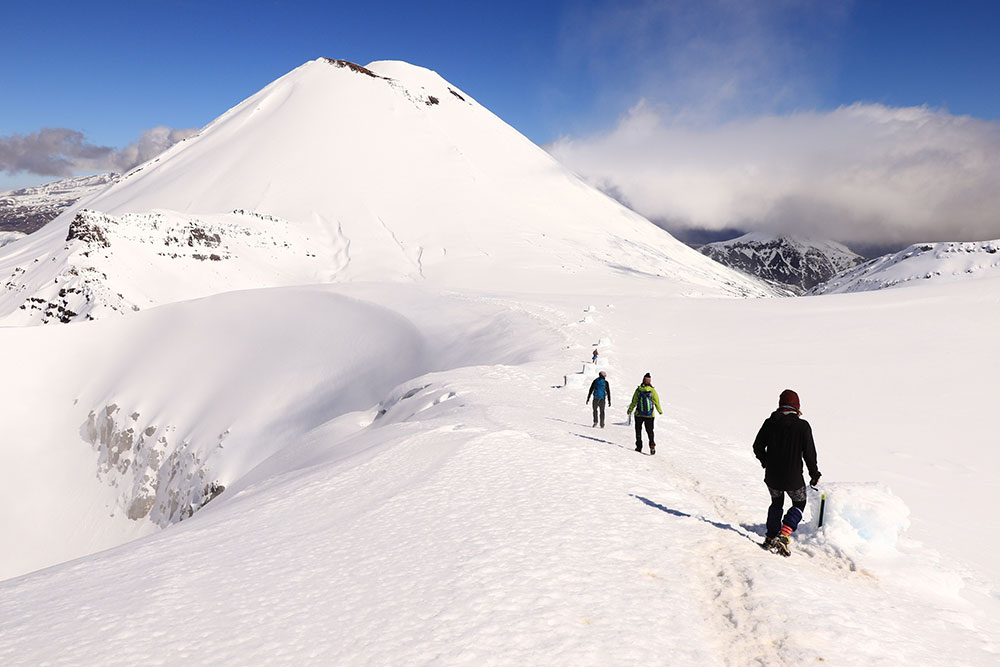
Winter (May–October): Experienced Hikers Only
In winter, the Tongariro Alpine Crossing becomes a serious alpine route. Conditions typically require:
- Guided trips or advanced mountaineering experience
- Crampons, ice axe, and winter gear
- Significantly higher costs (guided hikes ~NZ$250–350)
While winter landscapes are stunning and crowds minimal, the route can be dangerous without proper skills and equipment.
Weekday vs Weekend
Weekdays are noticeably quieter, with 30–40% fewer hikers than weekends. If possible, aim for Tuesday to Thursday.
Tongariro Alpine Crossing Shuttle & Transport Options
The Tongariro Alpine Crossing is a one-way track, which creates a logistical puzzle that trips up many first-time hikers. You’ll start at Mangatepopo and finish 20 kilometers later at Ketetahi.
Why Self-Shuttling Doesn’t Work
One of the most common questions hikers ask is whether they can drive to the trailhead, complete the hike, and then get picked up at the end.
Here’s why that’s problematic: Mangatepopo (the starting point) has a strict 4-hour parking limit. Since the hike takes 6-8 hours minimum, your car will be illegally parked for most of the day, risking fines or towing.
You could technically park at Ketetahi (the end point) and arrange a ride to Mangatepopo to get back to your car, but after completing the crossing myself, I’d strongly advise against it.
The climb from Ketetahi toward Blue Lake is a long, continuous grind that would be much harder on your legs and far less enjoyable than hiking the crossing in the usual direction.
You’re also relying on tight timing with your driver, which can quickly fall apart if the weather changes or you move slower than expected.
How Tongariro Shuttle Services Work
Most hikers use one of two shuttle options:
OPTION 1: Return Shuttle from Accommodation
- Shuttle picks you up from your accommodation (5:15am–9:30am departures)
- Drops you at Mangatepopo trailhead
- You hike to Ketetahi
- Shuttle picks you up at Ketetahi at pre-arranged time
- Returns you to your accommodation
OPTION 2: Park at End, Shuttle to Start
- Drive to Ketetahi and park
- Take morning shuttle to Mangatepopo
- Hike back to your car
Our Shuttle Experience & Recommendation
We stayed at Whakapapa Village Holiday Park, which turned out to be an excellent base location. The receptionist recommended Active Outdoor Adventures for our shuttle service, and it was worth noting their key advantage: they offer a monitored private car park.
This detail matters because other shuttle providers require you to park on the main road near the pickup point, leaving your vehicle unattended for 6 hours or more.
DOC Booking System
Before you you can start hiking, you have to fill out a quick form through the DOC website. This is simply a free registration system, not an actual booking or reservation.
You register your intended hiking date with the Department of Conservation (DOC) online—it takes about 5 minutes and is mandatory if you’re using shuttle services. The registration helps with safety tracking and trail management.
While registration is currently free, DOC plans to introduce a paid entry fee (NZ$20-40) starting in 2027 for international travellers.
Register as soon as you confirm your hiking date at the DOC website, and bring your confirmation on your phone or printed.
Tongariro Alpine Crossing Weather & Forecasts
Weather isn’t just a consideration for the Tongariro Alpine Crossing—it’s the single most important factor determining whether your hike is safe or even possible. More rescues happen due to weather than any other cause.
Why Weather Matters So Much
Once past the Devil’s Staircase, you’re exposed to full alpine conditions for 4-6 hours with minimal shelter. The consequences of bad weather are serious:
- Hypothermia (even in summer)
- Zero visibility when cloud rolls in
- Extreme winds (60-80+ km/h) that can knock you off your feet
- No bailout options—only forward or a long retreat
Rapid Weather Changes Explained
Tongariro is notorious for fast-moving weather systems:
- Temperature: Red Crater is 10-15°C colder than the base. A 20°C day becomes 5-10°C at the summit
- Wind: A moderate 30 km/h breeze becomes a dangerous 70+ km/h gale at exposed ridges
- Visibility: Clear skies can turn to thick fog in under 30 minutes
- Precipitation: Rain, sleet, or snow can arrive with little warning and turn volcanic gravel into slippery terrain
Wind is often the biggest challenge on this hike. Strong gusts near Red Crater can make walking difficult and unsafe, especially in poor visibility. Low cloud can also obscure route markers, making navigation harder even on a well-defined track.
This is why checking the forecast once isn’t enough — conditions need to be monitored right up until the morning of your hike.
Best Weather Websites to Check
Before hiking, always consult multiple reliable sources:
- MetService – Tongariro Alpine Crossing Forecast
The most trusted and detailed forecast for the area, including wind, cloud, and alpine conditions. - Department of Conservation (DOC) Track Status
Look for warnings such as “Not Recommended Today” — these advisories are issued for good reason. - Shuttle Company Updates
Shuttle operators often cancel or delay services based on real-time conditions and local assessments.
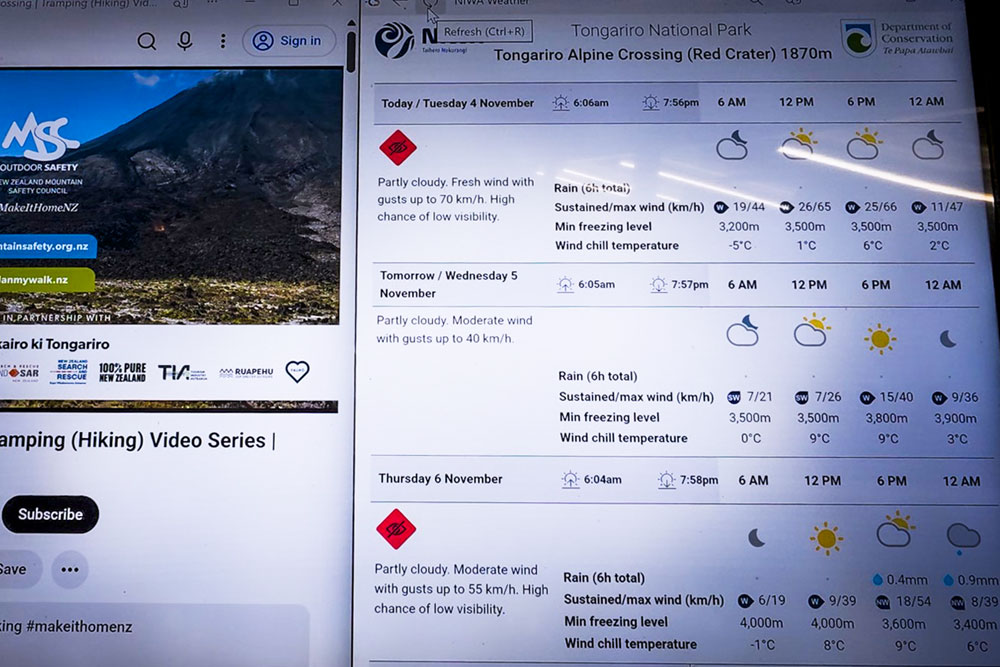
Whakapapa Village Tip (Highly Recommended)
Here’s something most guides don’t mention: If you’re staying at Whakapapa Village Holiday Park (like we did), the shared kitchen area features a live 2-day forecast tailored specifically to the Tongariro Alpine Crossing.
This is one of the most reliable last-minute checks because:
- It is updated multiple times daily
- It is tailored specifically to the crossing, not general area weather
- Staff use it to advise guests whether conditions look favorable
Weather Strategy Tip: Stay Flexible
If there’s one tip to follow, it’s this: plan to stay 2–3 days around Tongariro so you can wait for the best weather window (this is what we did).
If weather looks bad:
- Most shuttle companies allow you to reschedule (check their policies)
- Having a backup day removes the pressure to hike in dangerous conditions
- You can explore other amazing trails on bad weather days (Taranaki Falls, Silica Rapids, Tawhai Falls or Meads Wall)
Tongariro Alpine Crossing Difficulty – Is It Hard?
The Tongariro Alpine Crossing is often described as a “must-do day hike,” but don’t let that label fool you — this is not a casual stroll. While it doesn’t require technical climbing skills, it does demand solid fitness, preparation, and respect for alpine conditions.
Who Is The Tongariro Alpine Crossing Suitable For?
The good news: you don’t need to be an elite athlete. The Tongariro Alpine Crossing sees hikers ranging from kids as young as 5 to people in their 80s and 90s.
You’re likely ready if you:
- Have moderate to good fitness
- Are comfortable walking 6–8 hours on uneven terrain
- Have reasonably strong knees for long descents
This hike may not suit you if:
- You have significant knee or joint issues (the descent is punishing)
- You struggle with heights or exposure (some sections have steep drop-offs)
- You haven’t done any multi-hour hikes before
- Want to go with children under 10 (DOC doesn’t recommend it due to distance and exposure)
Tongariro Alpine Crossing: Technical Difficulty Explained
Here’s the distinction that matters:
- Technical Difficulty: Low to moderate. You don’t need mountaineering skills (no ropes or rock scrambling required), just basic hiking ability and comfort on uneven ground. The Red Crater descent is the most technical section—steep, loose scree requiring careful foot placement.
- Endurance Requirement: High. This is where the crossing challenges most people. It’s not about one hard section; it’s about maintaining pace and energy for 7-8 hours straight.
Practical Tips for Success
Pacing Strategy:
- Start slow on the Devil’s Staircase—you have all day
- Take short breaks (5 min) every 60-90 minutes
- Eat and drink regularly, not just when hungry/thirsty
- Save energy for the final descent—that’s where fitness matters most
Managing the Descent:
- Use hiking poles (they reduce knee stress by 25%)
- Take small steps on scree rather than long strides and go heel first
- Lean slightly back on steep sections
- Don’t lock your knees—keep them slightly bent
Common Mistakes First-Time Hikers Make
Some of the most common issues we saw (and heard about) include:
- Underestimating the length of the hike
- Starting too late in the day
- Wearing poor footwear (runners instead of hiking shoes / boots)
- Not carrying enough water
- Not brining enough warm layers and waterproof clothing
- Ignoring wind and weather warnings
Our Honest Assessment
Having completed the crossing, here’s my take: it’s absolutely achievable for people with moderate fitness, but it will challenge you. We’re reasonably active and we felt worked by the end—particularly on that final forest descent when our knees were screaming.
The crossing rewards preparation. Those who trained, started early, paced themselves, and came properly equipped seemed to genuinely enjoy the experience. Those who winged it looked miserable by the halfway point.
Best Places to Stay Near the Tongariro Alpine Crossing
Choosing where to stay significantly impacts your Tongariro Alpine Crossing experience. The closer you are to the trailhead, the less time you’ll spend on shuttles and the more you can sleep in—though you’ll trade amenities for proximity.
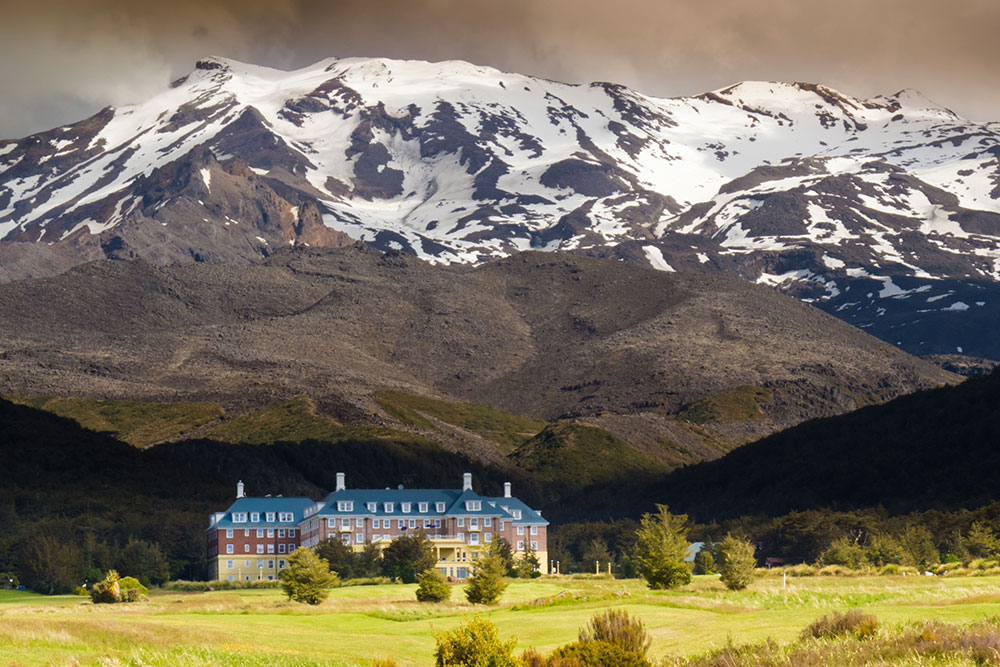
1. Whakapapa Village (Our Choice)
Located just 23 minutes from Ketetahi car park, Whakapapa Village Holiday Park was our base for several days exploring Tongariro National Park. We chose this location specifically because it’s perfectly positioned for accessing the best hikes in the park—not just the Alpine Crossing, but also Taranaki Falls, Silica Rapids, and other trails.
For the crossing itself, we drove from the holiday park to Ketetahi car park (the end point) and caught the shuttle from there to Mangatepopo to start the hike. This approach worked brilliantly—we hiked back to our own car and avoided the coordination hassle of return shuttles from accommodation.
The area is small with limited dining options (essentially one café and a couple of basic restaurants), so don’t expect a bustling town vibe.
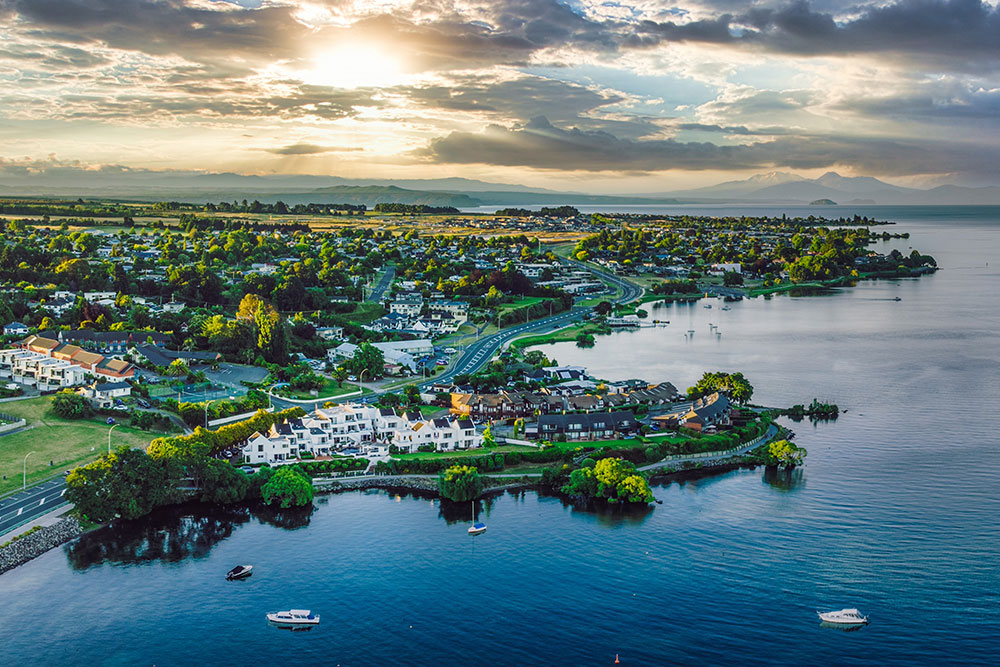
2. Taupō
New Zealand’s adventure capital and largest town in the region, Taupo offers the most amenities, restaurants, nightlife, and accommodation variety.
However, you’ll pay for this convenience with longer shuttle rides. It’s 1+ hours to the Mangetepopo trailhead, meaning very early morning start (some shuttles pick up as early as 5:15am from Taupo).
Choose Taupo if you want city comforts, are spending several days in the area doing other activities (bungy jumping, skydiving, lake cruises), or prefer more dining and entertainment options.
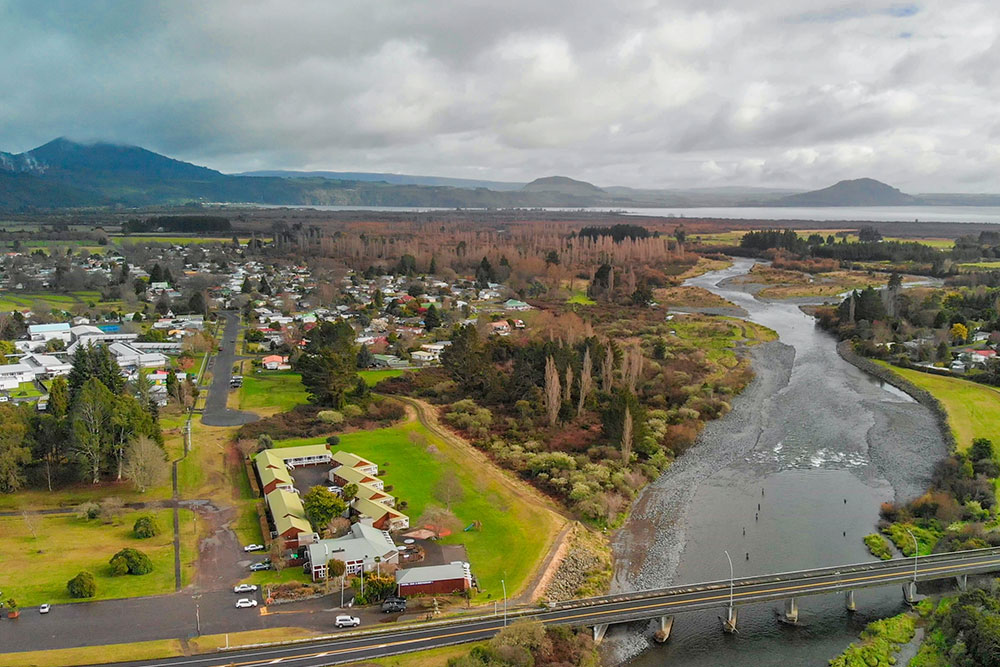
3. Turangi
Turangi is often considered the most practical base for the Tongariro Alpine Crossing. Located about 35 minutes from the trailhead, it sits on the southern shores of Lake Taupō and offers a wide range of accommodation — from budget motels and holiday parks to comfortable lodges.
It’s quieter and generally more affordable than Taupō, making it a great option if your main goal is hiking rather than sightseeing. Most shuttle companies operate from here, and early morning pickups are easy to arrange.
4. Waimarino (National Park Village)
Formerly known as National Park Village, Waimarino is one of the closest and most convenient bases for the Tongariro Alpine Crossing. Located right on the edge of Tongariro National Park at the intersection of State Highways 4 and 47, it’s just 15 minutes drive from the trailhead—making it ideal for those wanting to minimize shuttle time and maximize rest.
The small village has a convenience store, a couple of cafés, a couple of bars and restaurants, and a gas station — enough to cover your basic needs without the overwhelming tourism feel of larger towns like Taupo.
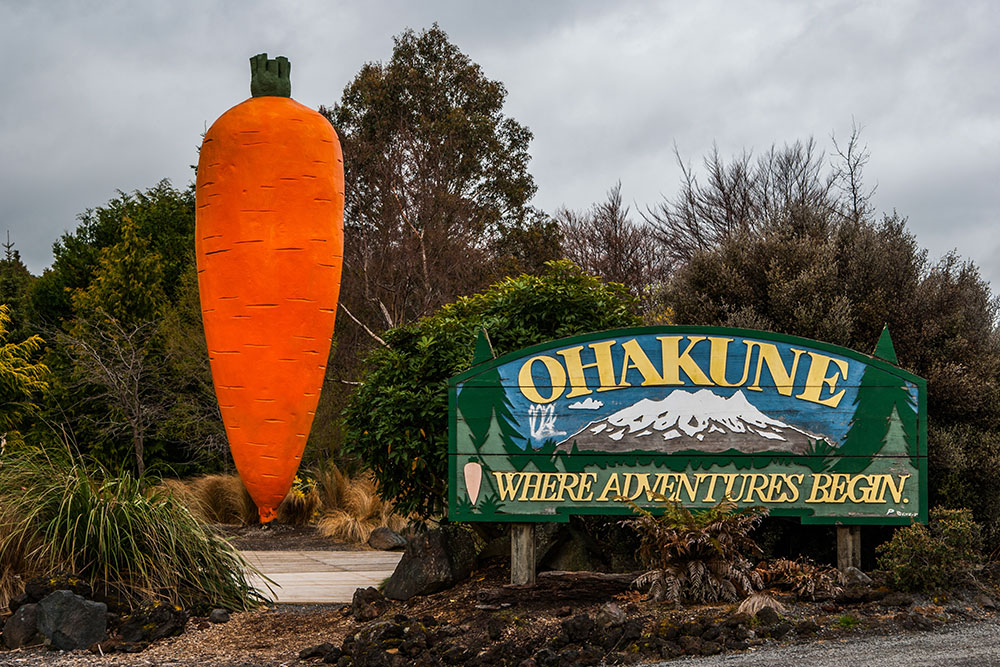
5. Ohakune
Ohakune sits on the southwestern side of Mt Ruapehu, about 40 minutes from the Crossing trailhead. It’s a popular ski town with a relaxed vibe and good restaurant options.
It works well if you’re combining the Tongariro Alpine Crossing with other walks (such as Waitonga Falls or Mangawhero Falls) or exploring the southern side of the national park. Accommodation ranges from alpine lodges to modern chalets and holiday homes.
6. Tongariro Holiday Park
For campers and van travellers, Tongariro Holiday Park is one of the most convenient places to stay. Located between Turangi and National Park Village, it offers cabins, powered sites, and basic facilities.
It’s a practical choice if you’re road-tripping or travelling by campervan. Shuttle services operate from here, making logistics straightforward without needing to relocate your vehicle.
Tongariro Alpine Crossing Route Breakdown
This section-by-section breakdown follows exactly how we experienced the Tongariro Alpine Crossing, starting early, pacing ourselves well, and soaking in every major highlight along the way.
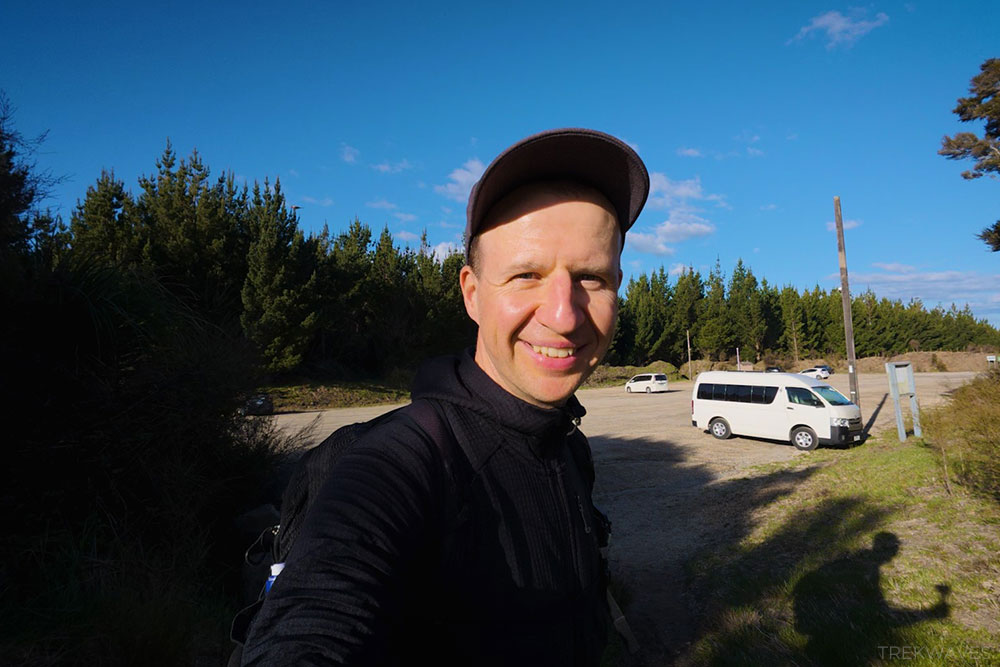
1. Mangatepopo Car Park → Soda Springs
We started the day early, jumping on the first available (in November) shuttle at 7:30 am, which already felt like a win.
Before the drive in, the shuttle driver shared a few key facts about the crossing — including its cultural significance and why places like the Emerald Lakes are considered sacred in Māori culture.
From the Mangatepopo car park, the trail begins with a gentle, well-formed climb up the valley. Boardwalks and poles mark the way through sections of damp ground, and information signs along the track explain the geology of the surrounding lava flows.
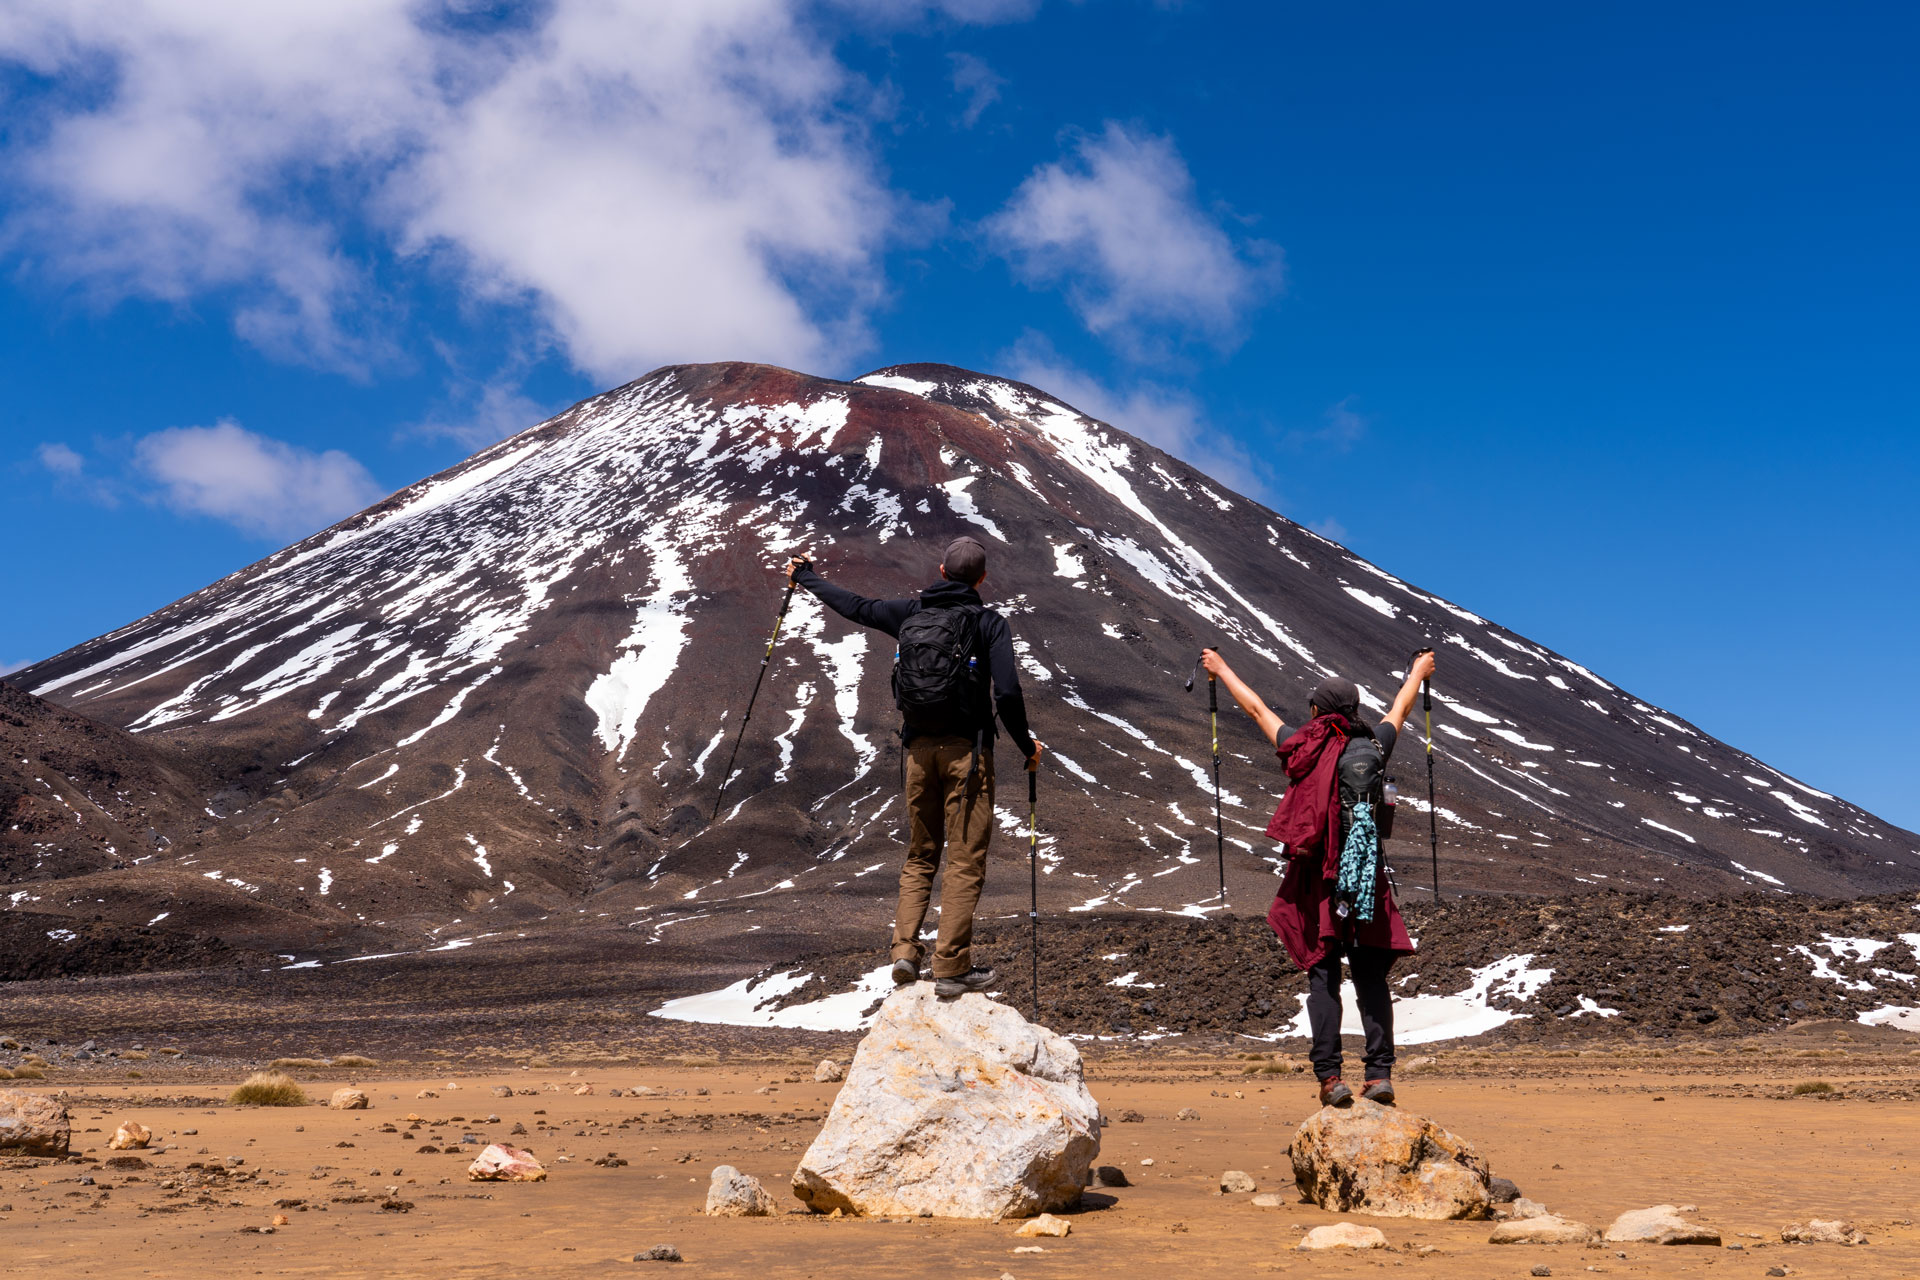
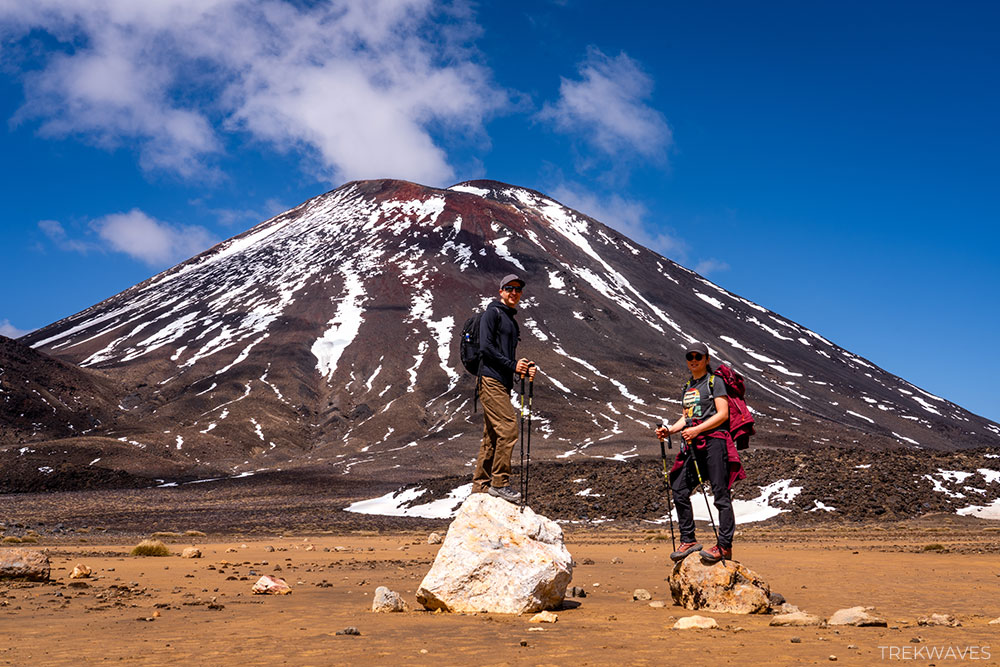
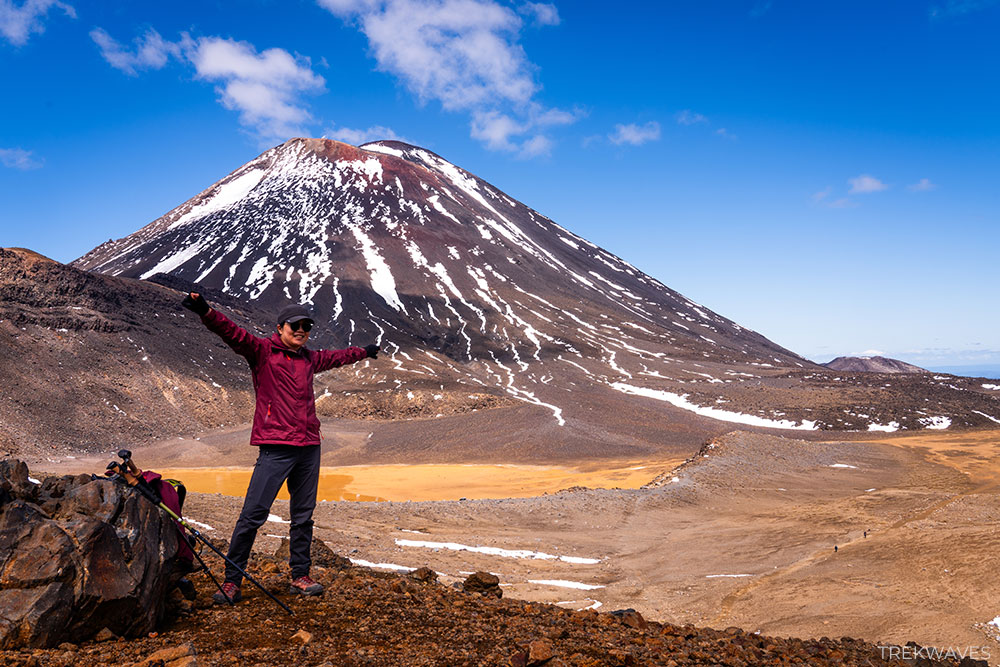
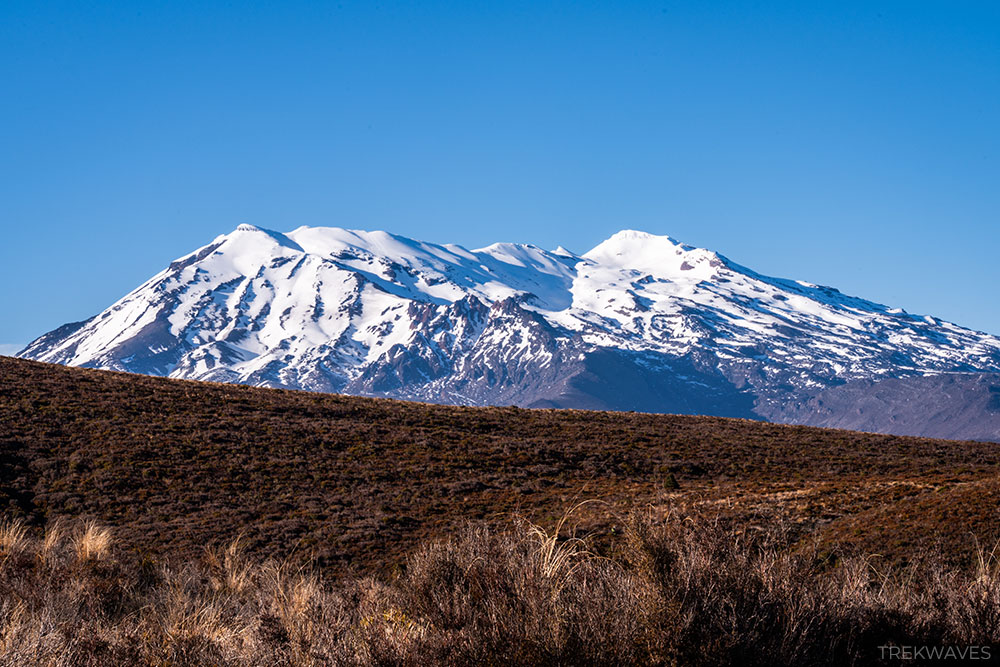
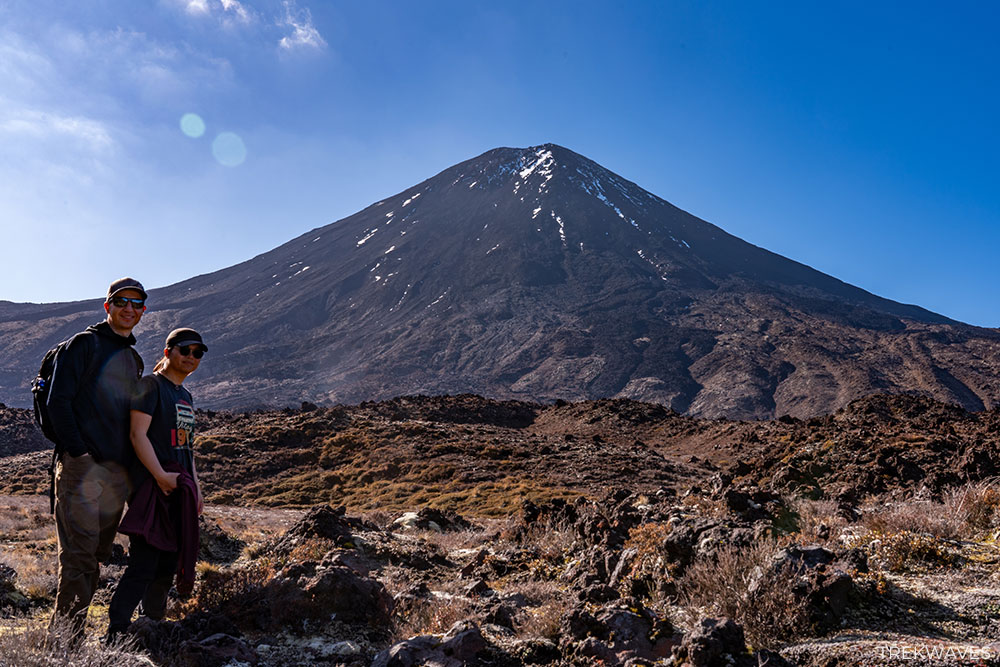
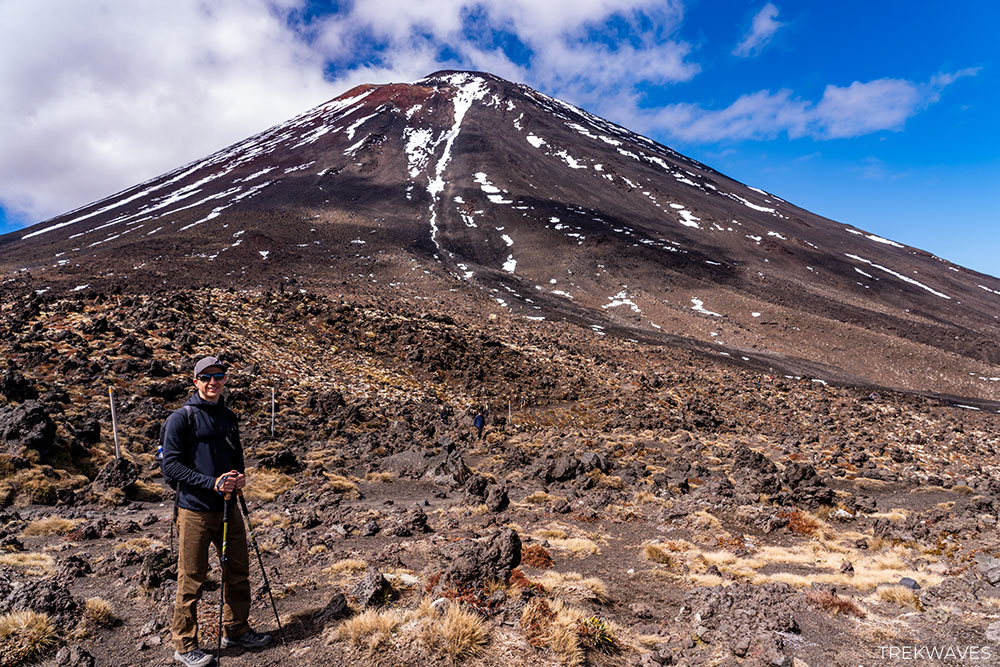
Almost immediately, Mount Ngauruhoe (the volcano used as “Mount Doom” in The Lord of the Rings film trilogy) dominates the skyline — making this section a fantastic first photo opportunity.
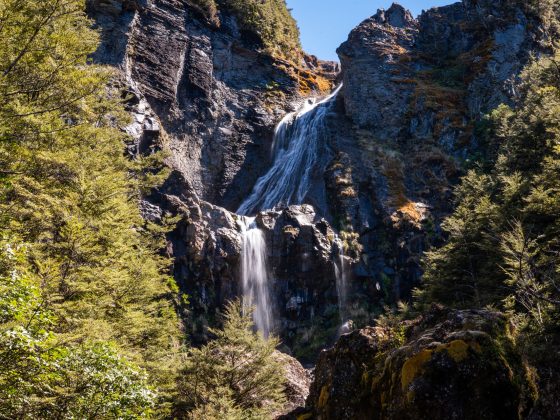
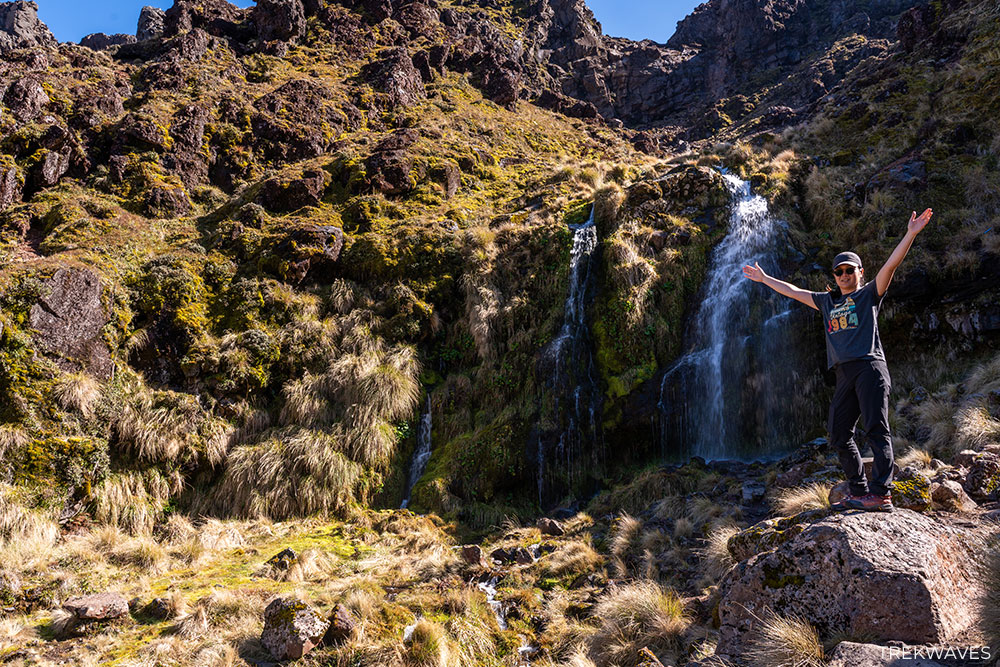
Before the climb hits its steeper sections, we took a very short detour to Soda Springs. Just a few minutes off the main track, this little waterfall isn’t massive, but the cool spring water cascading over mossy rocks was a lovely contrast to the volcanic terrain.
It also made for a perfect early snack break and mini-rest spot before tackling the day’s bigger climbs.
2. Soda Springs → Devil’s Staircase
Leaving Soda Springs behind, the trail begins to rise more noticeably as you head toward the Devil’s Staircase.
Despite the dramatic name, we found this section relatively easy. The climb is steady with well-constructed steps that make the ascent feel controlled and manageable — especially this early in the day, while legs are still fresh.
What makes this stretch truly fascinating is the landscape itself. According to the information signs along the trail, this valley is the result of both ice and fire working together over hundreds of thousands of years.
Around 340,000 years ago, this entire area was buried beneath thick ice during the last major glaciations. As the glaciers slowly retreated around 18,000 years ago, they carved out the broad valley shape you’re walking through today.
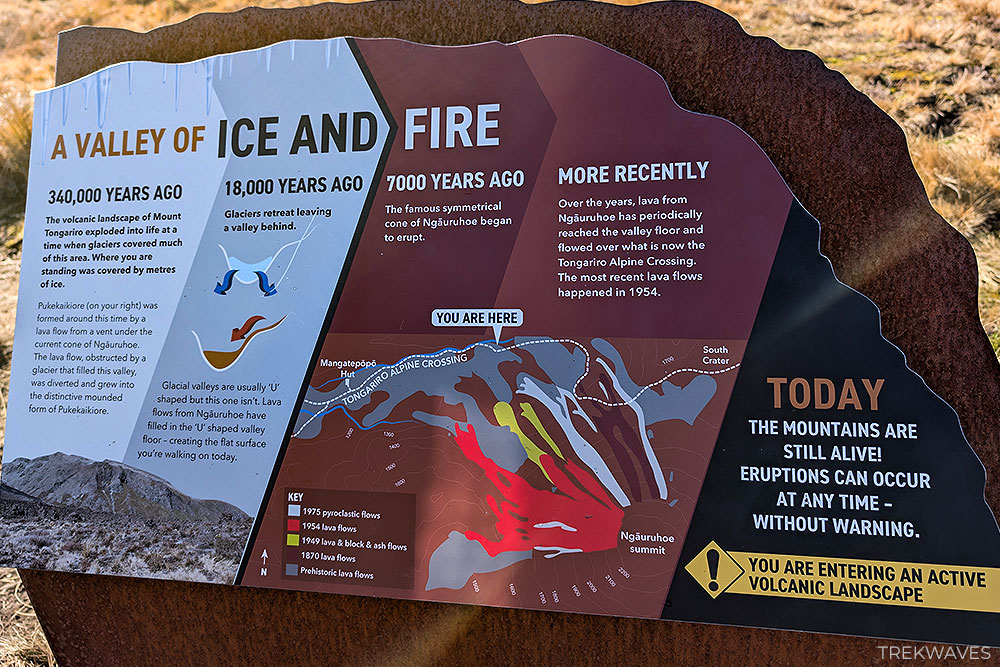
You can still see clear signs of this glacial past today. The valley sides show subtle ridges and raised edges — lateral moraines — formed from rock and debris pushed aside by moving ice.
These features mark the former edges of the glacier and help explain the wide, open feel of the Mangatepopo Valley.
What makes this valley unusual is what happened next. Unlike a classic U-shaped glacial valley, the floor here was later partially filled by lava flows. Around 7,000 years ago, the symmetrical cone of Mount Ngauruhoe began erupting, repeatedly sending lava down into the valley.
Over time — including major flows as recently as 1954 — lava filled the lower sections of the glacial valley, flattening the floor and creating the terrain you walk across today.
As we climbed higher on the Devil’s Staircase, we kept turning around to take it all in. With exceptional visibility on our day, the views back down the valley were already impressive — and from near the top, we could even make out the distinct silhouette of Mount Taranaki on the far western horizon.
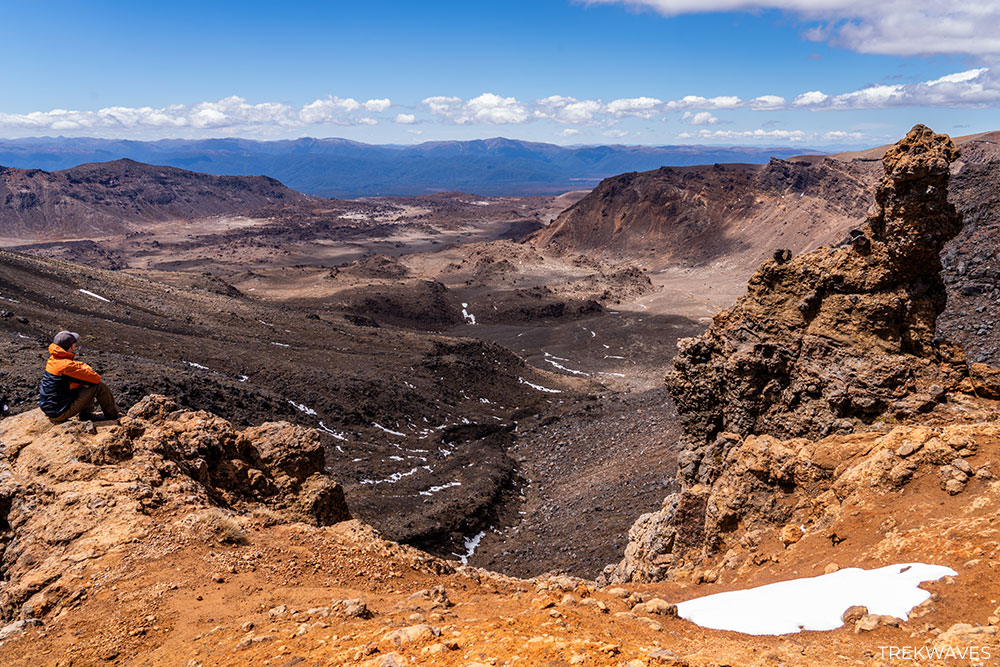
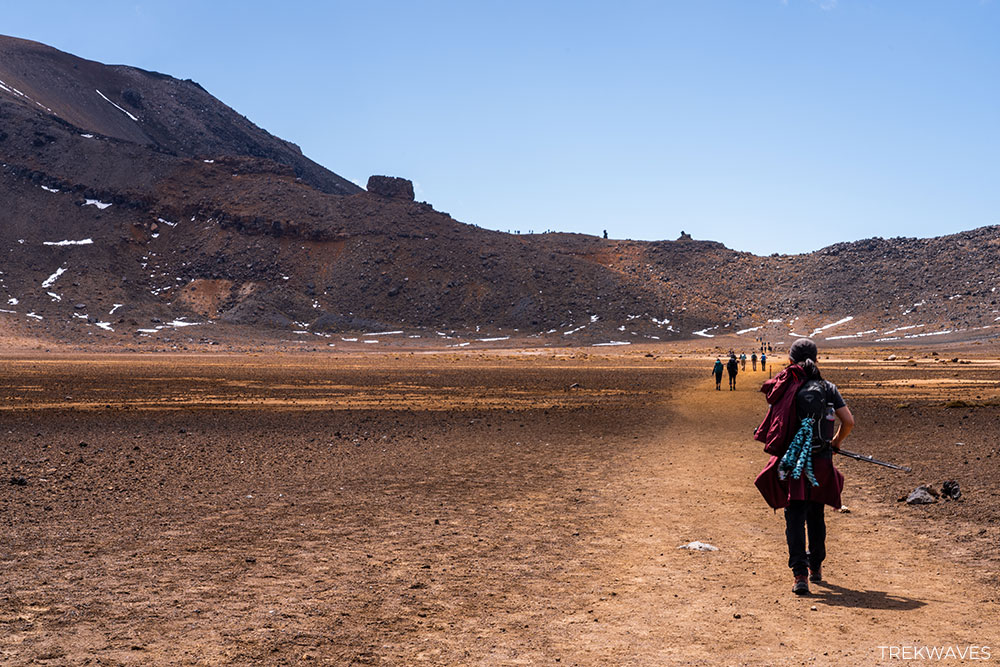
3. South Crater Crossing
After topping out on the Devil’s Staircase, the trail suddenly flattens as you enter the South Crater — and this section instantly feels like you’ve stepped onto another planet. South Crater is a vast, ancient volcanic basin shaped by both glaciers and explosions.
Despite its name, South Crater isn’t a traditional volcanic crater. Most of the basin was originally carved by retreating ice at the end of the last Ice Age, when glacial ice gouged a broad bowl into the volcanic terrain.
As the glaciers melted back roughly 18,000 years ago, they left behind flattened ground and telltale moraines along the higher ridges — visible reminders that this place was once filled with ice and rock grinding together.
On the southeast side of the South Crater sits an explosion crater, created by a past eruption that forcefully expelled material and reshaped this part of the basin.
In geological terms, an explosion crater forms when magma, gases, and steam violently eject rock and ash from beneath the surface — almost like nature’s own explosion-shaped bowl.
We chose to stop here for a proper lunch break, sitting on the edge of the basin and taking in the isolation and scale of the place.
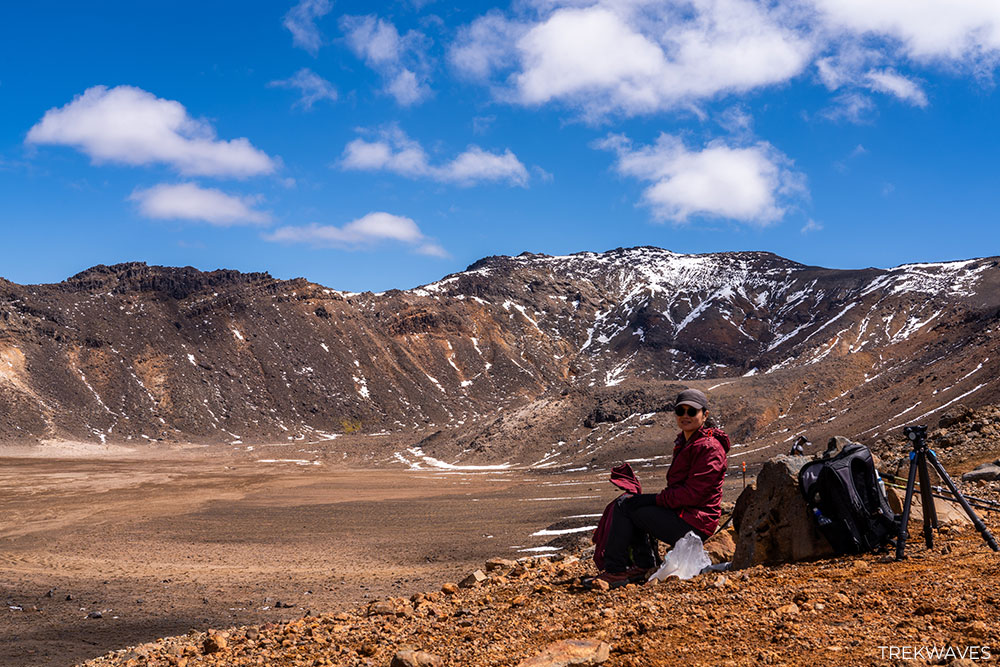
It was the perfect pause before the next challenge — the steep climb up to Red Crater — and a great opportunity to reflect on how dynamic this environment really is.
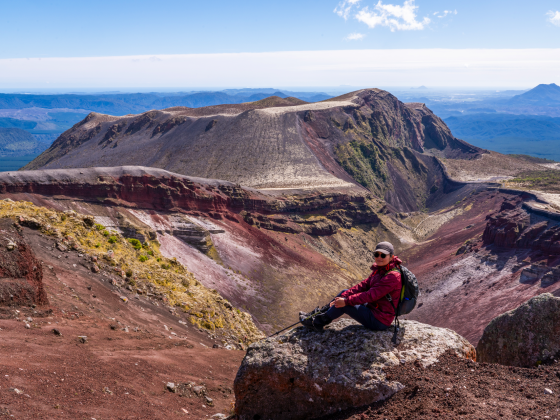
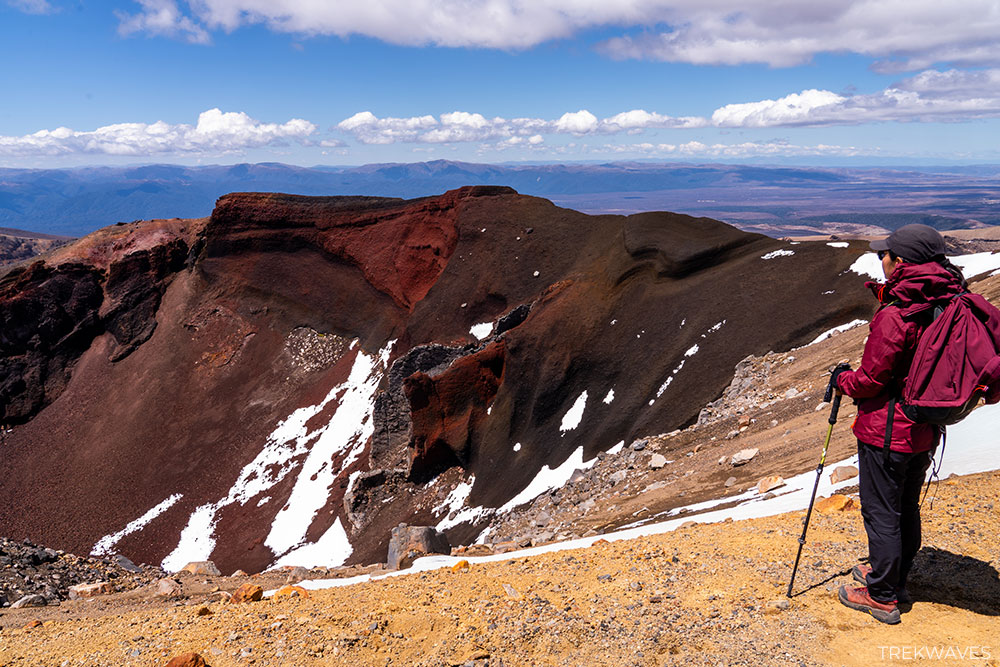
4. Red Crater Ascent & Summit
The climb to Red Crater is the steepest and most demanding part of the hike, but conditions couldn’t have been better for us.
Geologically, this section is fascinating. Red Crater is an explosion crater, formed by violent eruptions that blasted material outward rather than building a smooth cone. The striking red colour comes from iron-rich volcanic rock — mainly scoria — that has been oxidised over time, essentially rusting as it reacts with oxygen.
That’s what gives the crater rim its deep red and orange tones, standing out so sharply against the darker volcanic terrain around it.
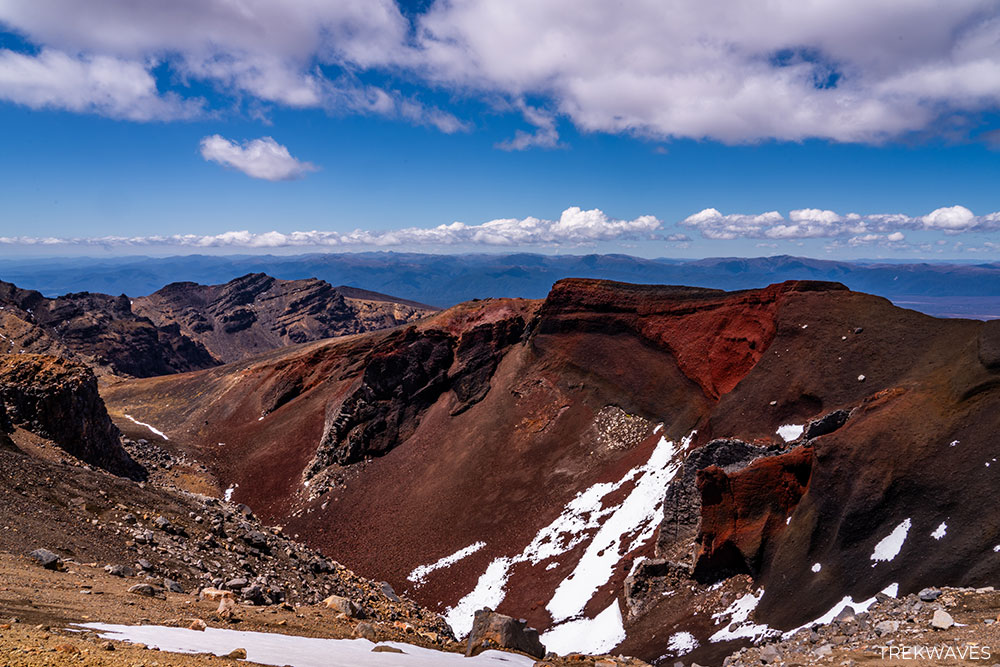
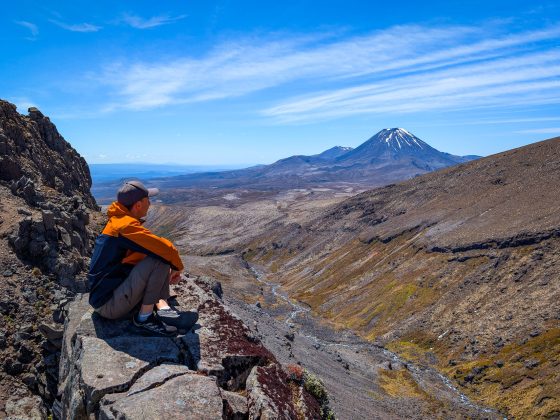
We were incredibly lucky with the conditions. At the summit, we experienced almost windless weather, which is rare at this exposed saddle between Mount Tongariro and Mount Ngauruhoe.
Instead of battling gusts, we were able to to pause, slow down, and fully appreciate the views.
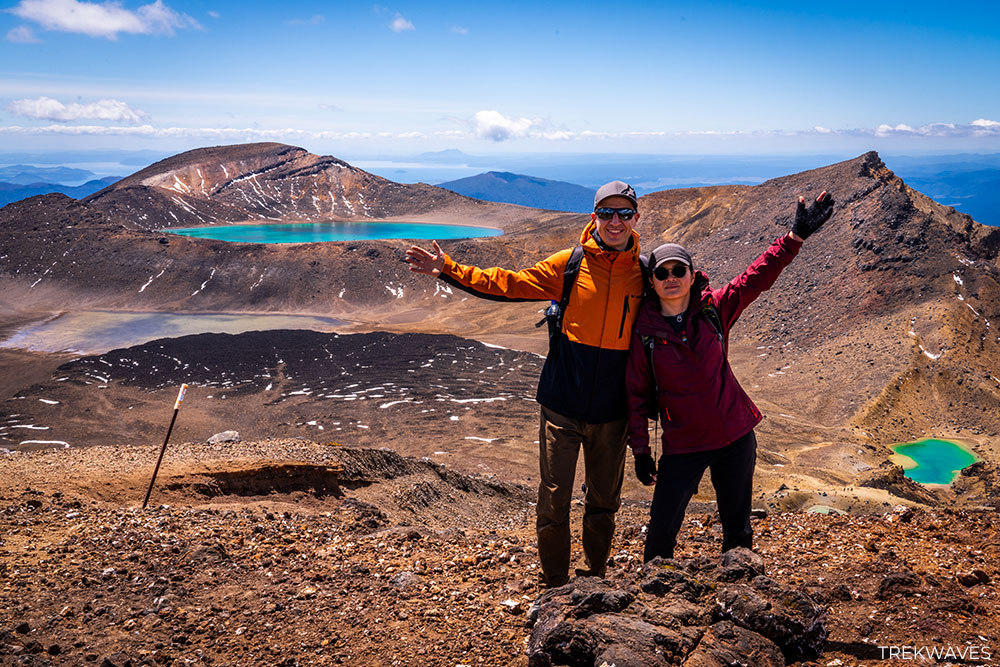
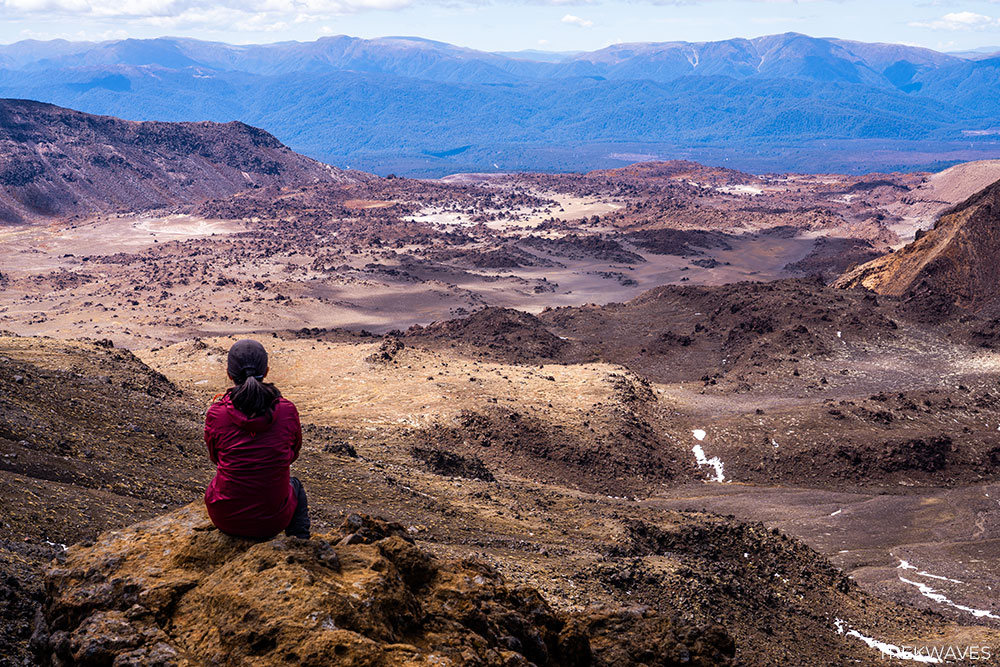
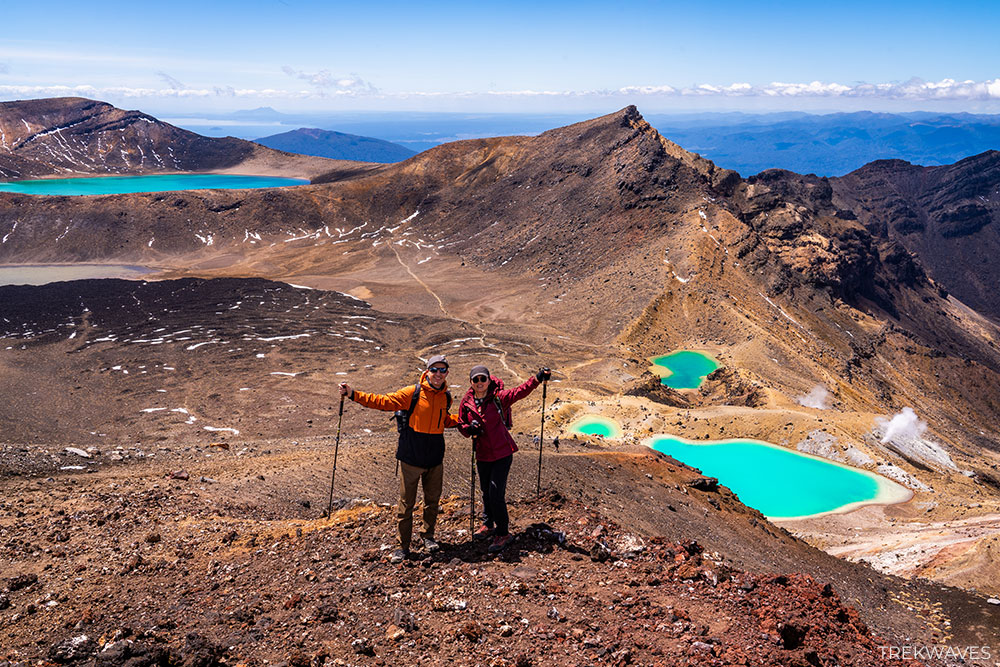
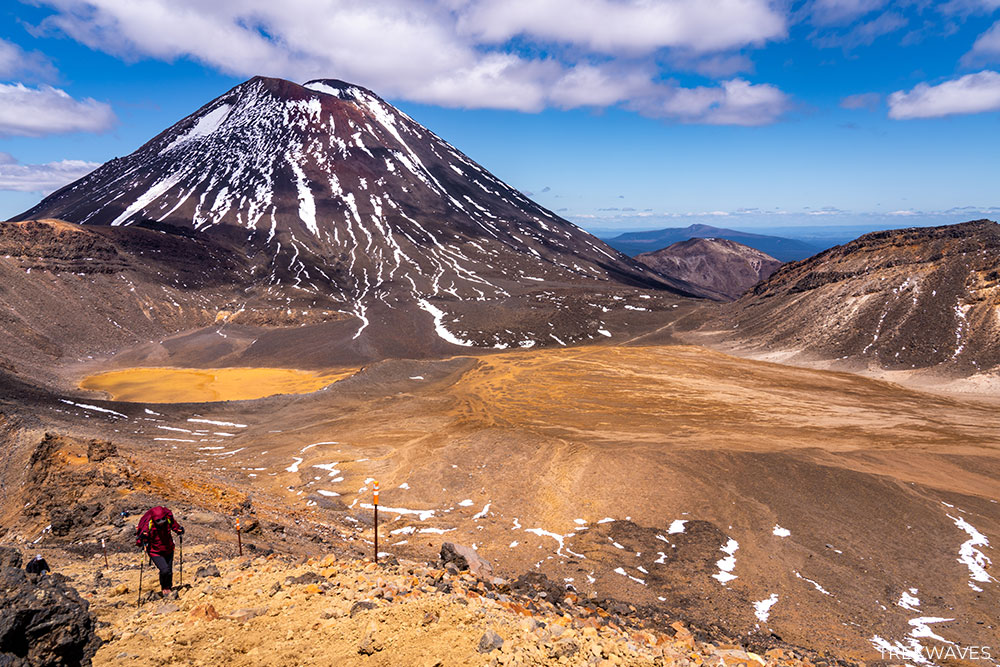
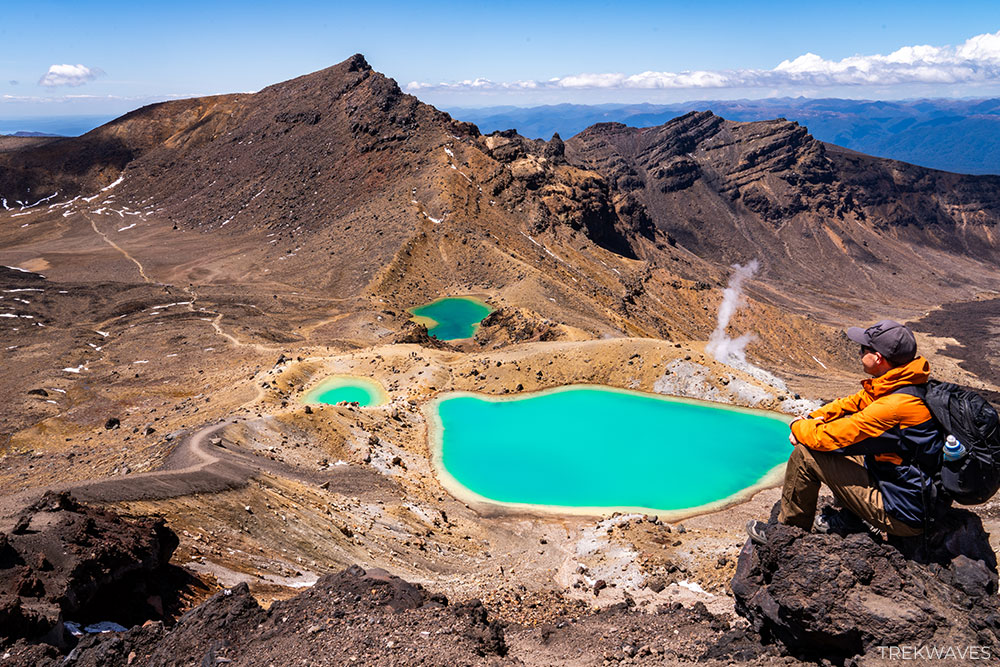
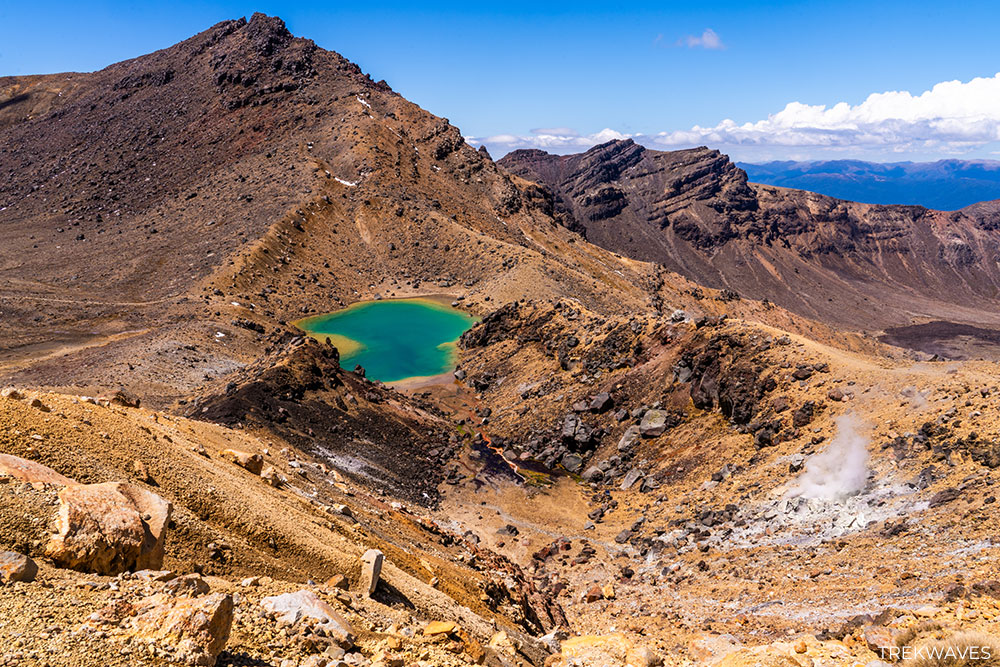
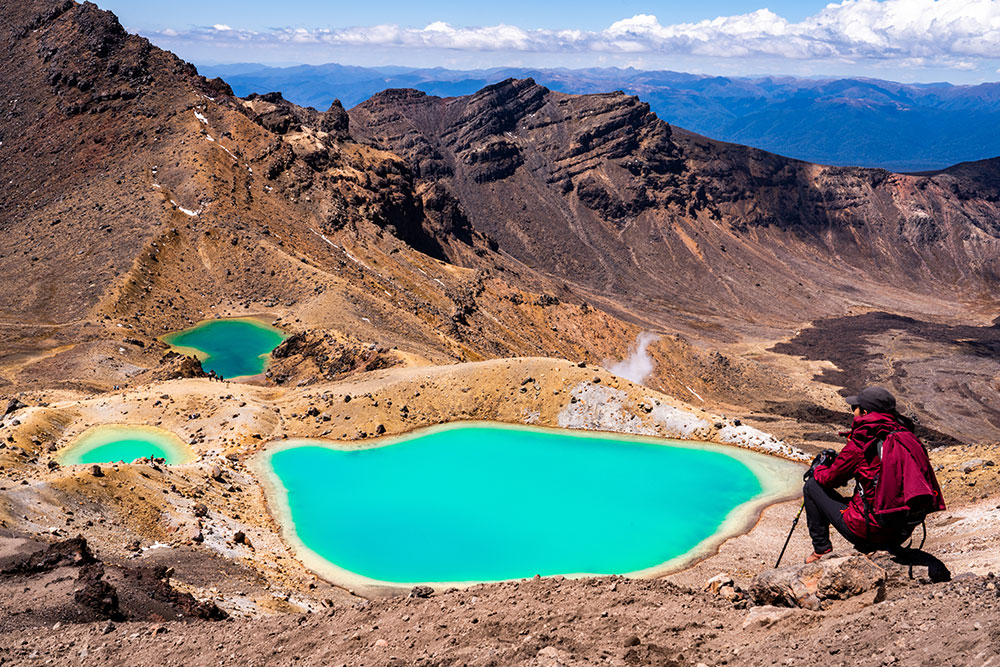
From the top, the views opened up in every direction. Below us, the Emerald Lakes glowed an unreal shade of turquoise, while beyond them stretched a vast volcanic landscape of craters, lava flows, and distant peaks.
Looking back, Mount Ngauruhoe dominated the skyline; looking forward, the route ahead felt almost surreal.
We took another break here, and without hesitation, this was the single biggest highlight of the entire hike for us.
Standing on the rim of an active volcanic crater, with panoramic views across Tongariro National Park, made it clear why this hike is so highly praised.
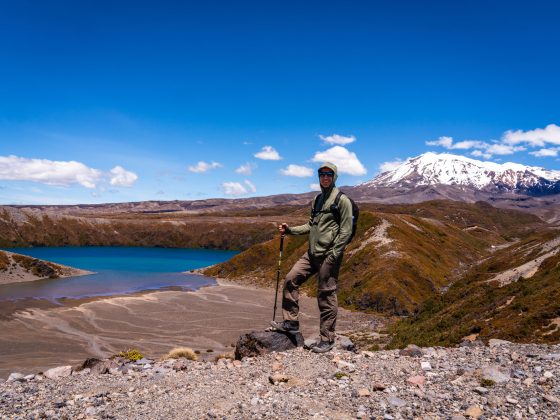
5. Emerald Lakes → Blue Lake
Descending from Red Crater toward the Emerald Lakes is one of the most memorable stretches of the entire crossing. The track is steep and covered in loose volcanic scree — fine ash and scoria that moves underfoot — so we took our time here. Once at the bottom, the colours of the Emerald Lakes are even more striking up close.
That intense turquoise comes from minerals leached from the surrounding volcanic rock, particularly sulphur and other dissolved elements.
Combined with sunlight and the pale lake bed beneath the water, it creates that almost unreal glow that makes this one of the most photographed spots on the trail.
From here, the route gradually climbs again into what’s known as the Central Crater — despite the name, it isn’t actually a true volcanic crater. Instead, this broad, flat basin was shaped by a combination of glacial erosion and later volcanic infill, similar to South Crater.
The wide, open feel makes it seem like a natural corridor between the dramatic high points of Red Crater and the quieter terrain ahead.
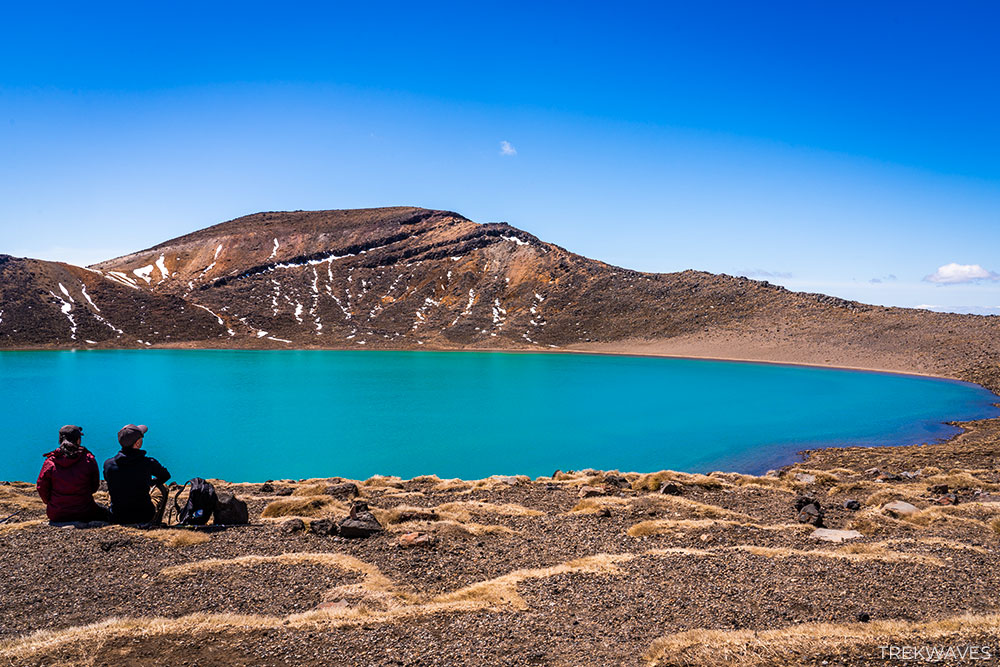
Eventually, the track rises slightly toward Blue Lake (Te Wai Whakaata o te Rangihīroa). Compared to the vibrant Emerald Lakes, Blue Lake feels deeper in tone and more subdued — often reflecting the sky when conditions are clear.
We stopped here for another quick snack break, enjoying the stillness before beginning the long descent toward Ketetahi.
6. Blue Lake → Ketetahi → Trail End
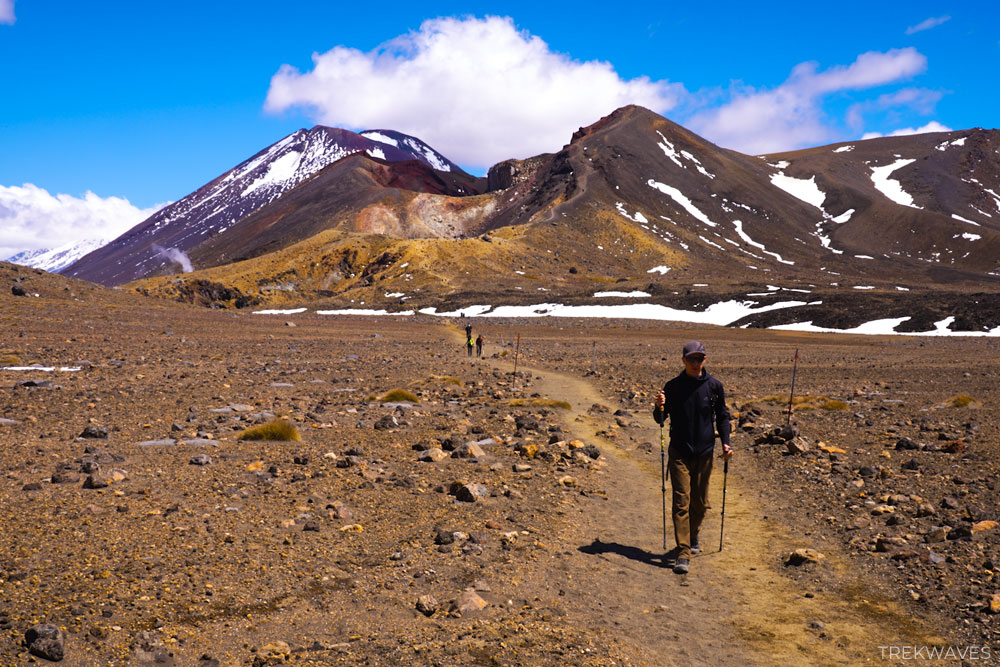
Leaving Blue Lake behind, the track begins its long descent toward Ketetahi — and this is where the character of the hike shifts dramatically.
Almost immediately, the raw volcanic landscape starts to soften. The loose scoria and exposed ridgelines gradually give way to more stable ground, and eventually, patches of alpine shrubs begin appearing.
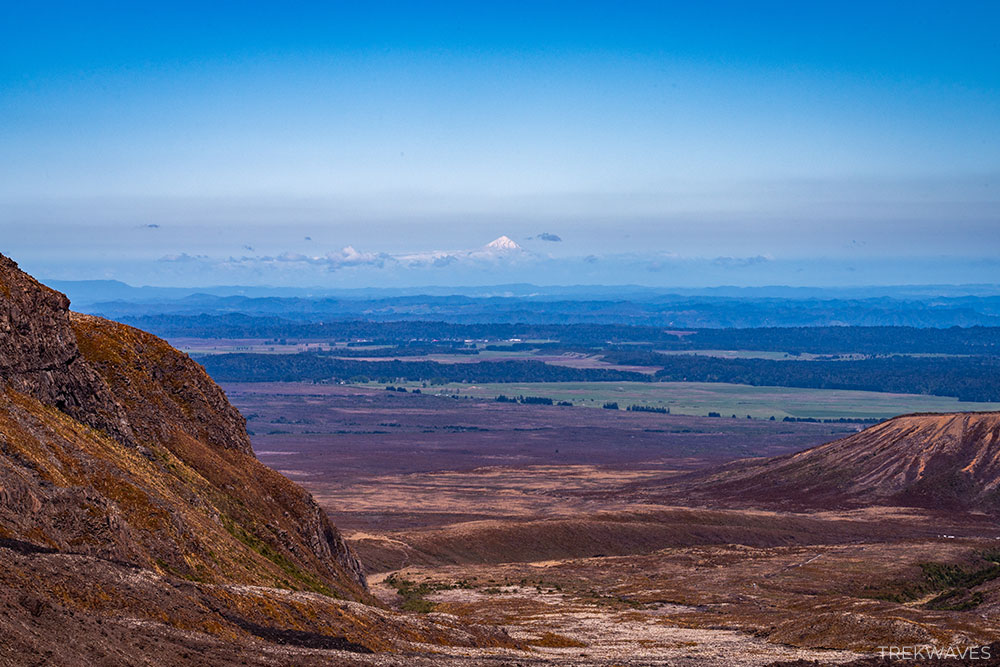
As you descend further, the views begin to open dramatically toward the north. On a clear day — like we had — you can see across to Lake Taupō, the largest lake in New Zealand, stretching across the horizon.
Knowing that Lake Taupō itself sits within a massive caldera formed by one of the largest volcanic eruptions in human history (The Ōruanui Eruption from 25,500–27,000 years ago) adds another layer of perspective to the landscape.
From up high, you’re not just looking at a lake — you’re looking at the remnants of an enormous volcanic system.
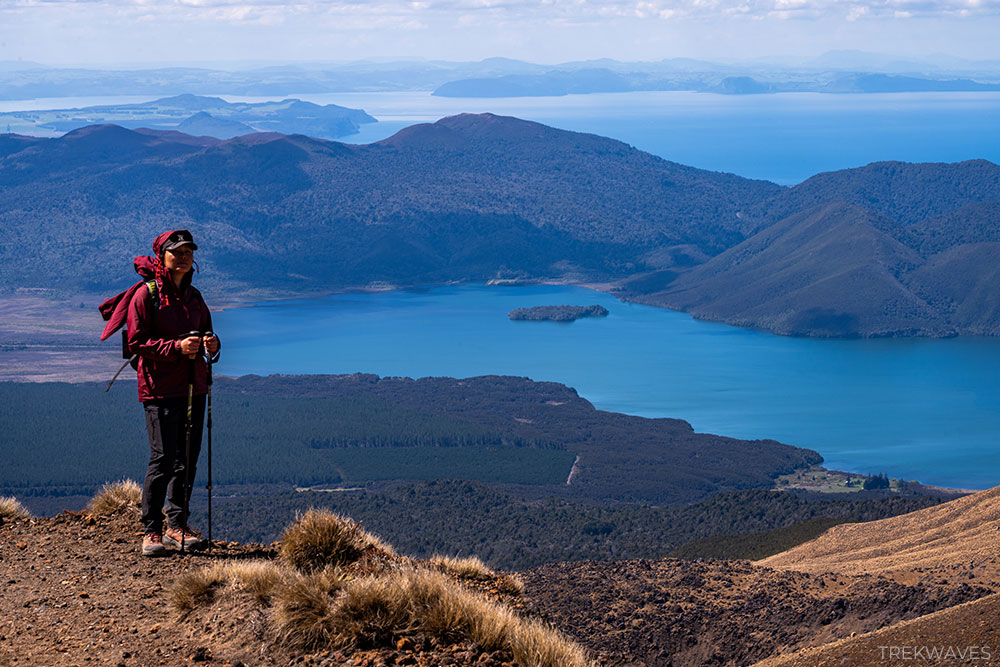
Closer in, Lake Rotoaira becomes visible as well, nestled below the park boundary, along with farmland and rolling hills that signal your gradual return to lower elevations.
Historically, this side of the mountain was known for geothermal activity near Ketetahi Springs. That original section of track was permanently closed after the 2012 Te Maari eruption, a reminder that Tongariro remains an active volcanic environment.

The current route follows a safer descent through open slopes before eventually entering native bush.
The final forest section can feel long, particularly on tired legs. It’s not difficult, but after +6 hours of hiking, the steady downhill becomes more of a mental challenge than a technical one.
And one final thing many hikers don’t expect: after reaching the official end of the track, there’s still another 800 metres to 1 kilometre of walking along a gravel road to reach the car park. That means the total distance is slightly longer than what most hiking apps show.
Exhausted by the finish but smiling the whole way, we knew this hike had delivered. The Tongariro Alpine Crossing had gone far beyond our expectations!
Frequently Asked Questions
Technically yes — but it’s complicated. The Tongariro Alpine Crossing is a point-to-point hike, not a loop, and parking restrictions at both ends make self-shuttling difficult. Most hikers use a commercial shuttle, which removes timing stress and ensures your car isn’t left unattended all day.
The reality is that shuttle services (~NZ$60) are designed specifically for this problem and are what 95% of hikers use. They’re not a luxury—they’re the practical solution.
Yes. There are several basic DOC toilets along the route: Mangatepopo Hut, Soda Springs, South Crater, Blue Lake, Ketetahi Shelter and Ketetahi Car Park. They are long-drop style, have no running water, and can run out of toilet paper — so carry your own supplies just in case.
The critical gap is between Soda Springs and Blue Lake—roughly 4 hours covering Devil’s Staircase, Red Crater, Emerald Lakes, and Blue Lake. Use facilities at Soda Springs even if you don’t feel you need to.
The side trip is no longer encouraged. Mount Ngauruhoe is considered tapu (sacred) by local iwi (tribe), and DOC asks hikers to respect this by not climbing it.
Most shuttle operators build in a generous return window, but it’s essential to know your pickup time and allow a buffer. If you miss it, you may need to arrange a late transfer at additional cost — so start early and hike at a steady pace.
Winter transforms the crossing into a serious alpine route requiring crampons, ice axe, and proper experience (or a guided trip). It can be stunning under snow, but it’s not a casual hike and conditions can turn dangerous quickly.
Start with the first shuttle of the day, hike midweek if possible, and consider shoulder months like early November or April. An early start made a huge difference for us.
Fit, experienced teenagers can complete it in good conditions, but this is not an easy family stroll. The distance, exposure, and weather variability make it suitable only for confident young hikers used to long alpine days.
Is the Tongariro Alpine Crossing Worth It?
In short — absolutely!
The Tongariro Alpine Crossing isn’t just another scenic day hike. It’s a walk through a living volcanic landscape shaped by glaciers, explosive eruptions, mineral-rich lakes, and shifting alpine weather.
Few places in the world allow you to stand on the rim of an active crater, look down at neon-coloured lakes, and then see as far as Lake Taupō and even Mount Taranaki on a clear day — all within a single hike.
It does require preparation. The distance is real, the weather can change fast, and the steep sections demand effort. But with an early start, flexible planning, and the right gear, it’s completely achievable for fit hikers.
Out of our entire three-week North Island road trip, the Tongariro Alpine Crossing was the number one highlight. And considering how many incredible trails the region offers — many of which we cover in our guide to the 25 Best Hikes in New Zealand’s North Island — that’s saying a lot.
If you’re unsure whether to add it to your itinerary, don’t overthink it. With smart planning and the right conditions, the Tongariro Alpine Crossing delivers an experience you’ll remember long after the hike ends.
Found it Helpful? Pin it for Later!