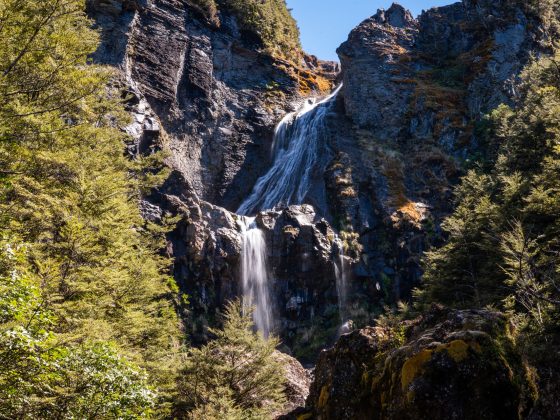
Blue Mountains National Park is home to many remarkable waterfalls, but none can match the unique charm of Minnehaha Falls nestled along the Yosemite Creek in northern Katoomba.
With its stunning beauty, along with a short hiking trail that ends with a bit of a steep section but remains relatively easy to walk, it undoubtedly earns its place as one of the top spots for a swim in Blue Mountains.
When the summer heat kicks in, everyone heads to this spot, and you better believe the locals are all in for it!
Alright, let’s dig a little deeper into what makes this waterfall special and talk about the hiking trail that gets you there.

How To Get To Minnehaha Falls
Traveling by Car:
If you’re arriving by car, set your GPS coordinates for Minnehaha Reserve Carpark along Minni Ha Ha Rd.
Be aware that parking spots within the Reserve Carpark can fill up quickly, especially on weekends. If it’s full when you arrive, like it was for us, you may need to find parking along Fifth Avenue.
Using Public Transport
Minnehaha Falls Reserve sits just 3.4km away from Katoomba Train Station, so if you’re up for a leisurely hour-long stroll, that’s definitely an option to consider.
But if you’d rather keep your energy for exploring the falls, here’s a tip: hop on the 697 Katoomba to North Katoomba (Loop Service) bus instead.
Once you get off the train at Katoomba Train Station, make sure to watch for the bus stop on Parke St, situated right across from the Fire Station.

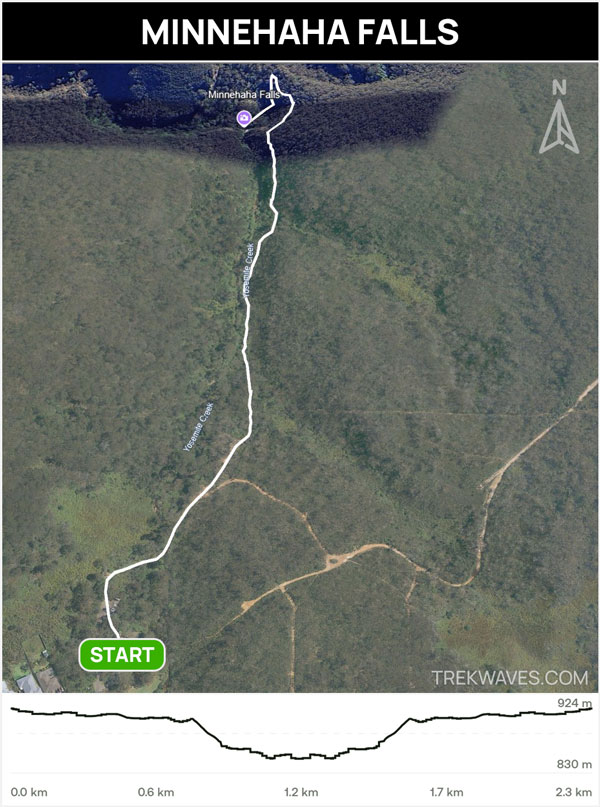
Minnehaha Falls Trail Overview
- Distance: 2.3 km return
- Time: 1 hour
- Total Ascent: 72m
- Difficulty: Easy to Moderate (there is a steep section towards the end of the walk)
It’s not a long walk, but you’ll need a bit of fitness as the trail gets steep towards the bottom. If it’s been raining, be cautious as it might get slippery.
Before you set off take a look at the info board near the trailhead for a map, some history, and pictures of the local animals.

Trekking Along Minnehaha Falls Trail
Once you’ve parked your car, keep an eye out for the Minnehaha Falls Reserve information board. Just to the left of it is where the trail begins.
Once you step onto the trail, you’ll spot a rectangular blue sign reading ‘TO FALLS 1.2km‘. The initial part of the trail is wide and flat, offering a first glimpse of Yosemite Creek if you decide to take a short 5-minute return side trail to your left (clearly marked).
Whether you choose to explore this side trail or carry on, be cautious when you reach the crossing of Yosemite Creek’s right tributary—it may be slippery.

As you make your way past the creek, the trail starts to narrow, and soon you’ll find yourself walking along a single-track path with Yosemite Creek in clear view to your left.
This part of the trail is incredibly peaceful, surrounded by lush greenery, and the gentle sounds of the creek create a soothing atmosphere.
There are a few spots along the way where you can easily get down to the creek if you want to pause, take in the view, and maybe snap a couple of photos—the creek widens out quite a bit here.

As you continue, you’ll reach a short section of the trail that’s fenced off to the left. Here, the view will start to open up, and you’ll notice the trail getting steeper as the descent begins.
Further ahead, the trail becomes quite exposed, giving you a first glimpse of Minnehaha Falls down in the valley below.
Since there are no fences, make sure to watch your step near the trail’s edge.

After enjoying the scenic views from the top, get ready for the most exciting part of the trail: the descent onto the steepest section.
You’ll come across a couple of metal step ladders with railings to help you down, and overall, I’d say it’s a very well-built descent.

Once you’ve climbed down two metal ladders, the trail makes a sharp left turn, guiding you directly towards Minnehaha Falls.
As you walk, you’ll find yourself passing under a large cliff overhang, providing a pleasant spot to seek shade from the sun on warmer days.

The last leg of the trail that takes you to the waterfall is relatively easy and not as steep.
Once you’ve descended via two small metal ladders and passed through the bushy, overgrown section, you’ll finally arrive at the bottom of Minnehaha Falls.
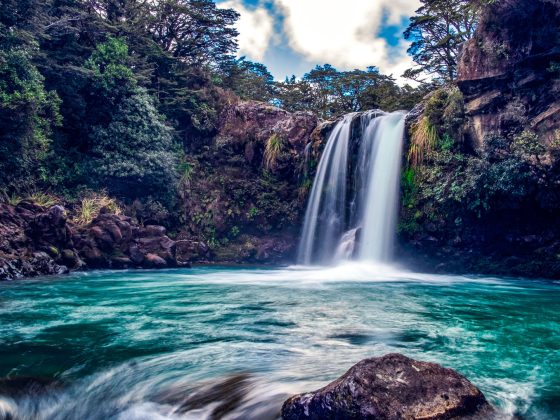
Minnehaha Falls
Now’s the time to find a cosy spot on a rock, unpack your picnic gear, lay out your towels, change into your swimsuit, and indulge in a dip in the refreshingly cold water.
The pool below is deep enough for some cliff jumping, and we’ve witnessed a few daring souls putting on quite a spectacle for everyone present.
Personally, I opted out of cliff jumping, but I did enjoy a quick swim for a few minutes. One of the highlights is being able to swim all the way up to the cascade, and I absolutely took advantage of that.


Treating Minnehaha Falls with Respect
While Minnehaha Falls was once a hidden treasure cherished by locals, it has gained popularity in recent years.
It’s important to note that there are no toilet facilities at the car park or along the track. Unfortunately, some visitors resort to using the bushes or nearby private gardens as a restroom, leading to runoff that affects the stream and falls.
To avoid this, you can use the toilets at the Bureau Park further down on Barton Street. Additionally, please remember to take your rubbish with you to keep the area clean for others.
Found it Helpful? Pin it For Later!

Frequently Asked Questions (FAQs):
How long does the trail take?
- Under 1 hour
What about signage and trail quality?
- There are plenty of signs along the trail
How difficult is the trail?
- Easy to Moderate (due to steep section towards the end)
What should I wear?
- Hiking shoes / boots
What essentials should I carry?
- Water, sunscreen, hat, swimwear, towel and some snacks
Is the trail wheelchair accessible?
- The trail is not wheelchair accessible
When is the best time to visit?
- Early in the morning if you want to avoid the crowds
Is there phone service?
- Yes
Can I bring my dog?
- Yes, but they must be on a leash