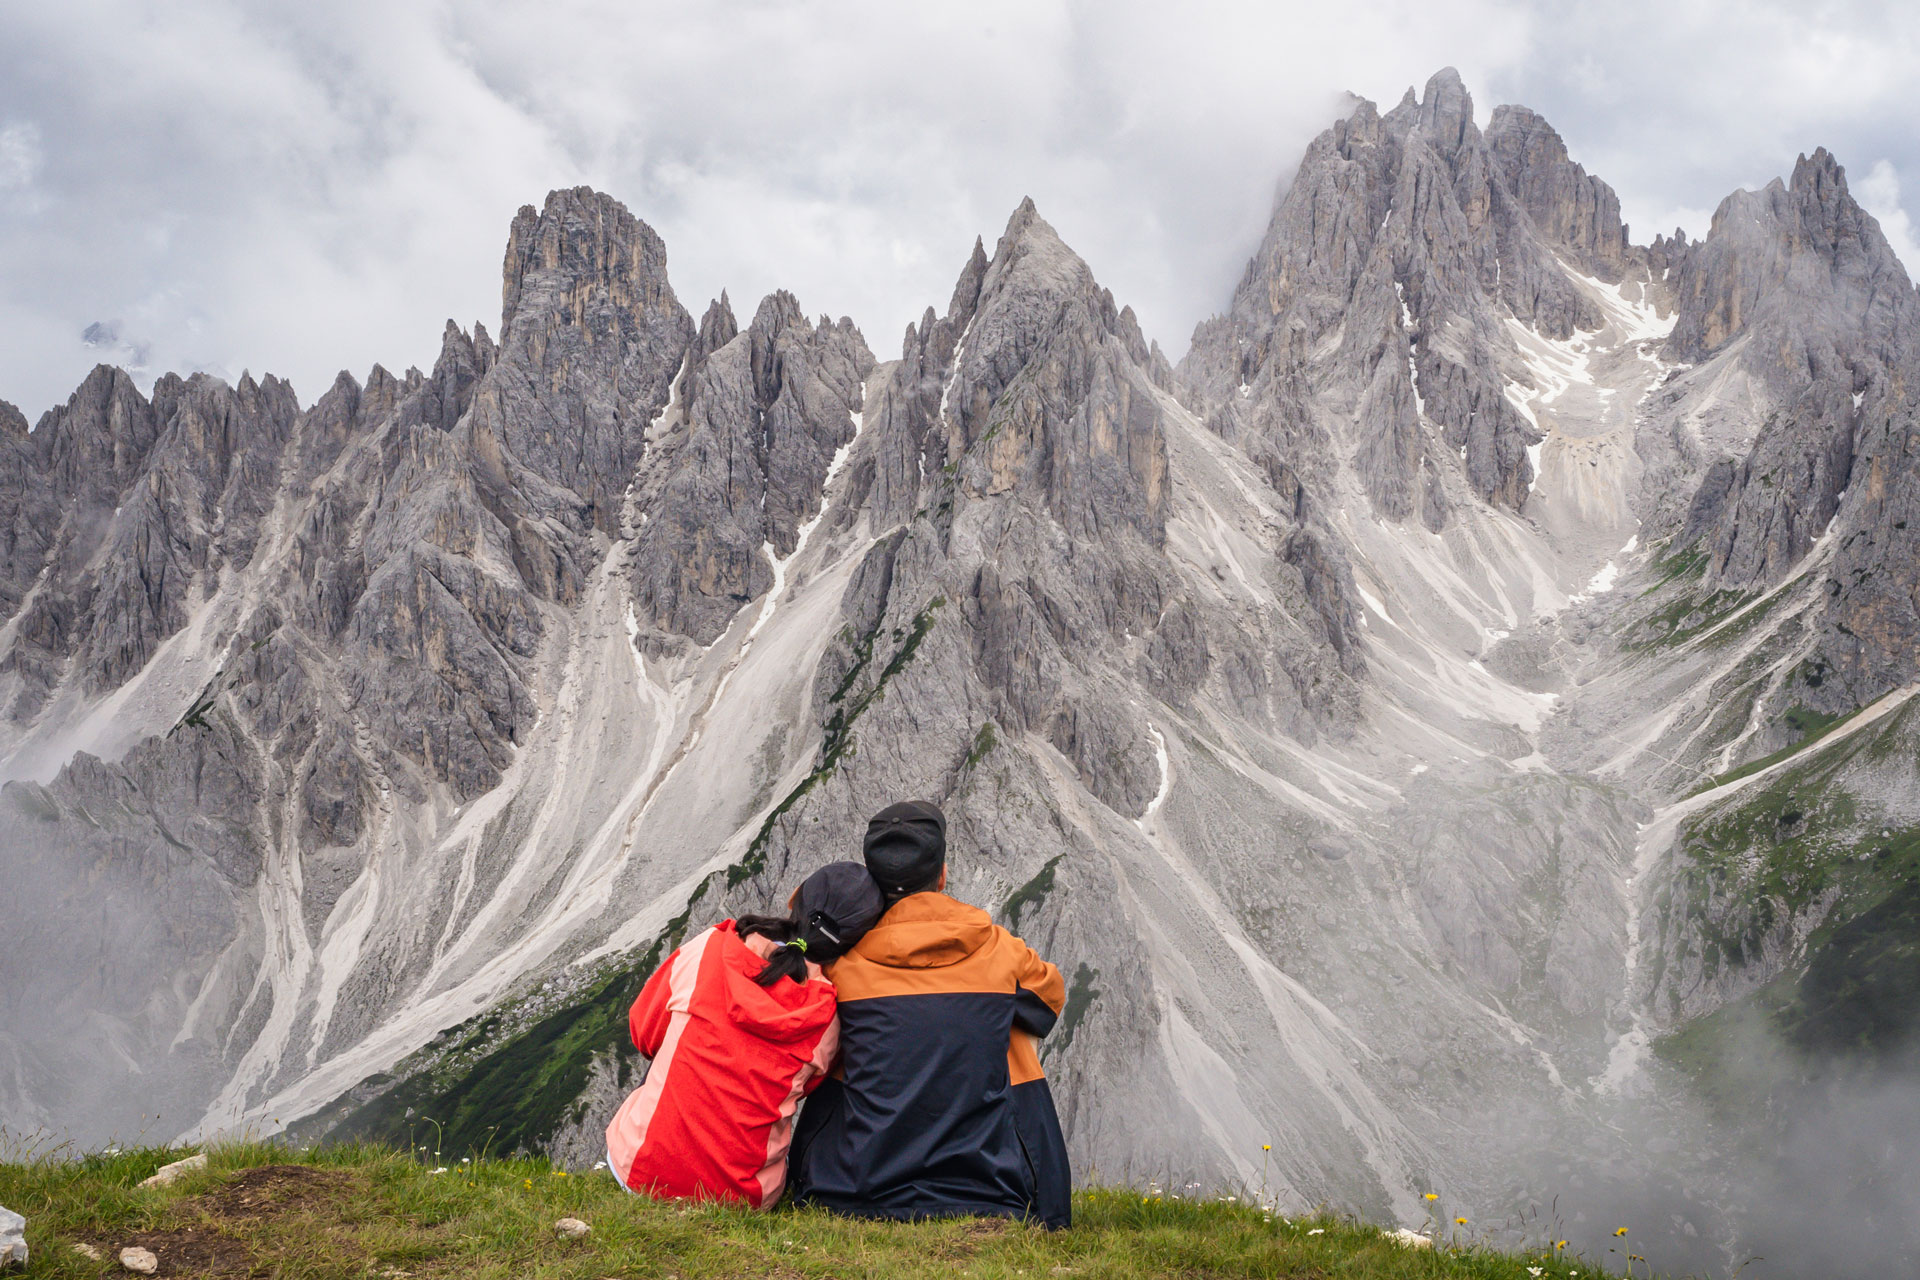
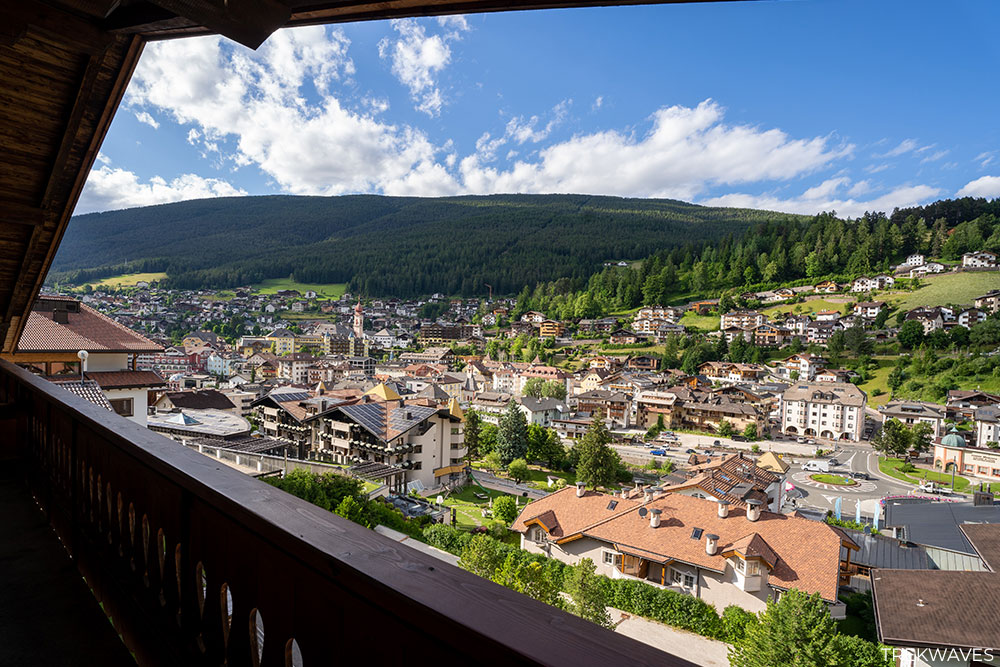
Located in northeast Italy, the Dolomites are famous for their exceptional hiking trails, offering some of the most scenic treks in the world.
From the majestic rock formations of Tre Cime di Lavaredo to the calm waters of Lago di Sorapis, hiking in the Dolomites is an unforgettable experience.
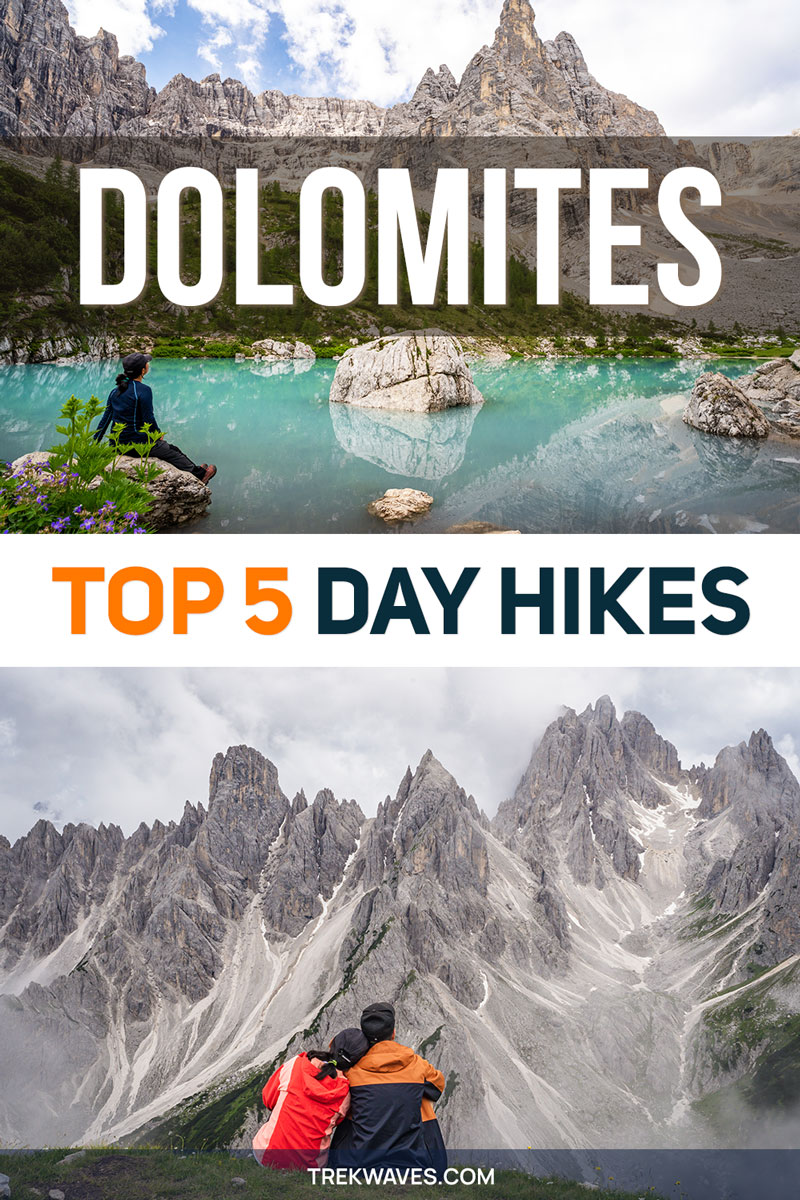
We spent an incredible 7 days exploring and hiking in the Dolomites, and I’m thrilled to share a bunch of useful tips for your trip, as well as some of the main highlights from our itinerary, including my top 5 hiking trails.
Dolomites Location and Geography
The Dolomites, located in northeast Italy, stretch across 3 regions:
- Veneto
- Trentino-Alto Adige
- Friuli Venezia Giulia
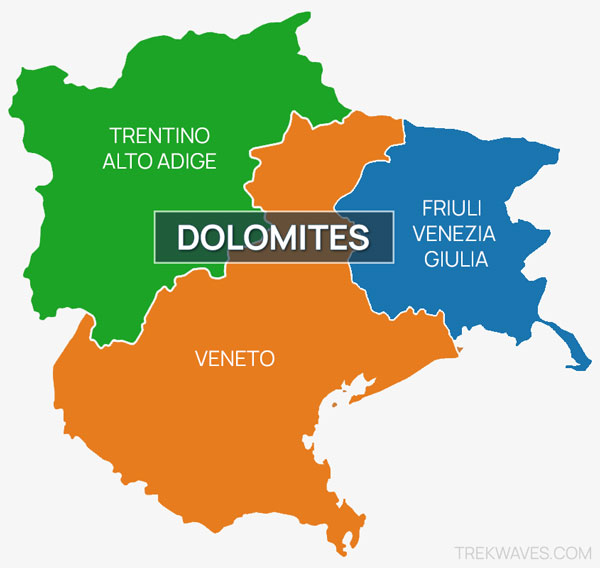
Within these three main regions, there are 5 primary provinces:
- South Tyrol (Südtirol or Alto Adige): Once part of the Austro-Hungarian Empire until World War I, this province primarily speaks German, with Italian and Ladin also in use.
Featuring Seceda and Lago di Braies this area of the Dolomites is a must-see. - Belluno: Located in the Veneto region, Belluno features iconic sites like Marmolada, Lago di Sorapis and Cortina d’Ampezzo. The main language here is Italian, but Ladin is also used in some areas.
- Trentino: Here you’ll find the Brenta Dolomites mountain group within the Adamello Brenta Nature Park. Italian is the main language in this province.
- Udine and Pordenone: These provinces in the Friuli Venezia Giulia region include parts of the Friulian Dolomites, where Italian and Friulian are the primary languages.
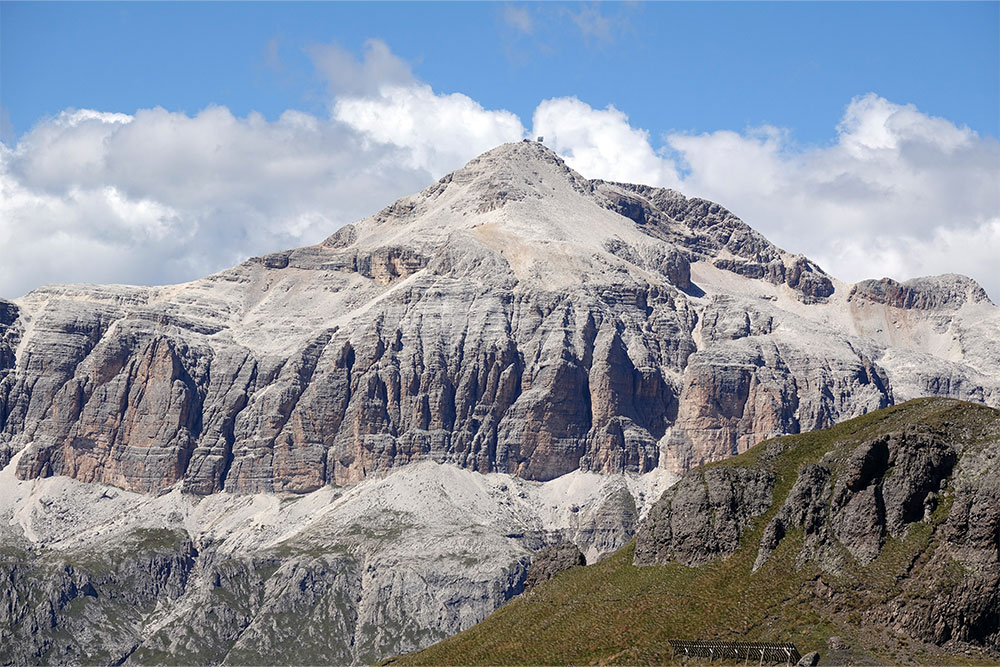
Covering an area of 141,903 hectares, the Dolomites are made up of 26 mountain ranges with 18 peaks exceeding 3,000 meters, the highest being Marmolada at 3,343 meters (10,968 feet).
The unique geological formations and the natural beauty of the Dolomites led to their designation as a UNESCO World Heritage Site in 2009.

Why Are They Called Dolomites?
The Dolomites, often referred to as the “Pale Mountains,” are named after the carbonate rock dolomite, which was identified by the French mineralogist Déodat Gratet de Dolomieu (1750–1801) in the 18th century.
However, it’s worth noting that not all rocks in this region are composed of dolomite. The Latemar and Marmolada are made of limestone, a rock with similar origins but slightly different characteristics.
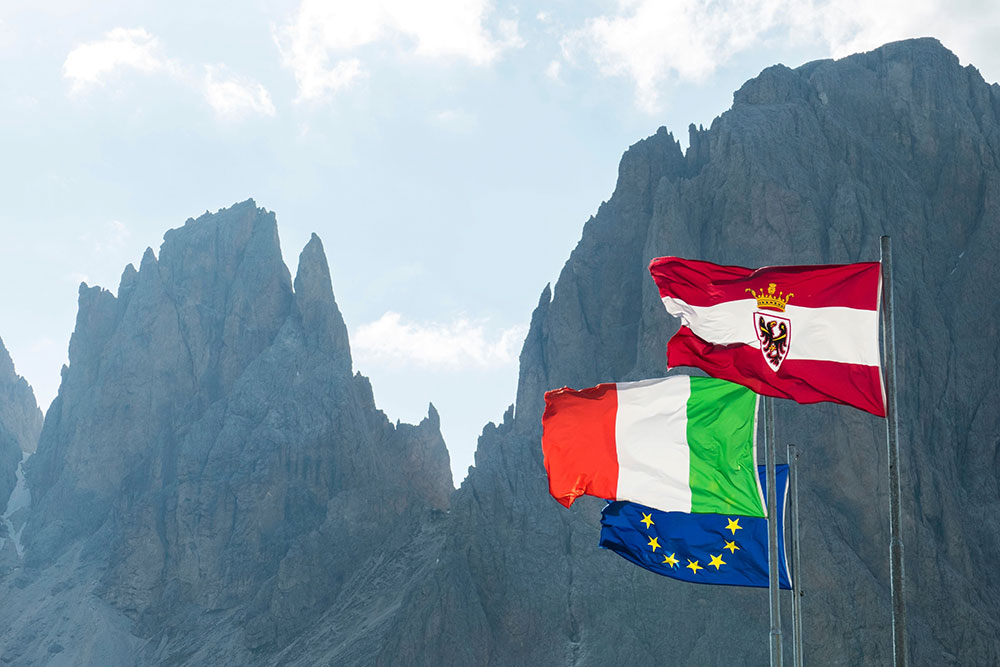
The Languages of The Dolomites
When traveling through the Dolomites, you may encounter trilingual signage and a rich blend of cultural influences, reflecting the area’s complex history.
Three languages that are being used here are:
- German: Predominantly spoken in South Tyrol due to its historical ties to Austria.
- Italian: The main language in the Trentino, Belluno, Udine, and Pordenone provinces.
- Ladin: A Romance (Latin) language spoken in certain valleys of South Tyrol, Trentino, and Belluno, particularly in Val Gardena, Val Badia, and Val di Fassa.
Best Time To Visit Dolomites
If you want to ensure the best weather for hiking in the Dolomites, visiting in the summer is probably your safest bet.
We visited in mid-June and had wonderful weather throughout most of our trip, enabling us to complete 90% of our planned activities.
Having seen photos of the Dolomites with vibrant autumn foliage, I’d say autumn would be my second choice.
So, here’s an overview of what to expect in the Dolomites during different times of the year:
- Summer (June to September): Ideal for hiking, climbing, and cycling. The weather is generally mild, but it can be very busy with tourists.
- Shoulder Seasons (April-May, October-November): Quieter with fewer tourists, but some facilities may be closed, and weather can be unpredictable.
- Winter (December to March): Perfect for skiing and snowboarding. The Dolomites are renowned for their excellent ski resorts.
How To Plan Your Dolomites Hiking Trip
If you’re visiting the Dolomites for the first time, be aware that trip planning can be both challenging and time-consuming, given the region’s diverse geography, winding roads, multitude of hiking options, and extensive accommodation options.
So, before we get into the best hikes in the Dolomites, let me give you a few tips on how to plan your trip most efficiently and suggest the best places to stay to reduce your travel time to the trailheads of the top hikes.
The Dolomites are commonly divided into Western and Eastern, separated by a line following the SS244 road through the Val Badia region.
In the Western Dolomites, most people choose to stay in Ortisei, with Selva di Val Gardena also being a great option. In the Eastern Dolomites, Cortina d’Ampezzo stands out as the best choice.
When you look at the map with the location of the most popular hikes in the Dolomites, you’ll see why these two towns are the best bases for exploring the region.
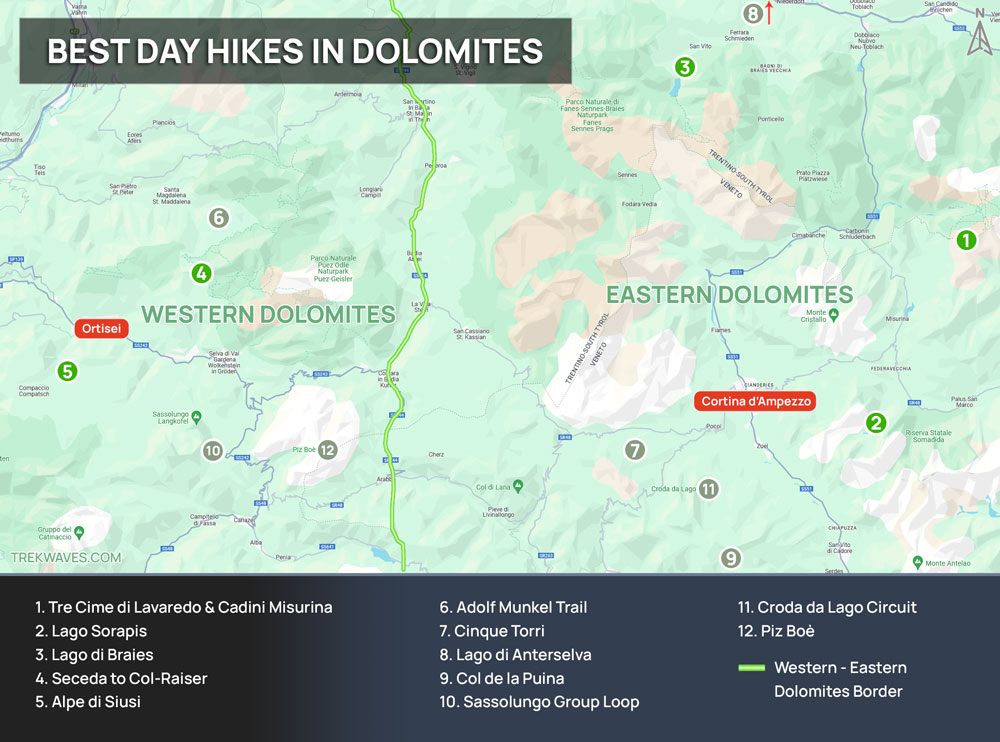
Depending on how much time you have for your Dolomites trip, I recommend splitting your itinerary evenly between the Western and Eastern parts to see the main highlights of the area like Seceda (Western Dolomites) and Tre Cime di Lavaredo (Eastern Dolomites).
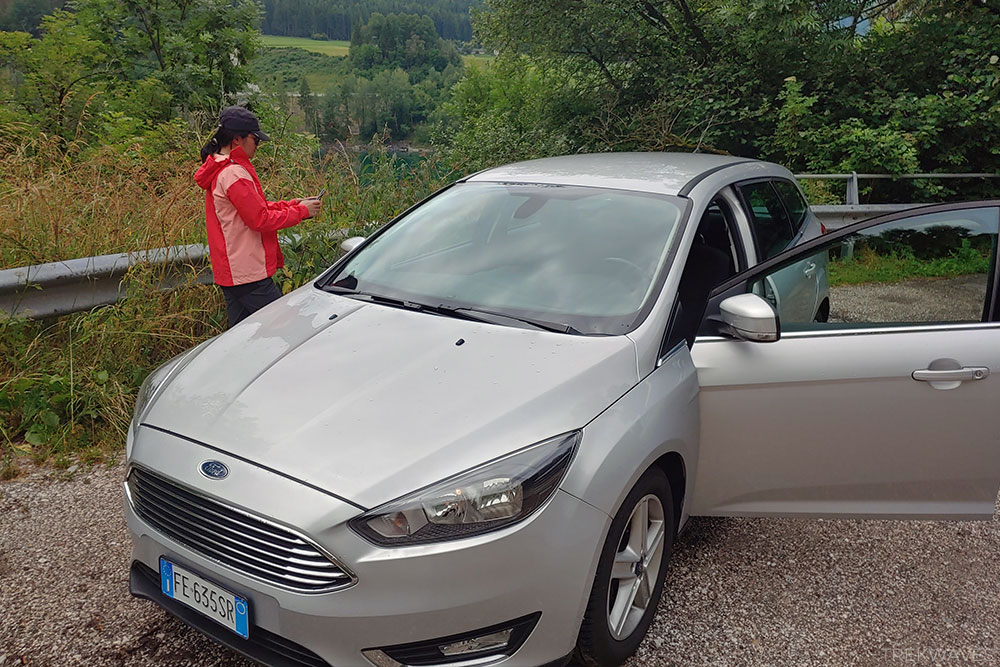
Is a Car Necessary in the Dolomites?
Having a car in the Dolomites is highly recommended for several reasons. The region is vast and public transportation, while available, may not be as convenient or frequent, especially if you want to reach more remote trailheads and scenic spots.
Benefits of having a car include:
- Flexibility and Convenience: A car allows you to explore the Dolomites at your own pace. You can start your hikes early in the morning or stay out late for sunset without worrying about bus schedules.
- Access to Remote Areas: Some of the most beautiful locations and trails in Eastern Dolomites, such as Tre Cime di Lavaredo and Lago di Braies, are more easily accessible by car. Public transport might not take you directly to these spots, requiring additional walking or shuttle services.
- Time Efficiency: Driving can significantly cut down travel time between different parts of the Dolomites, allowing you to make the most of your trip. This is particularly important if you have a tight schedule and want to see as much as possible.
- Comfort and Safety: Navigating the mountainous terrain with a car can be more comfortable, especially if you are carrying hiking gear. It also provides a safe and reliable way to return to your accommodation after a long day of hiking.
Having said all that, there is a significant difference between the quality and frequency of public transport between the Eastern and Western Dolomites.
If you are staying in one of the main towns in Val Gardena (Ortisei, Santa Christina, or Selva Val Gardena), you will automatically get a complimentary Val Gardena Mobil Card, which allows you to use nearly all public transport in South Tyrol for free!
With free public transport and an excellent cable car network in the Western Dolomites, you likely won’t need to rely on your car, especially if you are staying in Ortisei.
Since we were coming by train from Rome and staying for 4 nights in Ortisei, we opted against renting a car in the Western Dolomites.
Instead, we bought a 3-day Val Gardena Card, granting unlimited use of all 18 lift facilities in Val Gardena during the summer, priced at €109 at the time of writing this article.
💡 PRO TIP: If you are considering getting a Val Gardena lift pass, you can easily plan all of your hikes with the help of this amazing “3D map” of Val Gardena.
This map is all you need to get around the area, eliminating the need to check any of your navigation apps.
For the second part of our Dolomites trip, we headed to the town of Bruneck, where we found a very affordable car rental place and explored the Eastern Dolomites by car.
Top 5 Day Hikes in Dolomites
With all the essential information about the Dolomites at your disposal, let’s explore some of my favorite day hikes from our week-long adventure.
Plus, if you stick around until the end of this article, I’ll share 7 more amazing hikes to add to your itinerary, especially if you’re planning to stay longer than we did.
Every hike listed in this article is marked on the map I shared earlier, illustrating the division of the Dolomites into Eastern and Western parts.
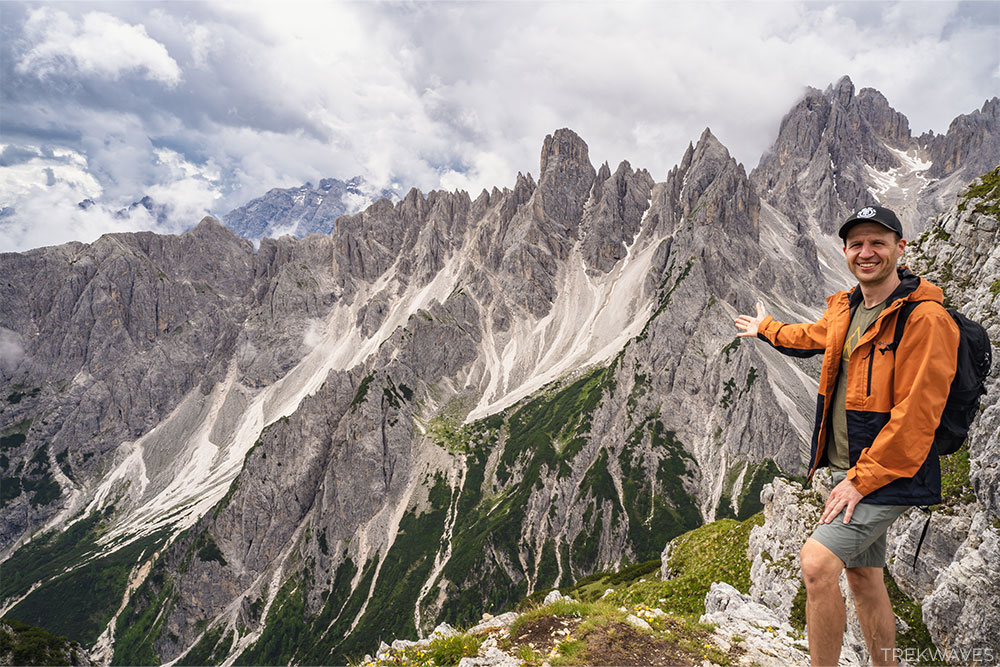
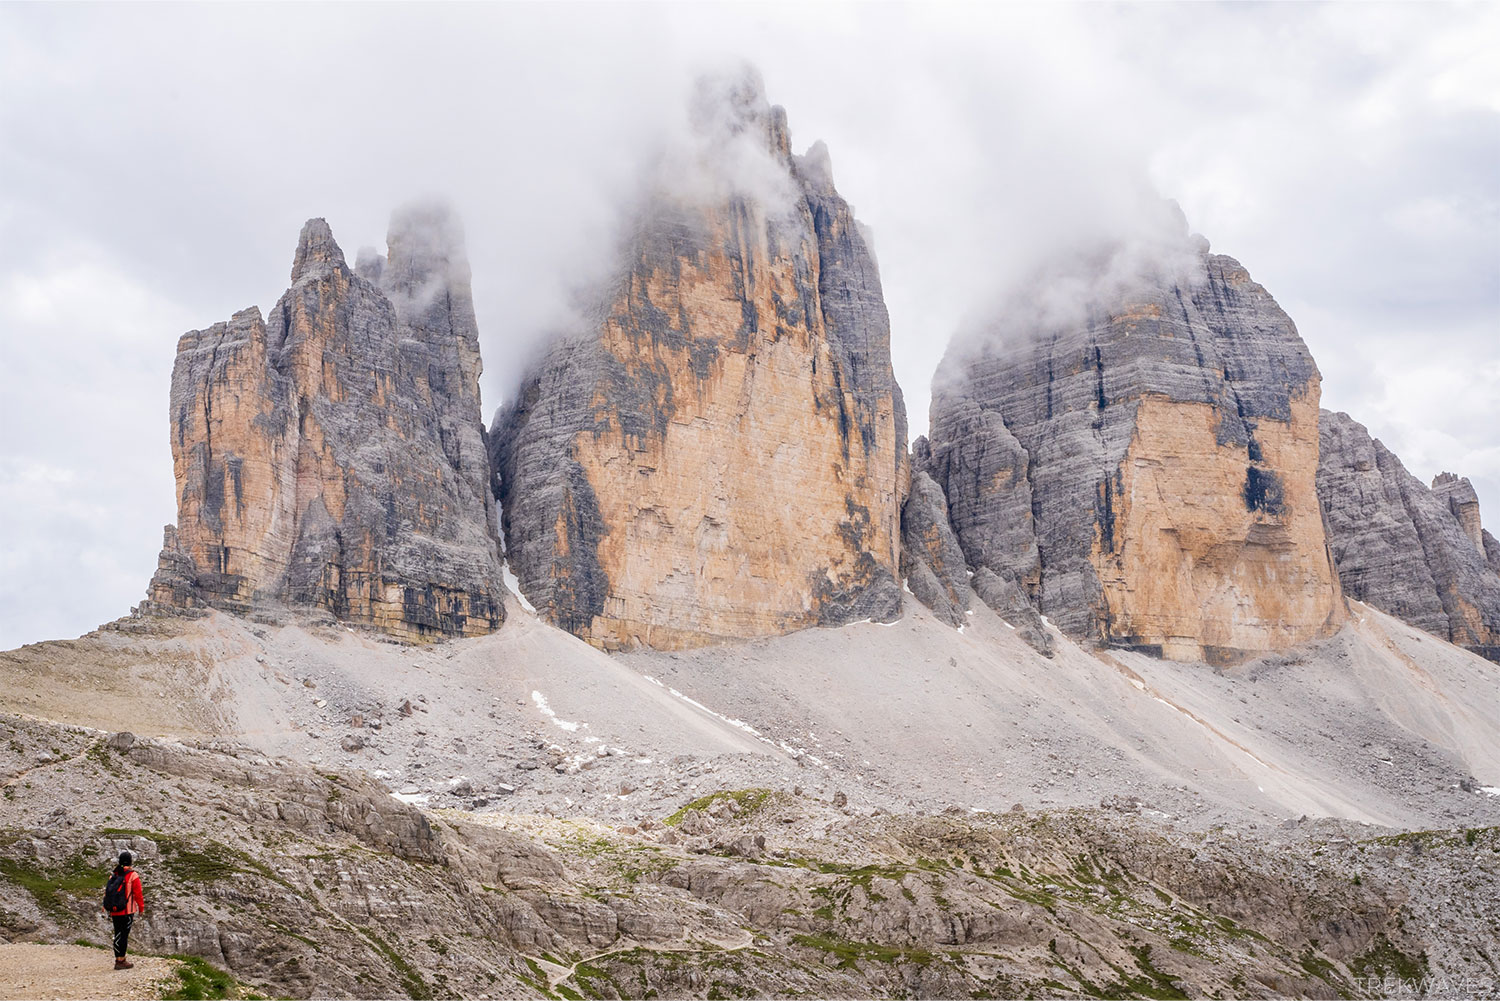
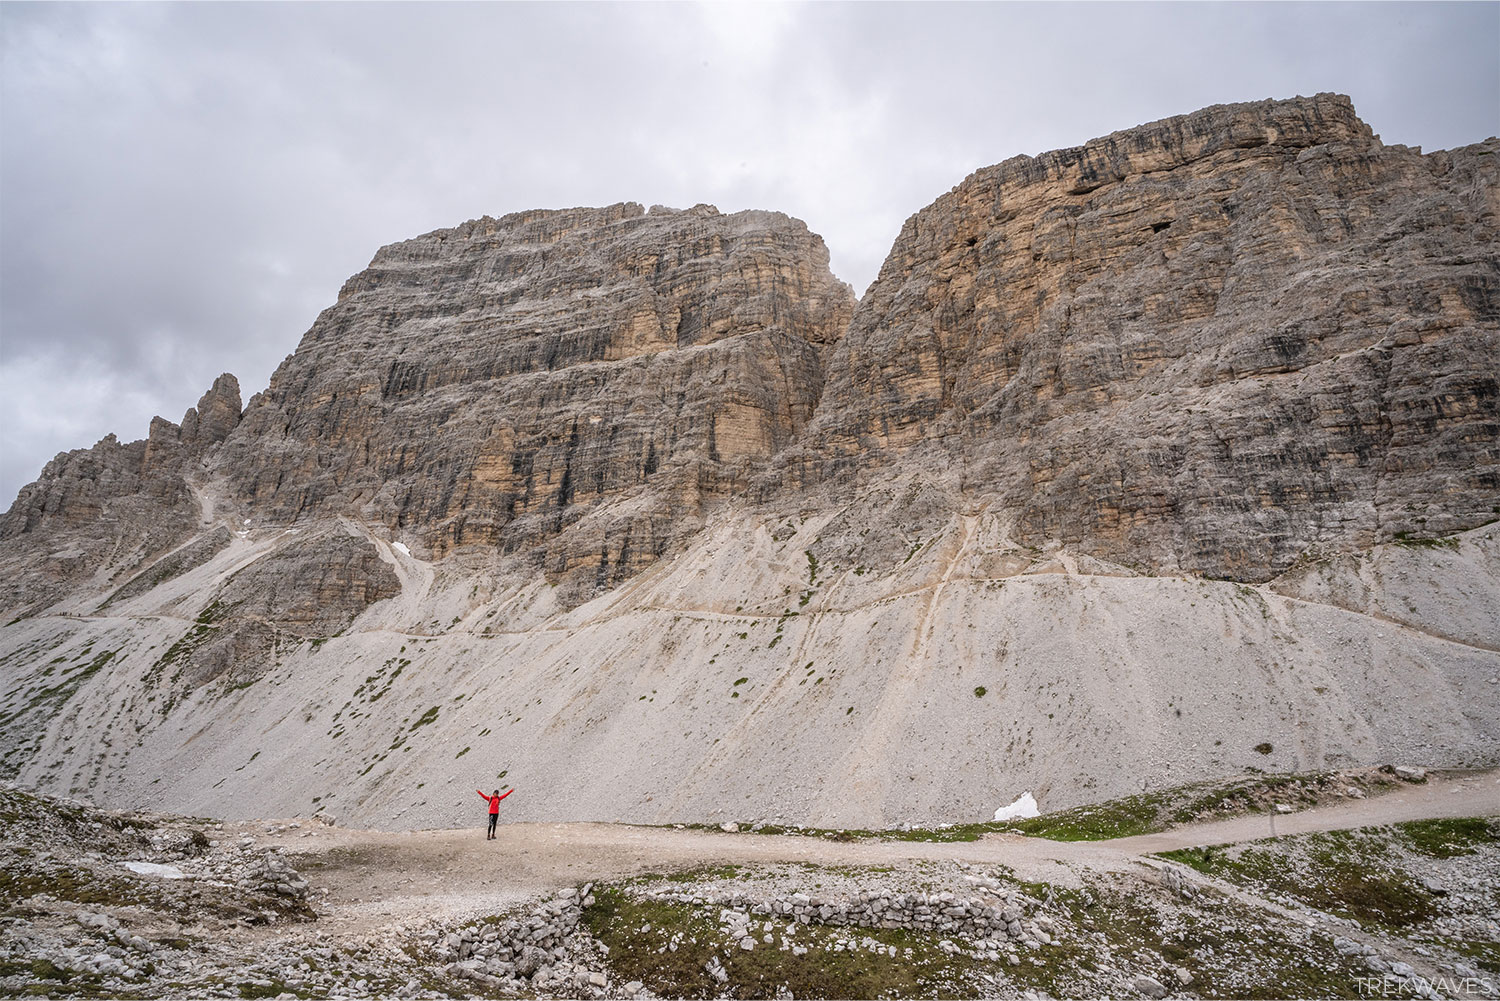
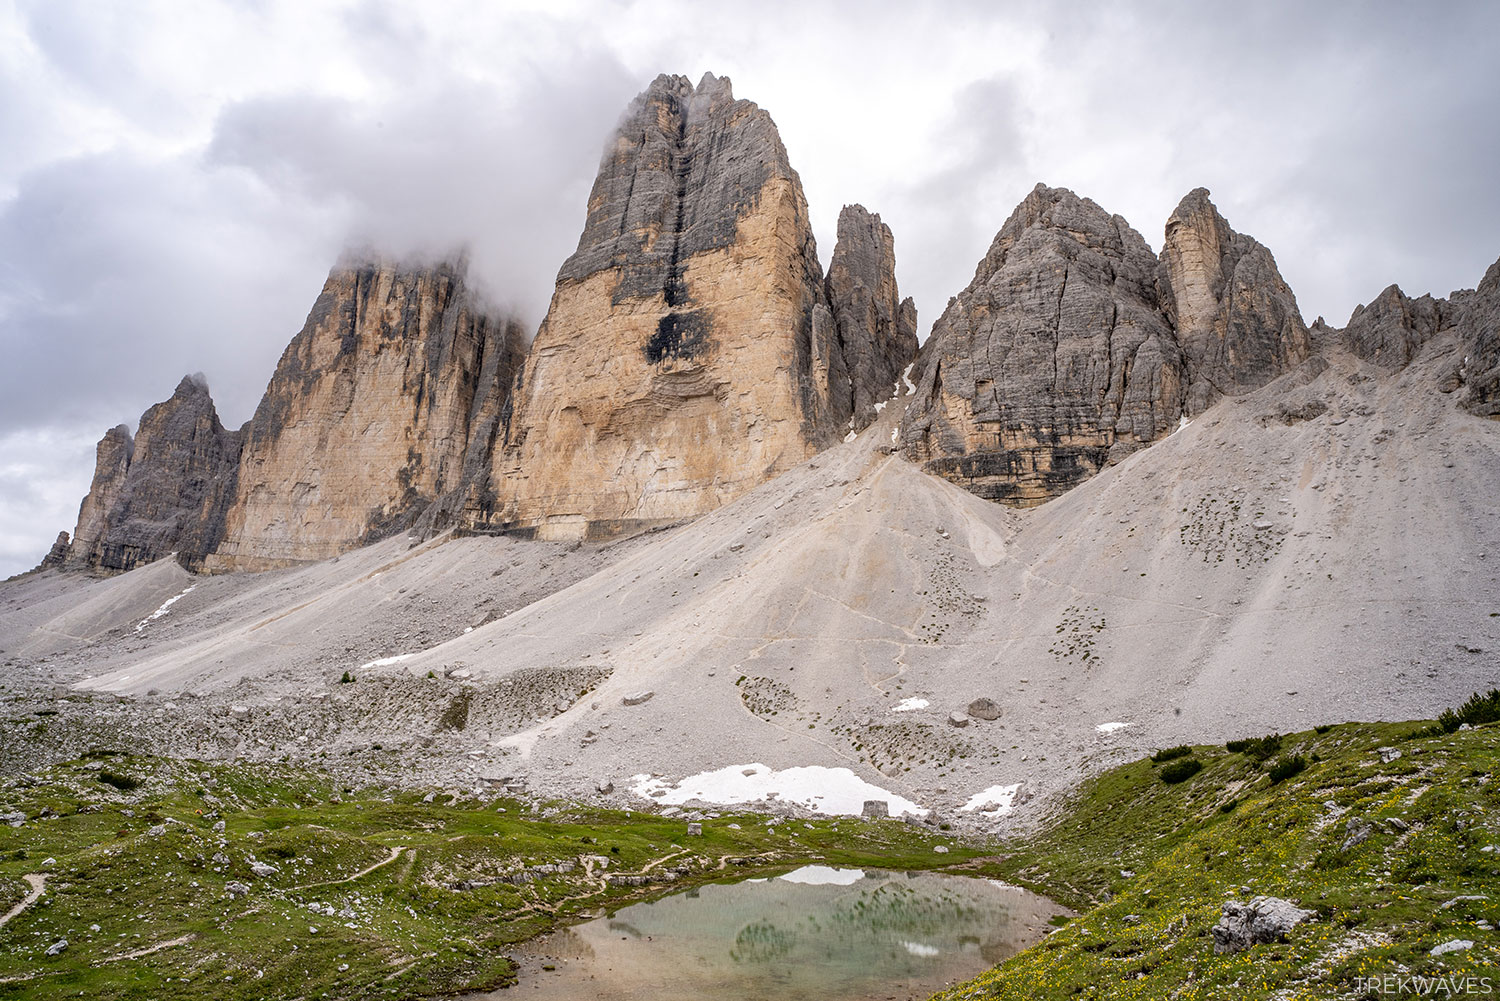
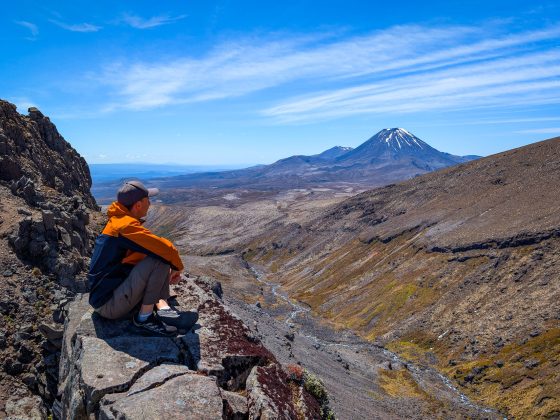
1. Tre Cime di Lavaredo & Cadini di Misurina
- Start & finish: Rifugio Auronzo
- Distance: 13.2 km
- Elevation gain: 673m
- Time: At least half day
- Difficulty: Medium
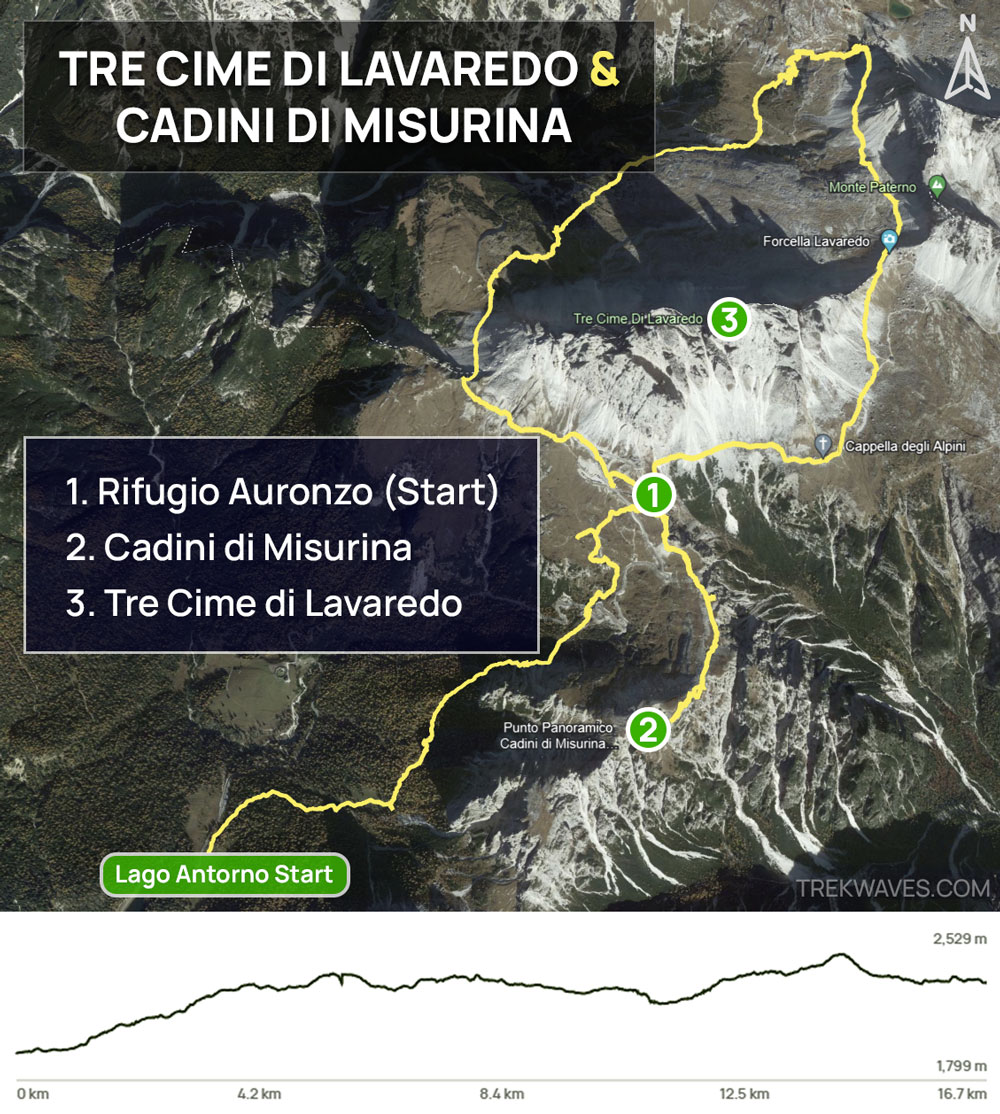
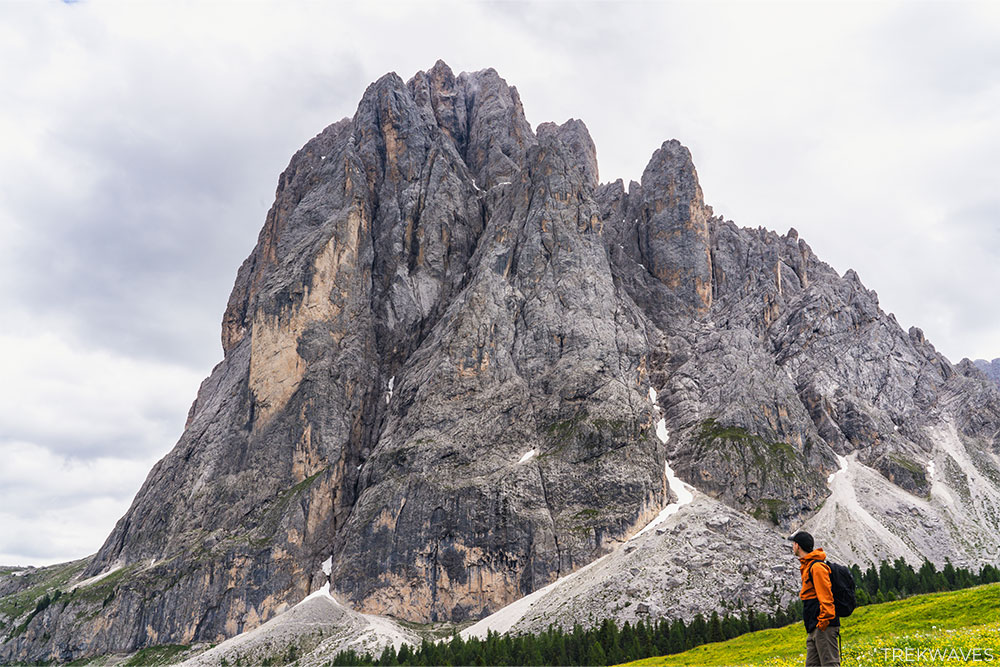
A visit to the Dolomites isn’t complete without hiking the iconic 9.8km Tre Cime Di Lavaredo loop and taking in the amazing views at Cadini di Misurina viewpoint, both of which are worth every bit of their acclaim.
The starting point for these two incredible trails is at Rifugio Auronzo, situated at the end of a very steep, toll road (Strada per il Rifugio Auronzo).
As of the time of writing, the toll road fee is 30 euros for cars, 20 euros for motorcycles, and 45 euros for campervans.
To avoid paying the toll fee, you can park near Lago Antorno* and hike up about 4km to Rifugio Auronzo. This is what we did after getting stuck in a massive queue leading to the toll booth (even though we originally planned to drive all the way up and weren’t too concerned about the fee).
*If you decide to start from Lago Antorno, be prepared for a hike of about 20-21 km. We ended up at 16.7 km as we decided to hitchhike back to the lake at the end of the day.
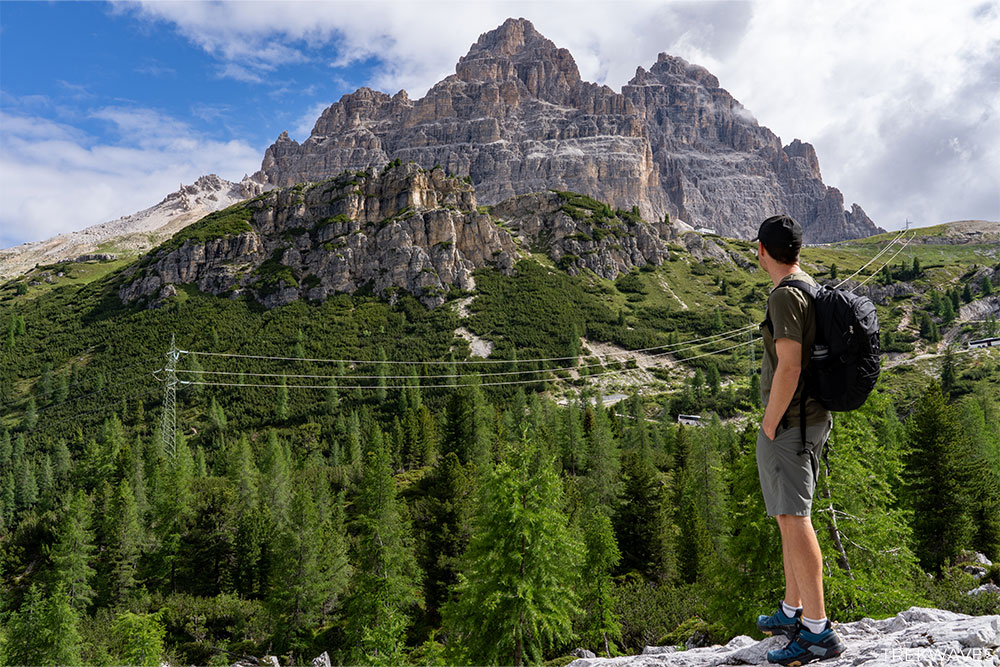

Just before reaching Rifugio Auronzo and after crossing the main road, we first chose to go southeast along the trail 117 toward the Cadini di Misurina, as the weather was changing, and clouds began to fill the sky.
We were lucky to arrive at the first viewpoint right on time and take in one of the most stunning views in the Dolomites from Cadini di Misurina viewpoint, sometimes called Mordor.

Afterward, we returned to Rifugio Auronzo and started our hike along the Tre Cime di Lavaredo loop trail in a clockwise direction. This wasn’t the best idea since the trail was very busy and 90% of the people walked anti clockwise.
However, once we passed the Malga Langalm Hut, the crowd thinned out, and the views of the majestic Three Peaks of Lavaredo became even more spectacular.
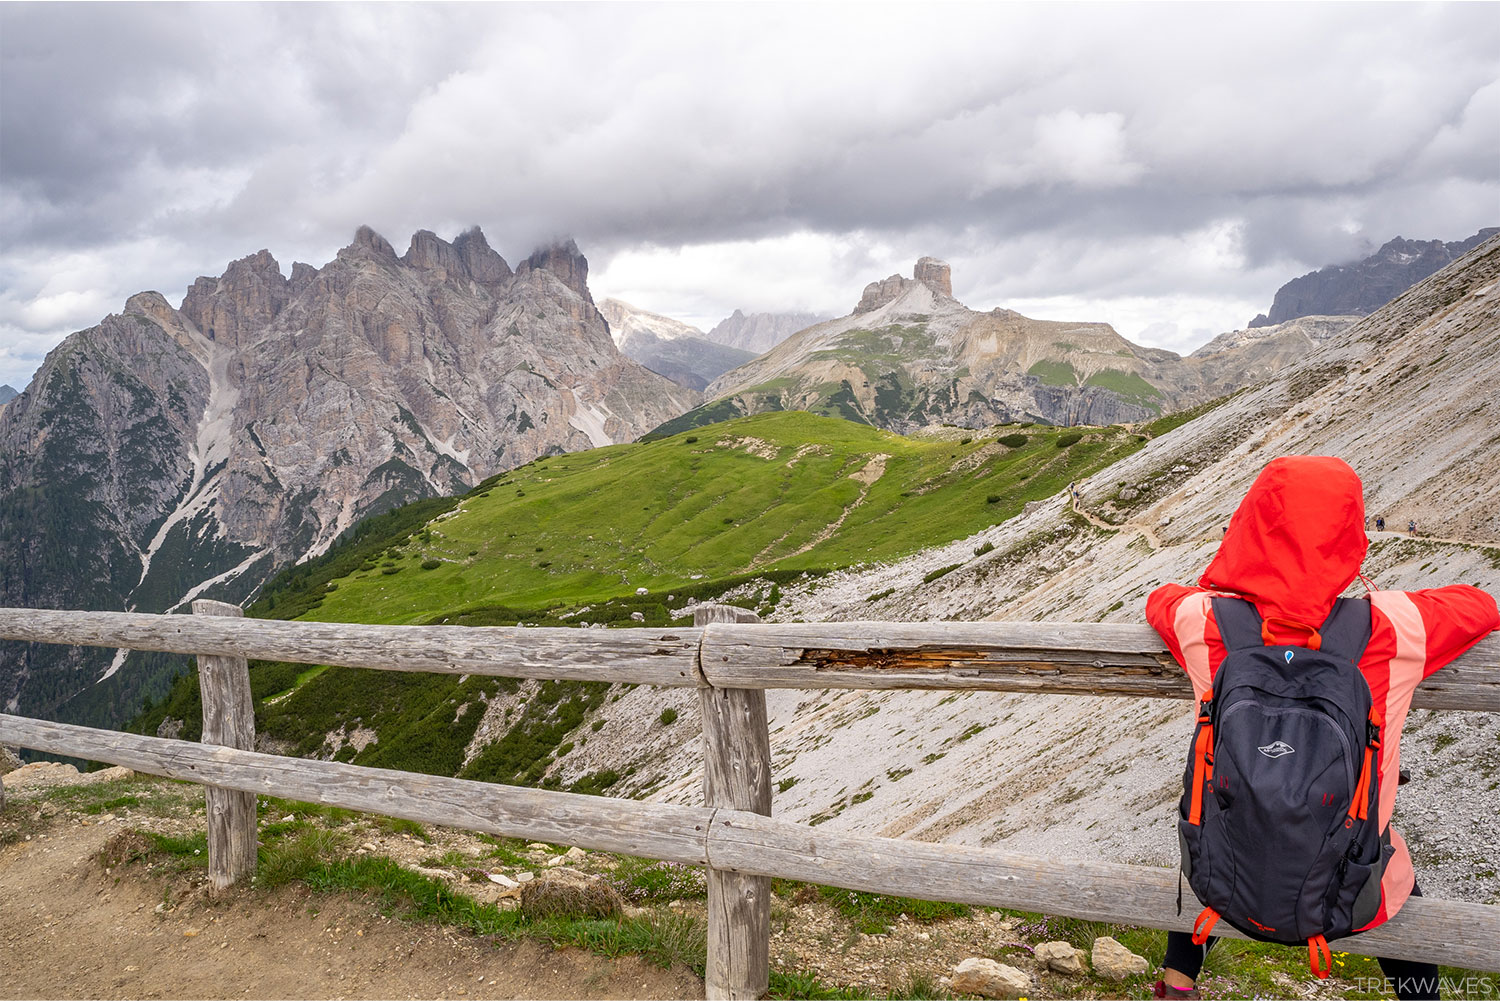
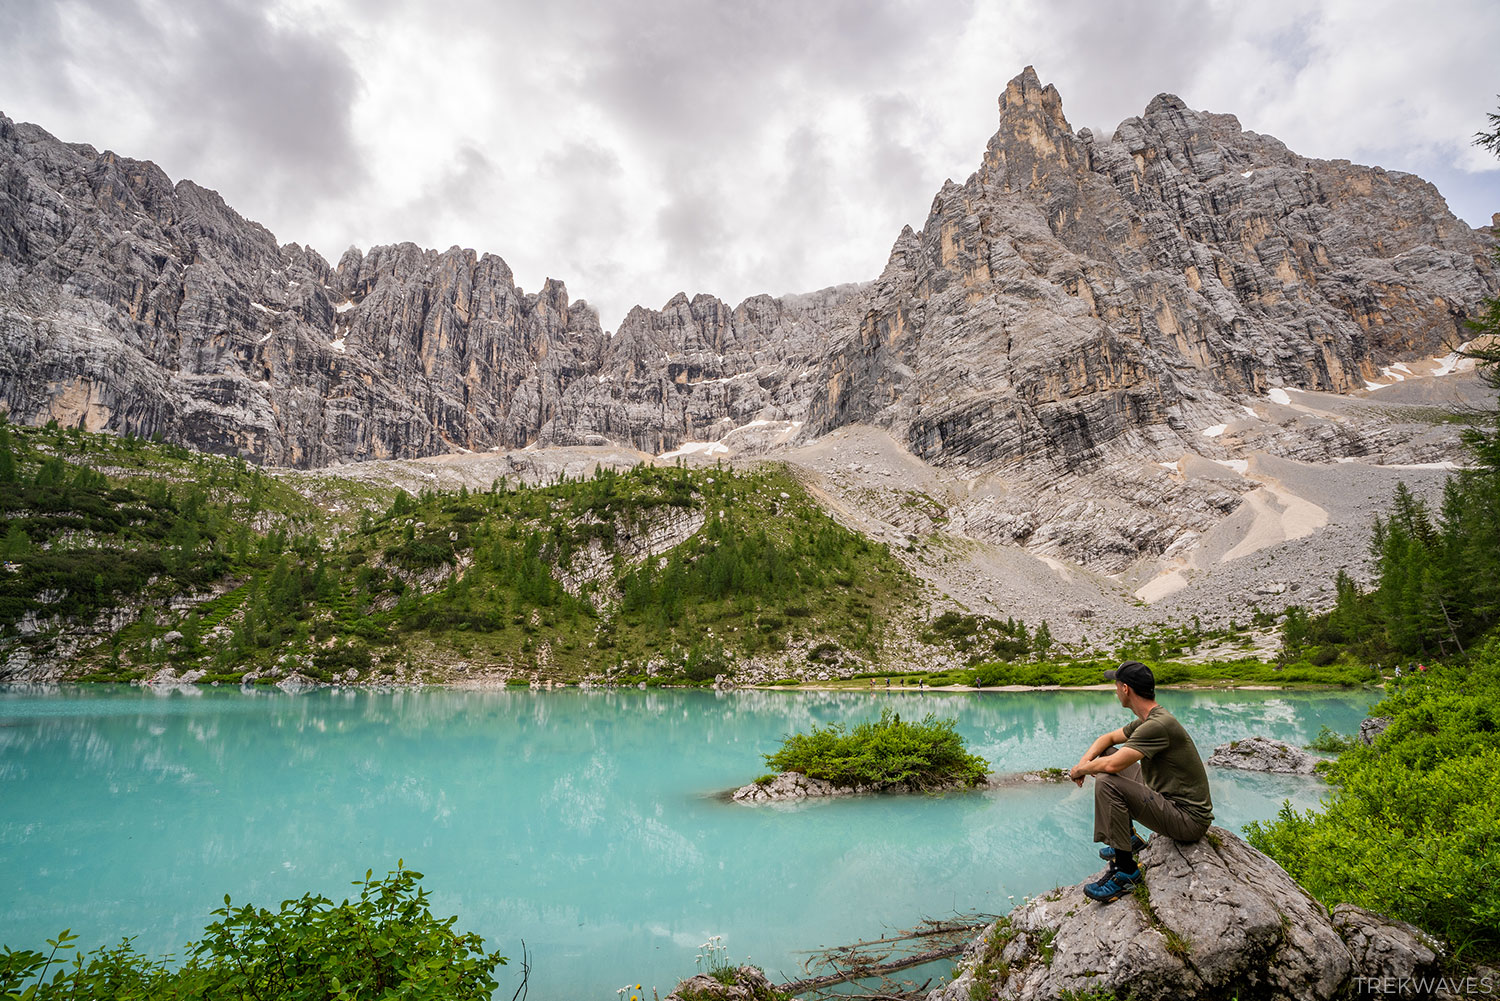
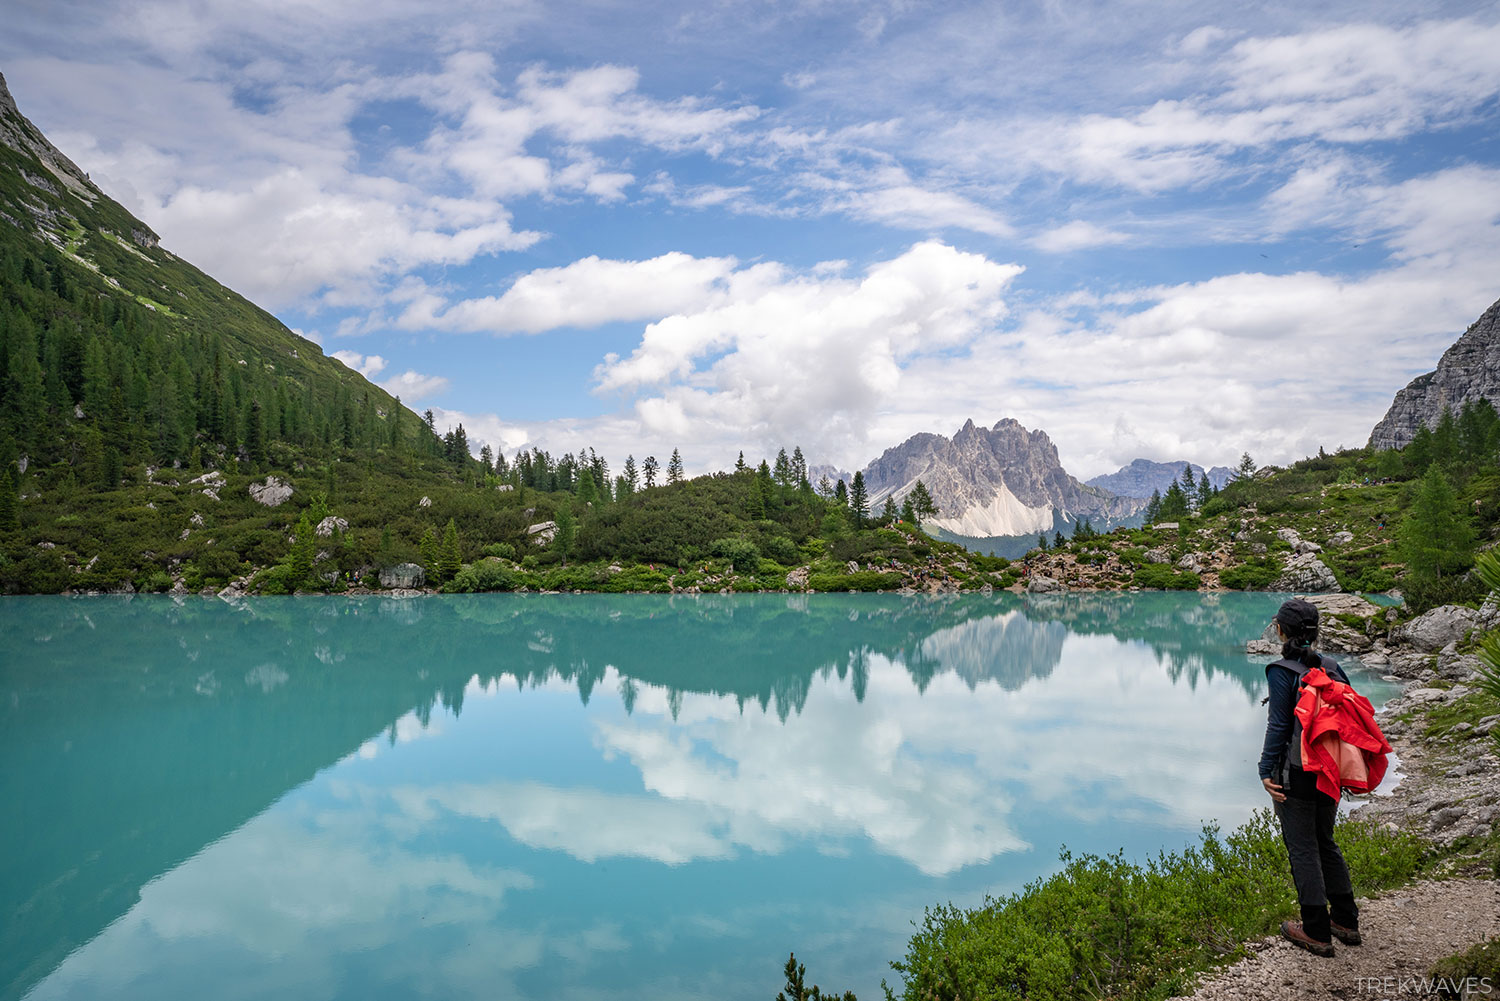
2. Lago di Sorapis (Lake Sorapis)
- Start & finish: Passo Tre Croci (along Strada Regionale 48 delle Dolomiti)
- Distance: 11.8 km
- Elevation gain: 628m
- Time: Half day
- Difficulty: Medium

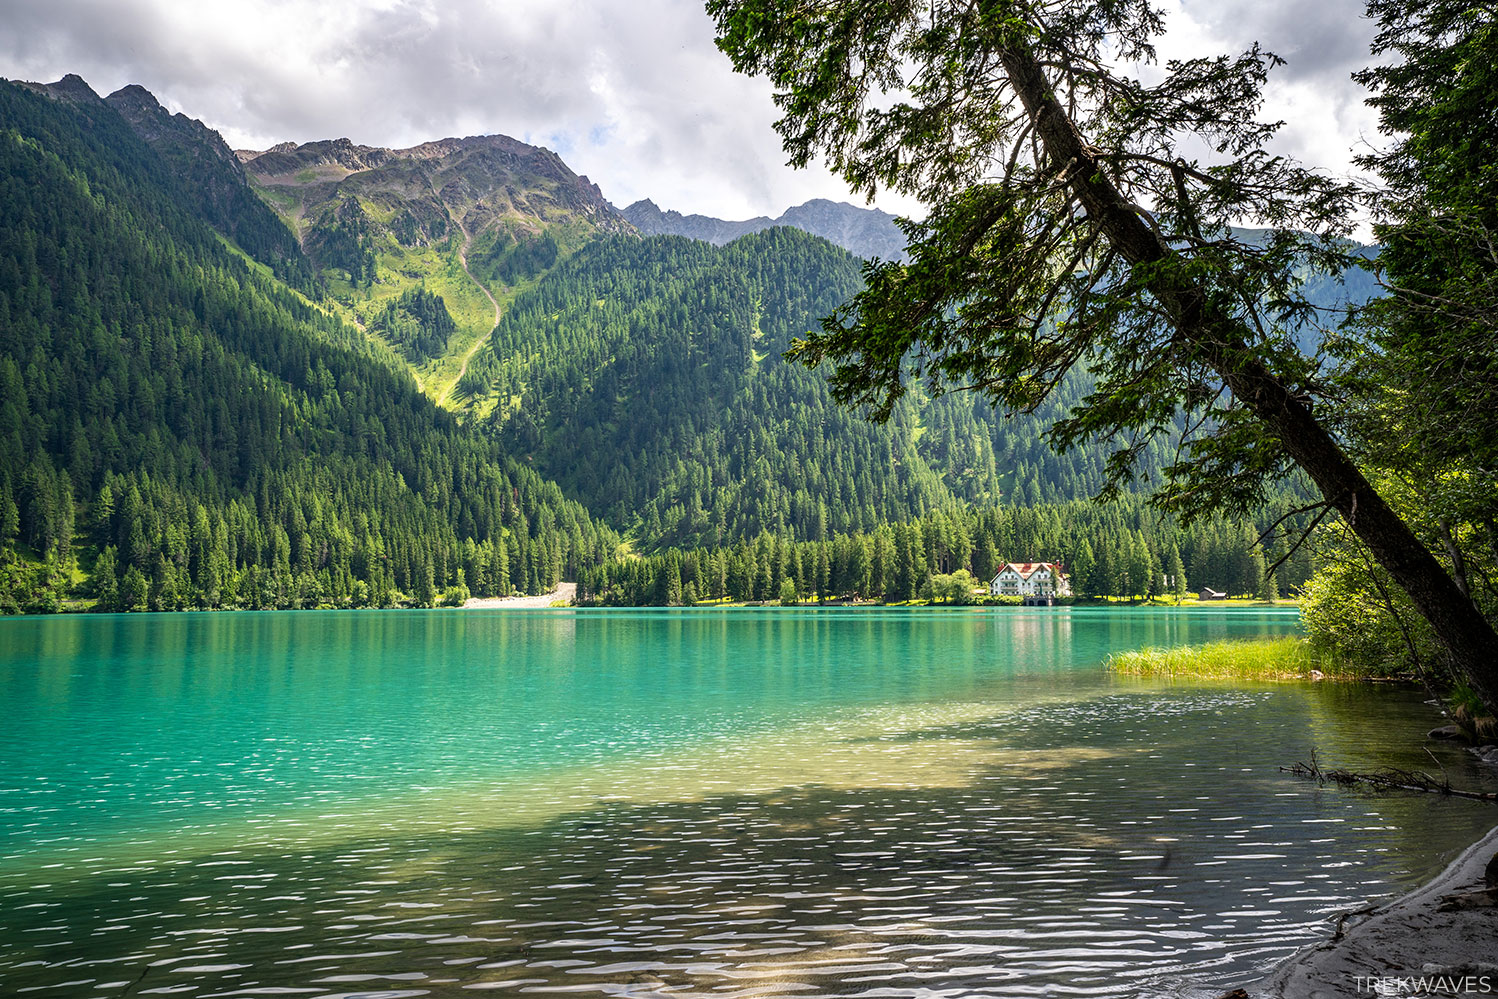
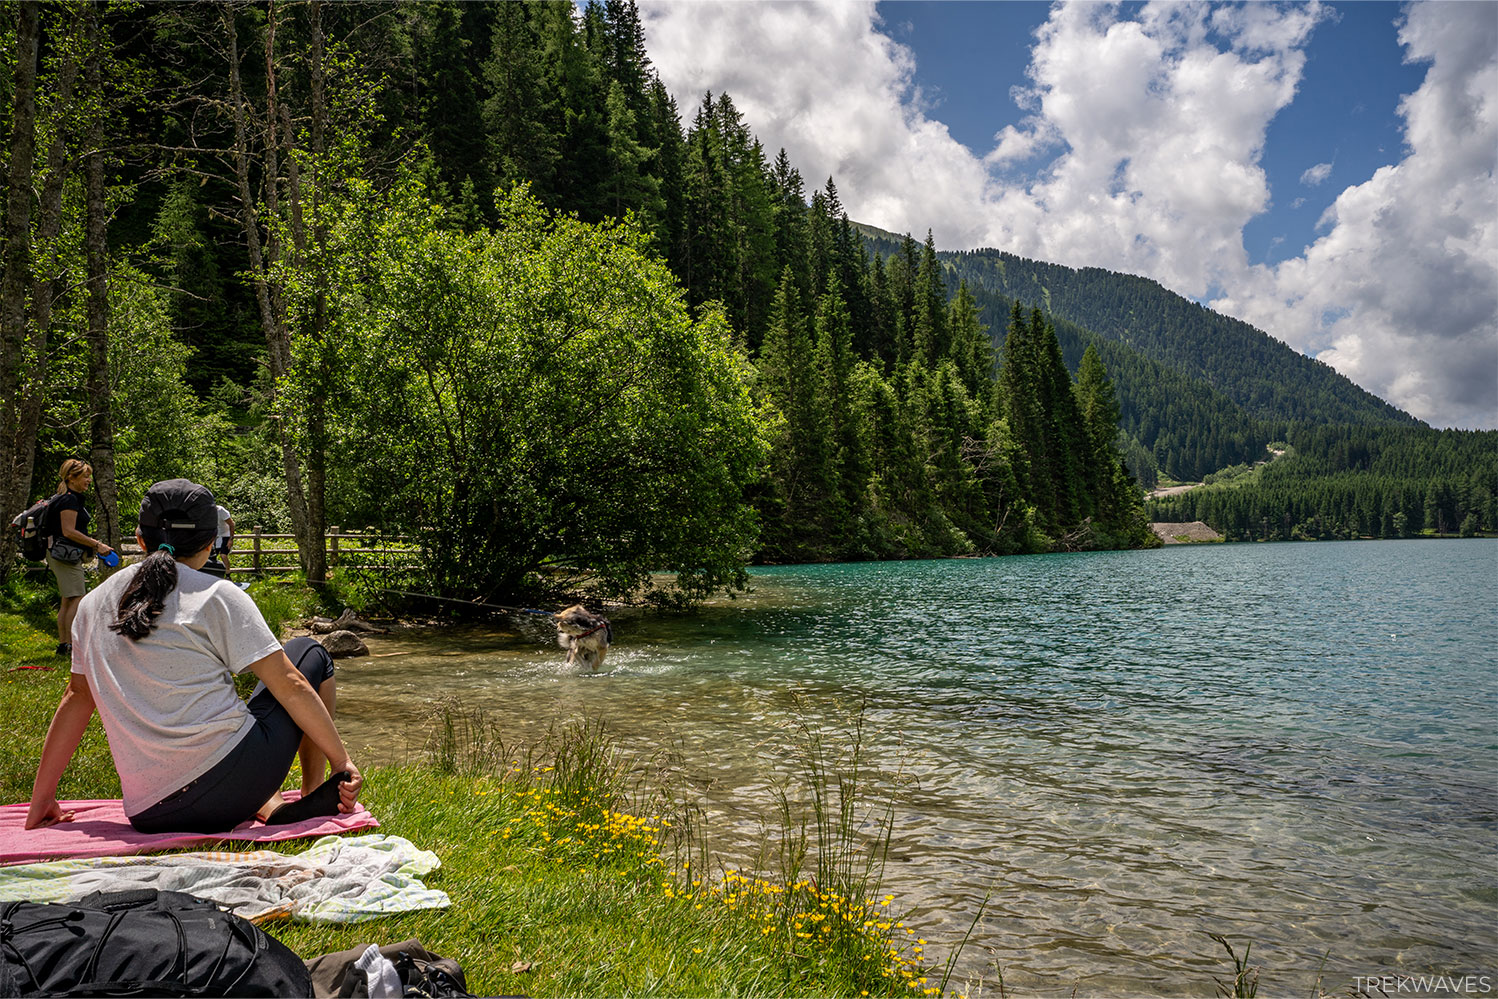
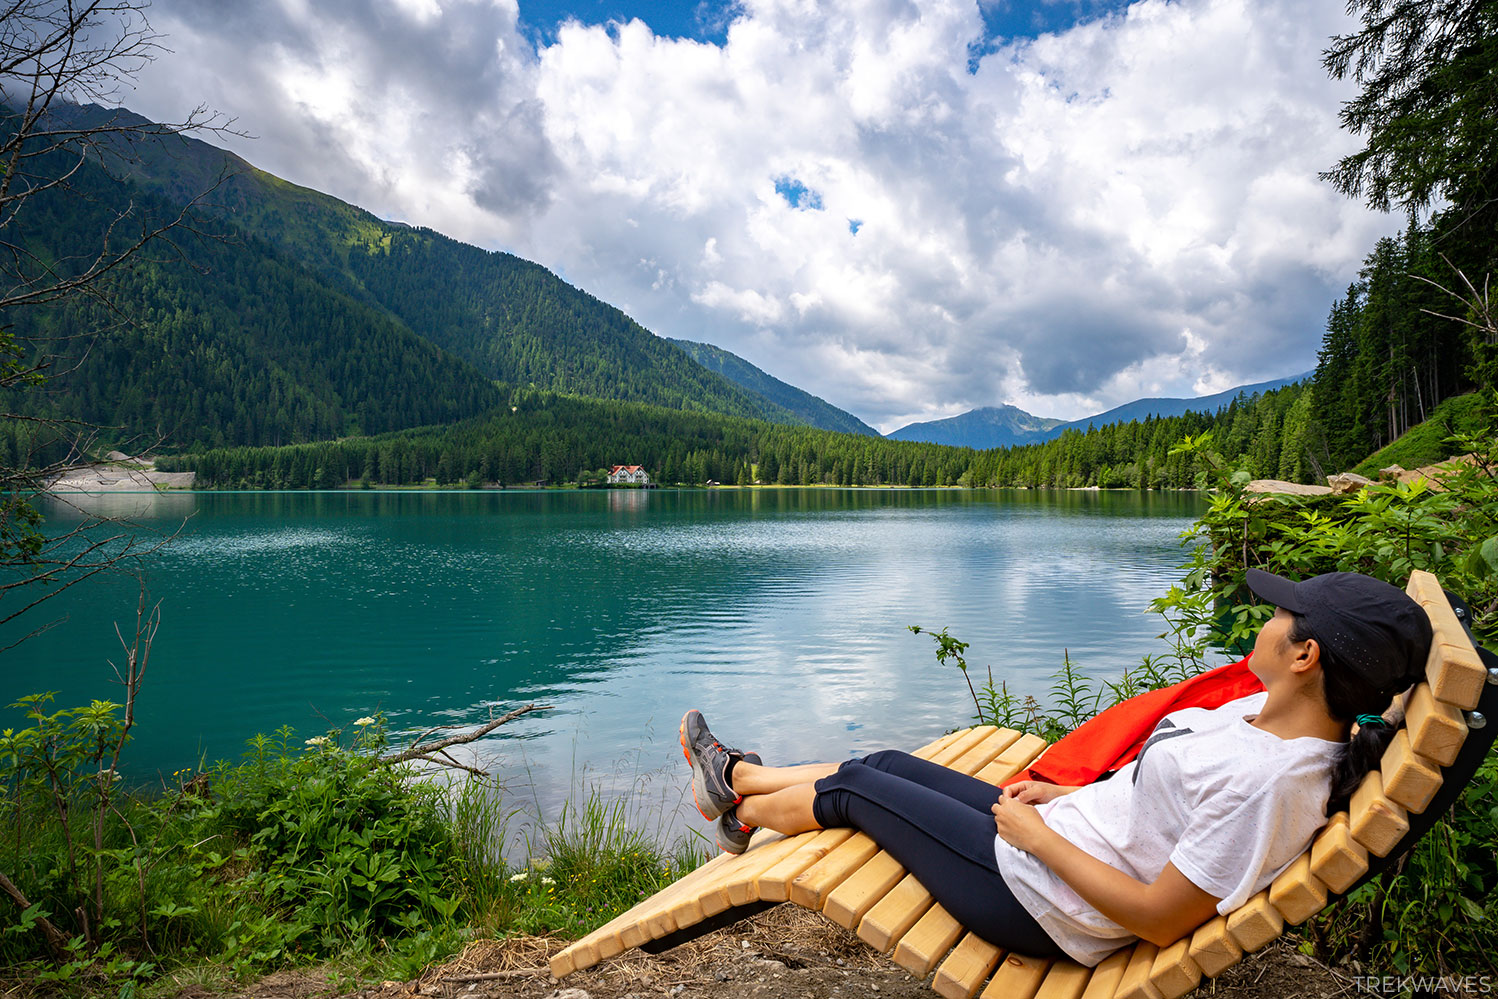
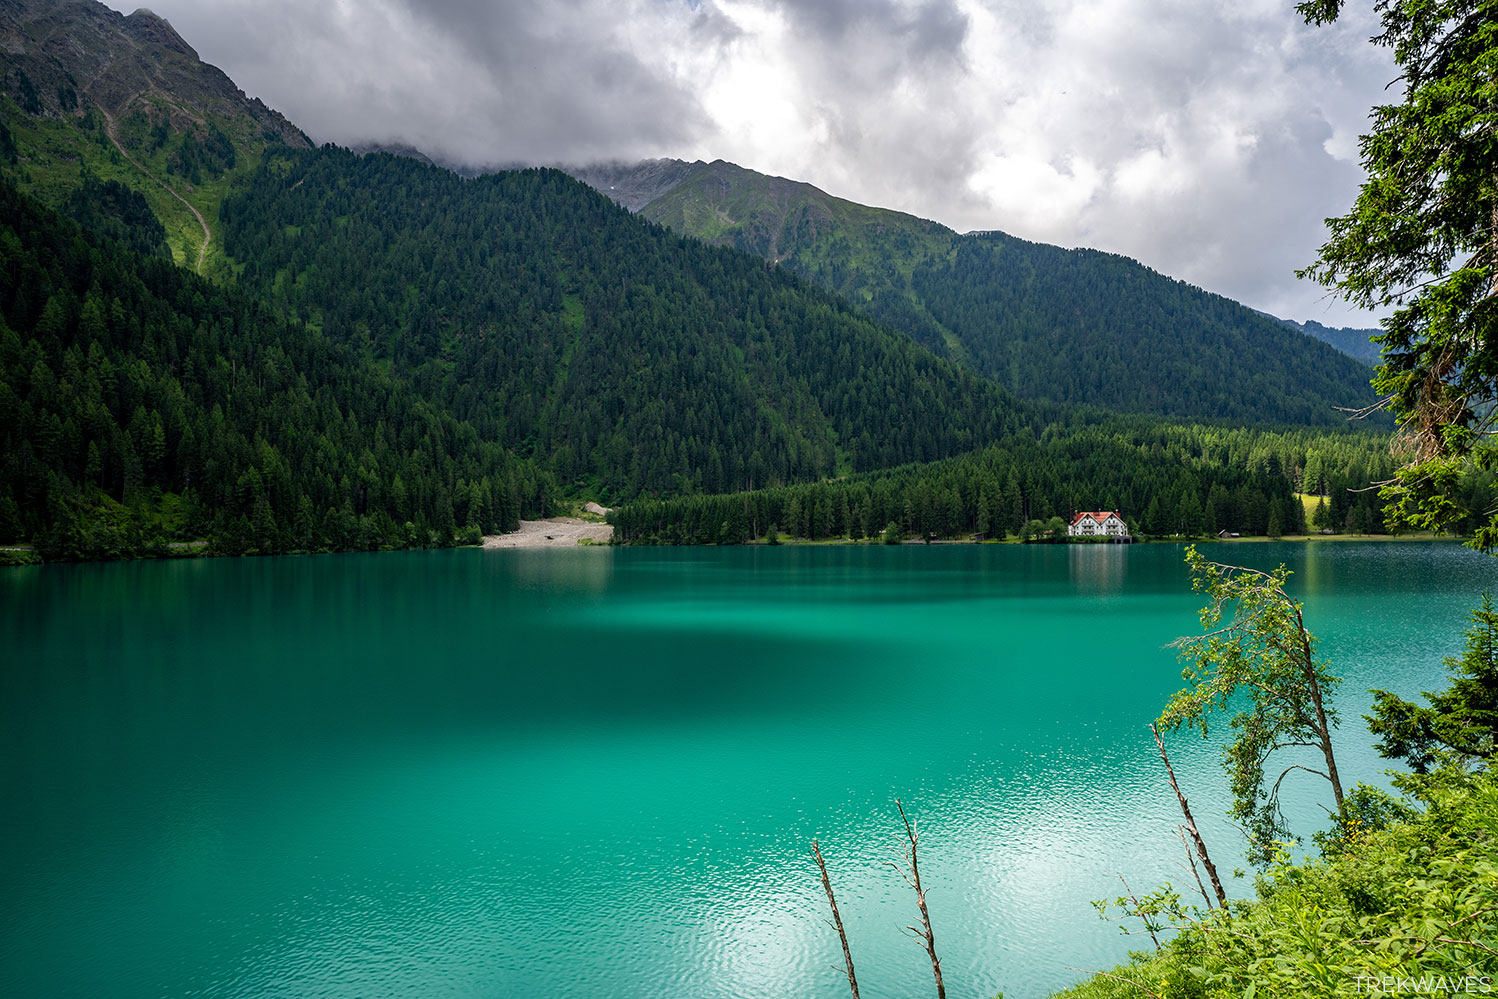
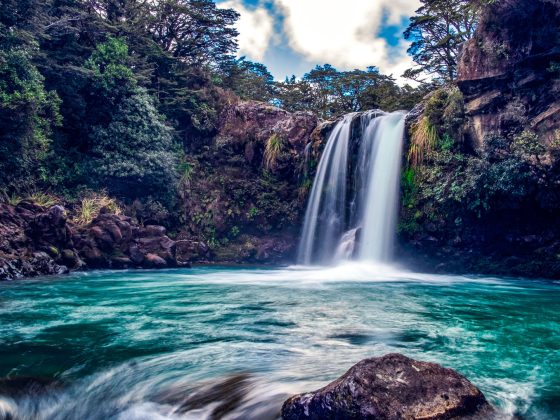
The hike to Lago di Sorapis is another must-do trail in the Dolomites. This high-altitude lake is known for its bright turquoise waters, set against a backdrop of towering mountain peaks.
This 11.8km return hike is not overly strenuous but does require some caution due to loose rocks and a few exposed sections with metal ropes for support.
The reward at the hike’s end is a magnificent glacier-fed lake, surrounded by white rock formations, green alpine pastures and the impressive 3,200-meter Mount Sorapis towering in the background.
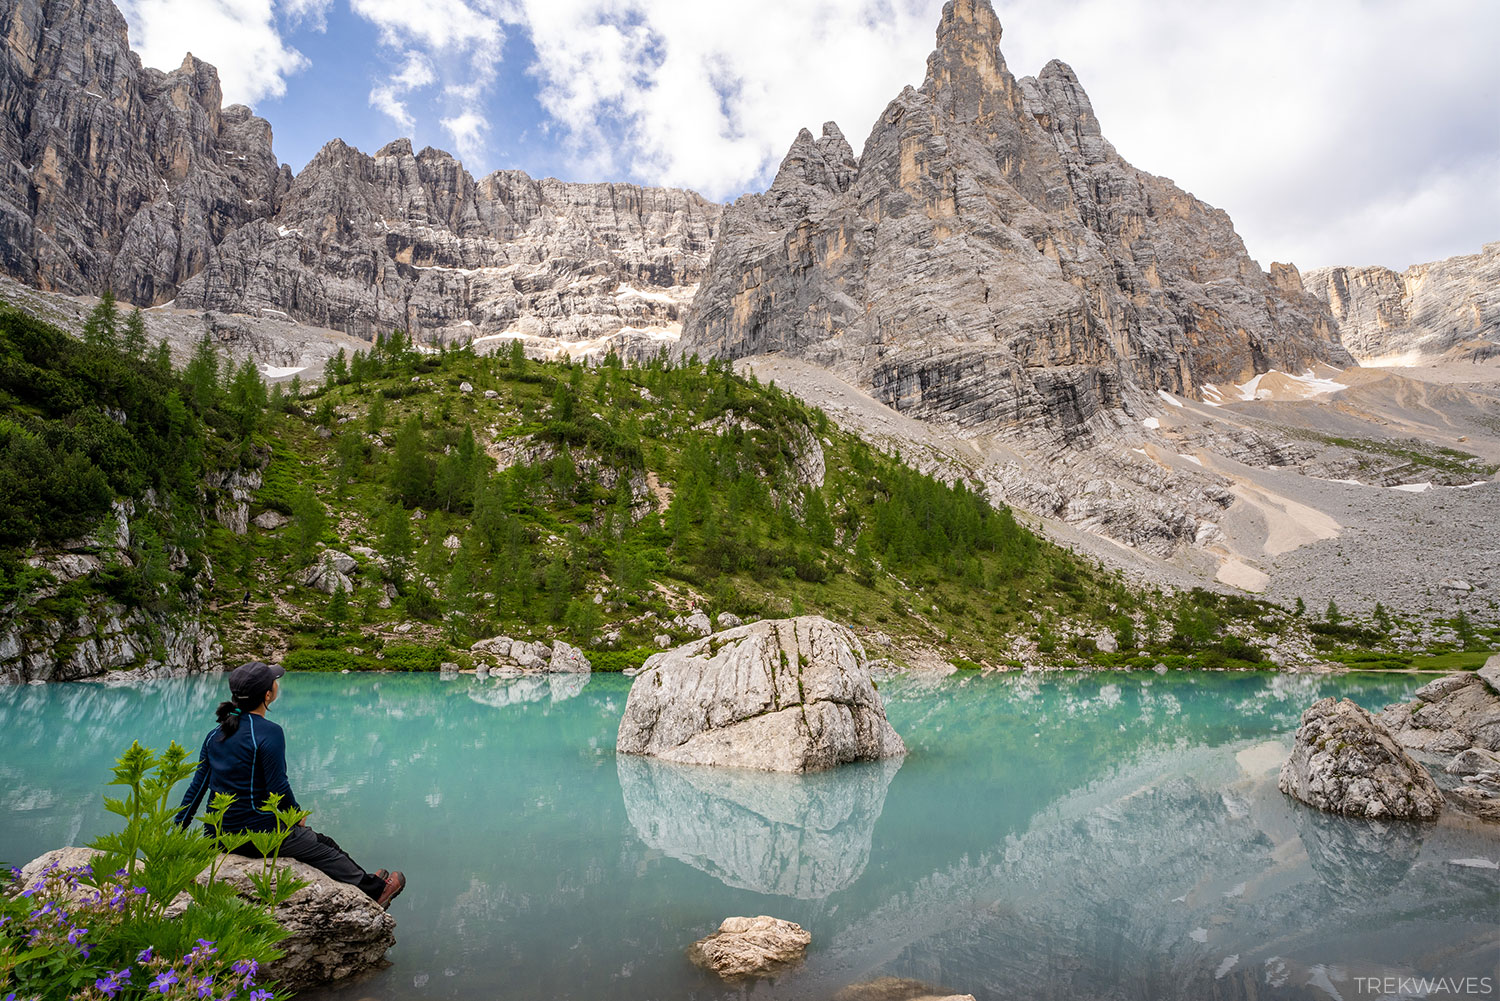
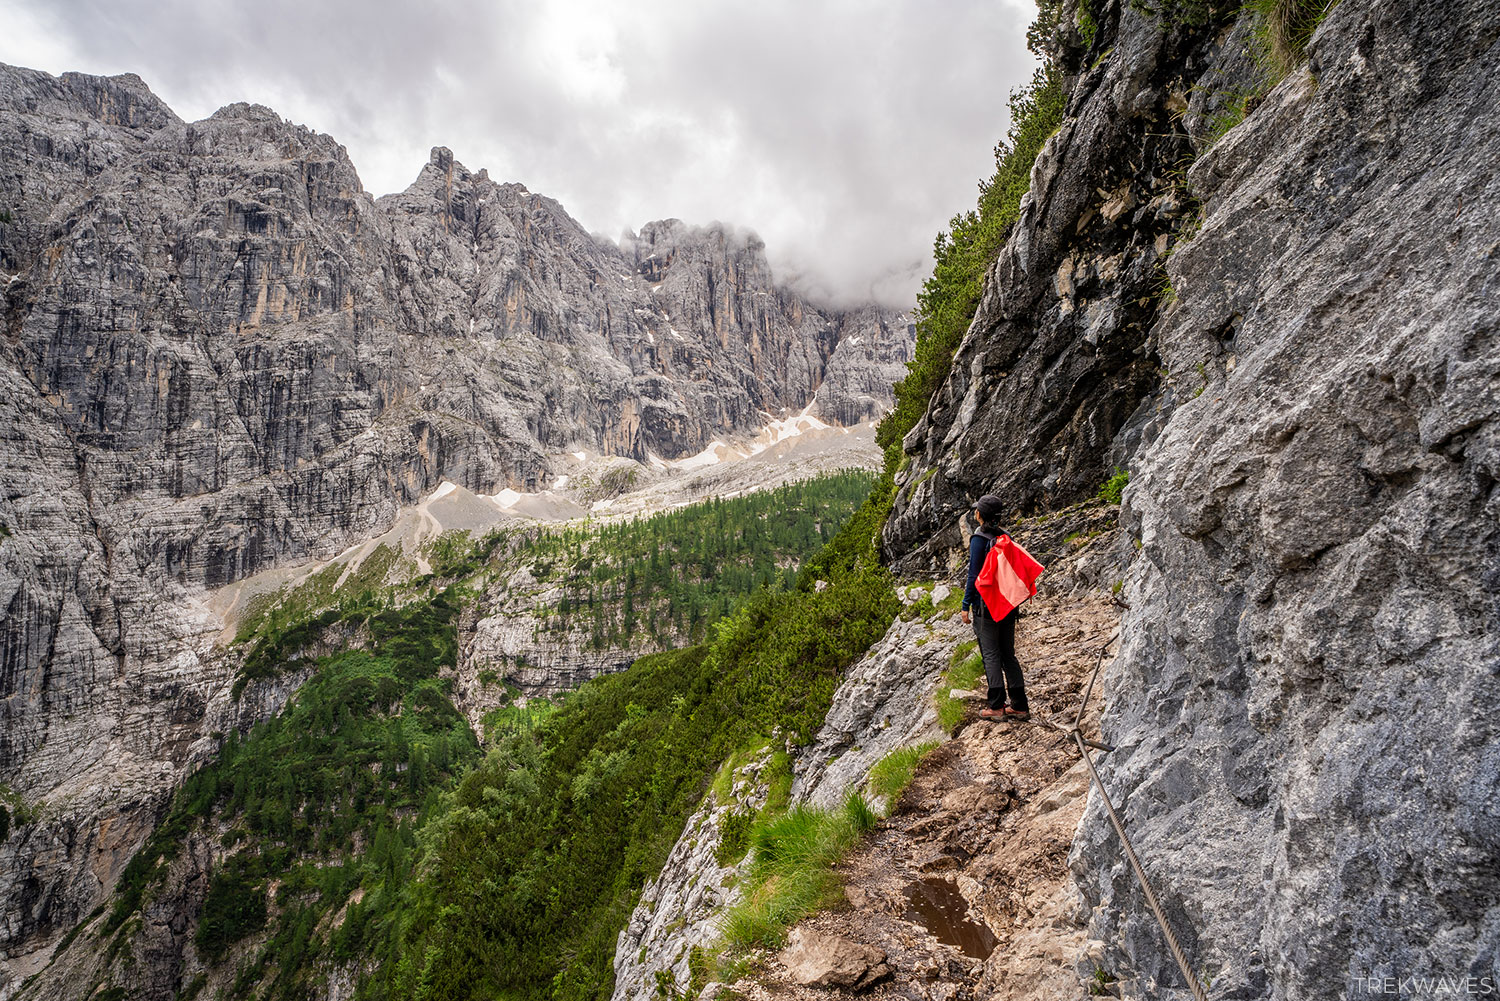
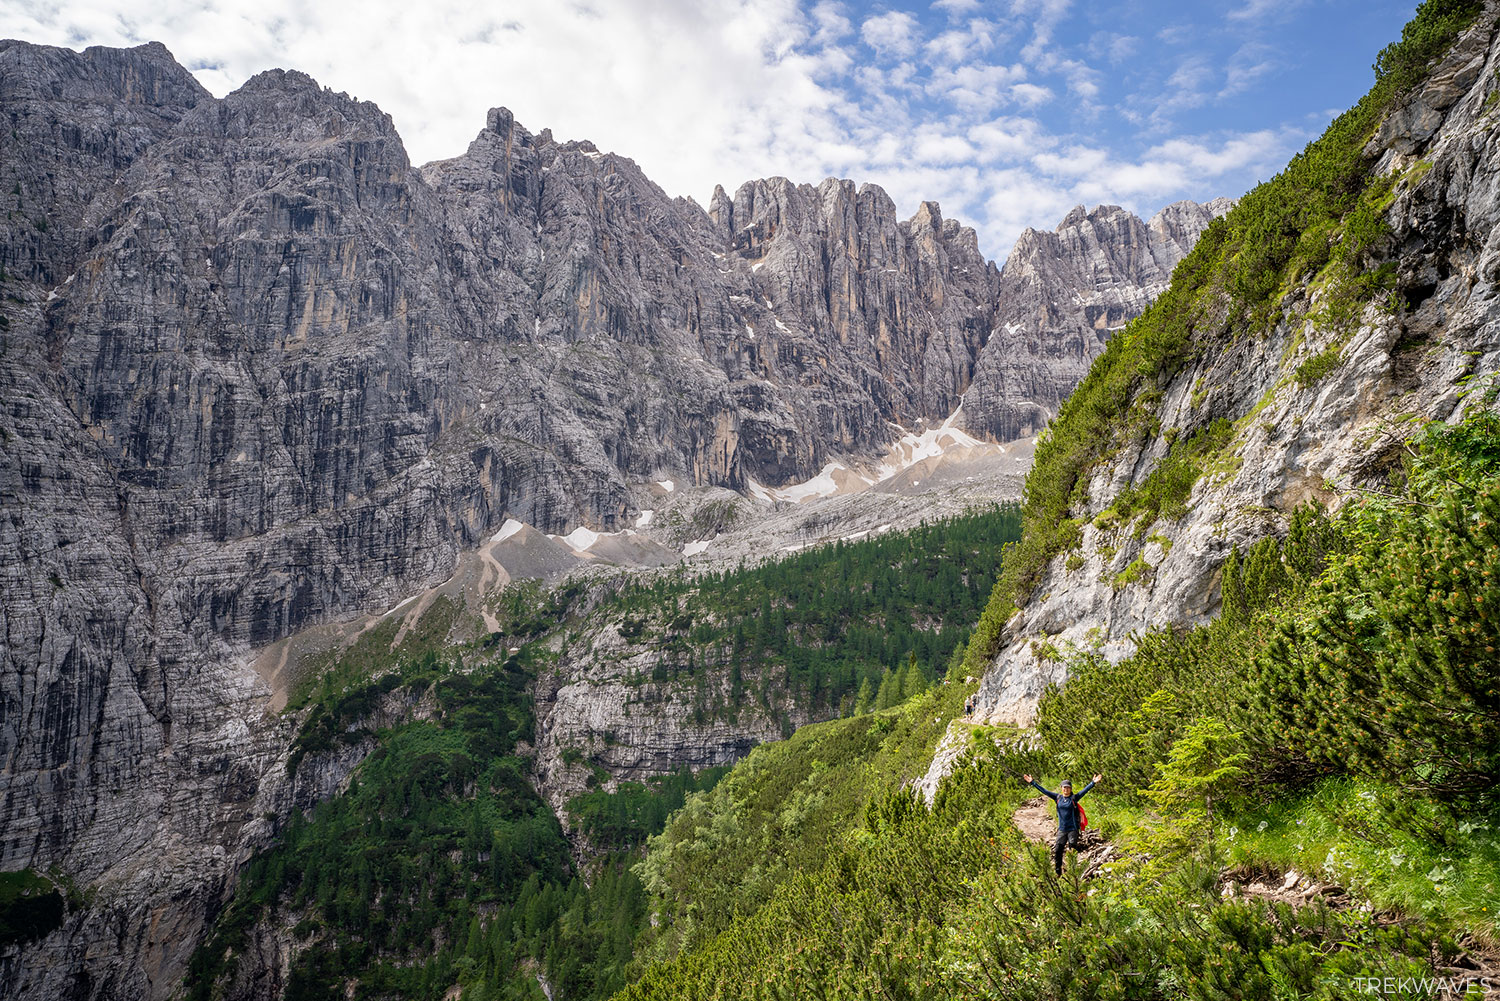
The route from Passo Tre Croci to the lake follows path 215, but you can also choose a tougher, 13.5km loop trail returning via path 216 through the pass (and Forcella Marcoira peak).
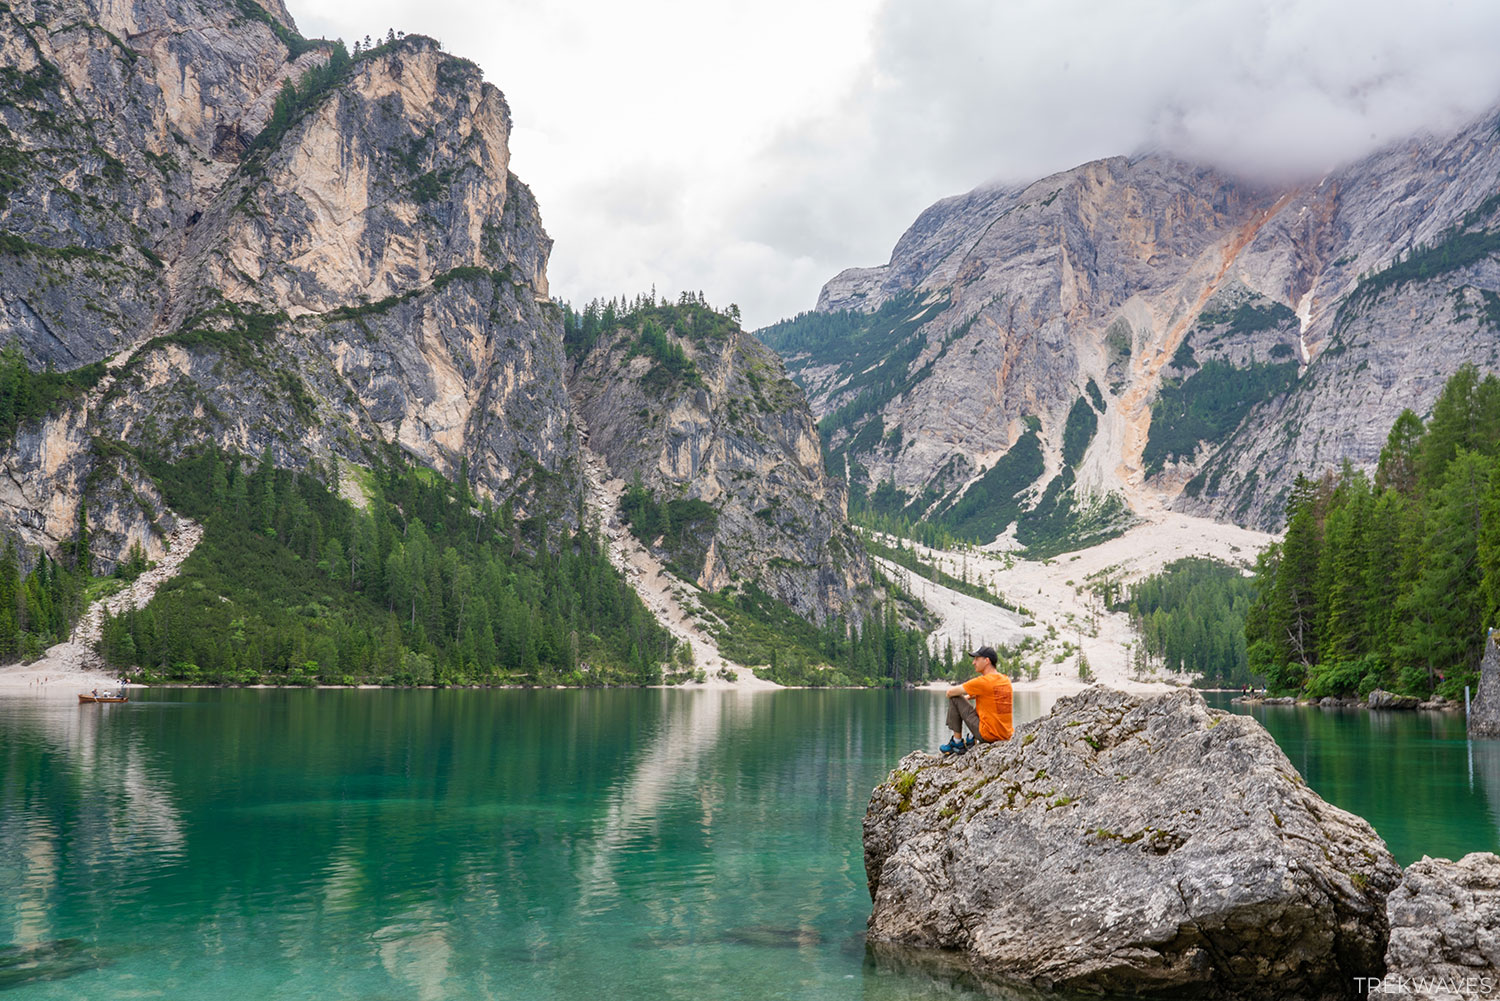
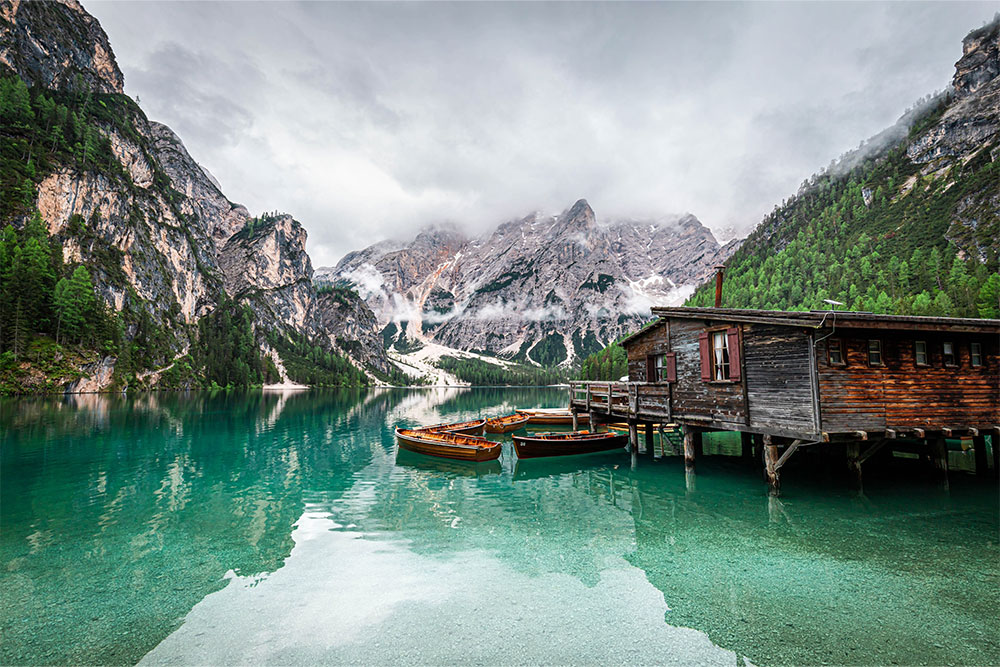
3. Lago di Braies (Pragser Wildsee) Loop
- Start & finish: Behind Hotel Lago di Braies
- Distance: 3.7 km
- Elevation gain: 137m
- Time: 1.5-2h
- Difficulty: Easy
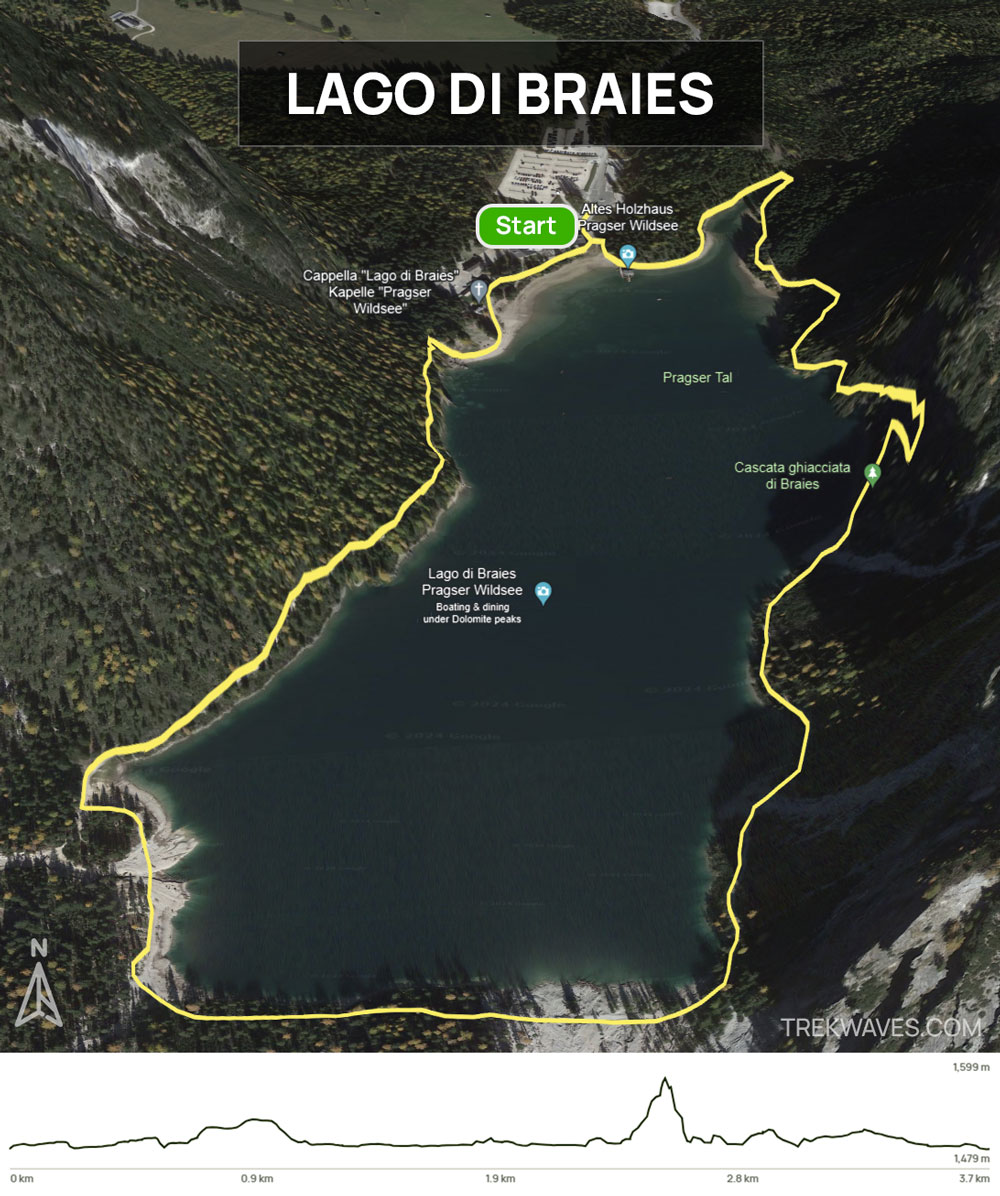
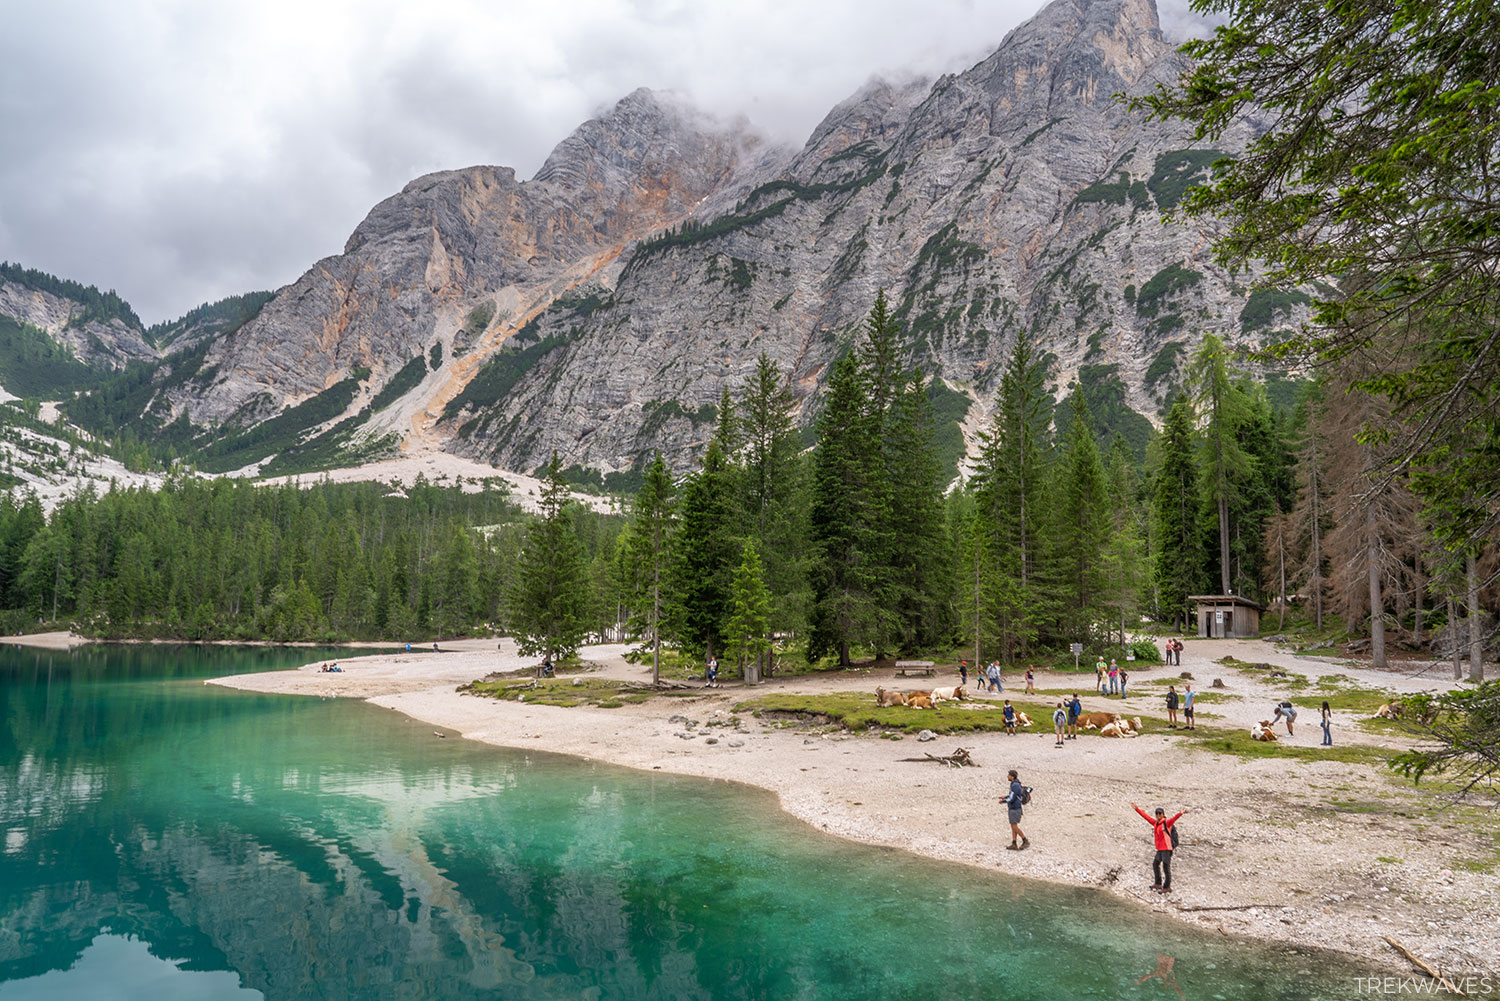
Lago di Braies stands out as one of South Tyrol’s most stunning lakes, often referred to as the “Pearl of the Dolomite Lakes.”
Situated at an altitude of approximately 1,500 meters in the scenic Alta Pusteria, the 77-acre Lago di Braies (Pragser Wildsee in German) is known for its bright green and blue color, and the imposing Seekofel (2,810 meters) that surrounds it.
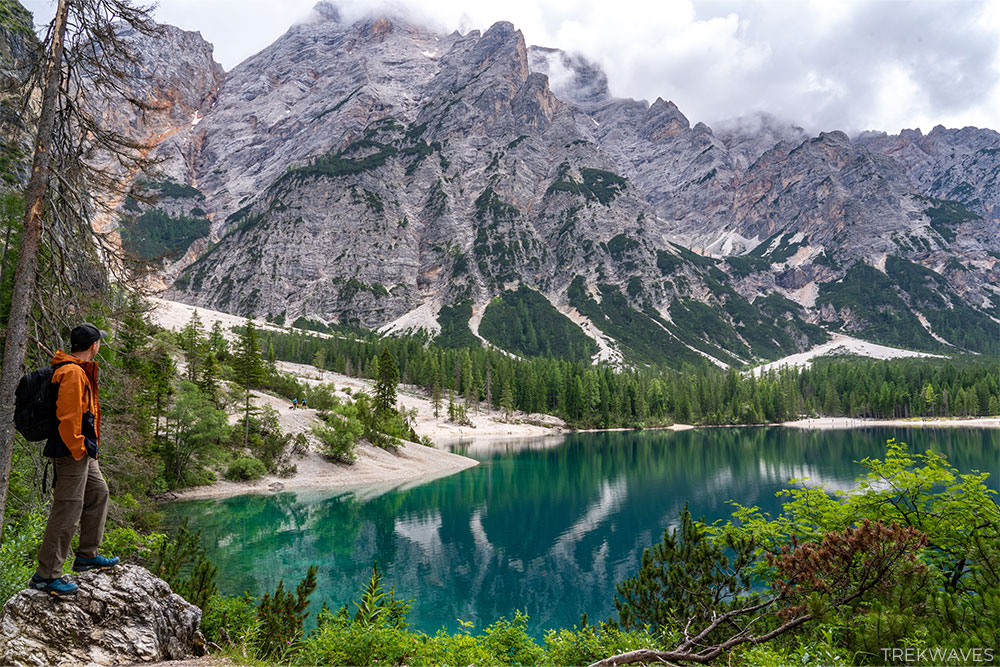
The most popular trail in this area is a 3.7km loop around the lake, a must-try for anyone visiting the lake. The lake’s circuit path is mostly flat, though there are some stairs on the east side.
As one of the most popular spots in the Dolomites, Lago di Braies tends to be very crowded. To enjoy a quieter experience, aim to visit early in the morning or later in the afternoon. We arrived after 3pm.
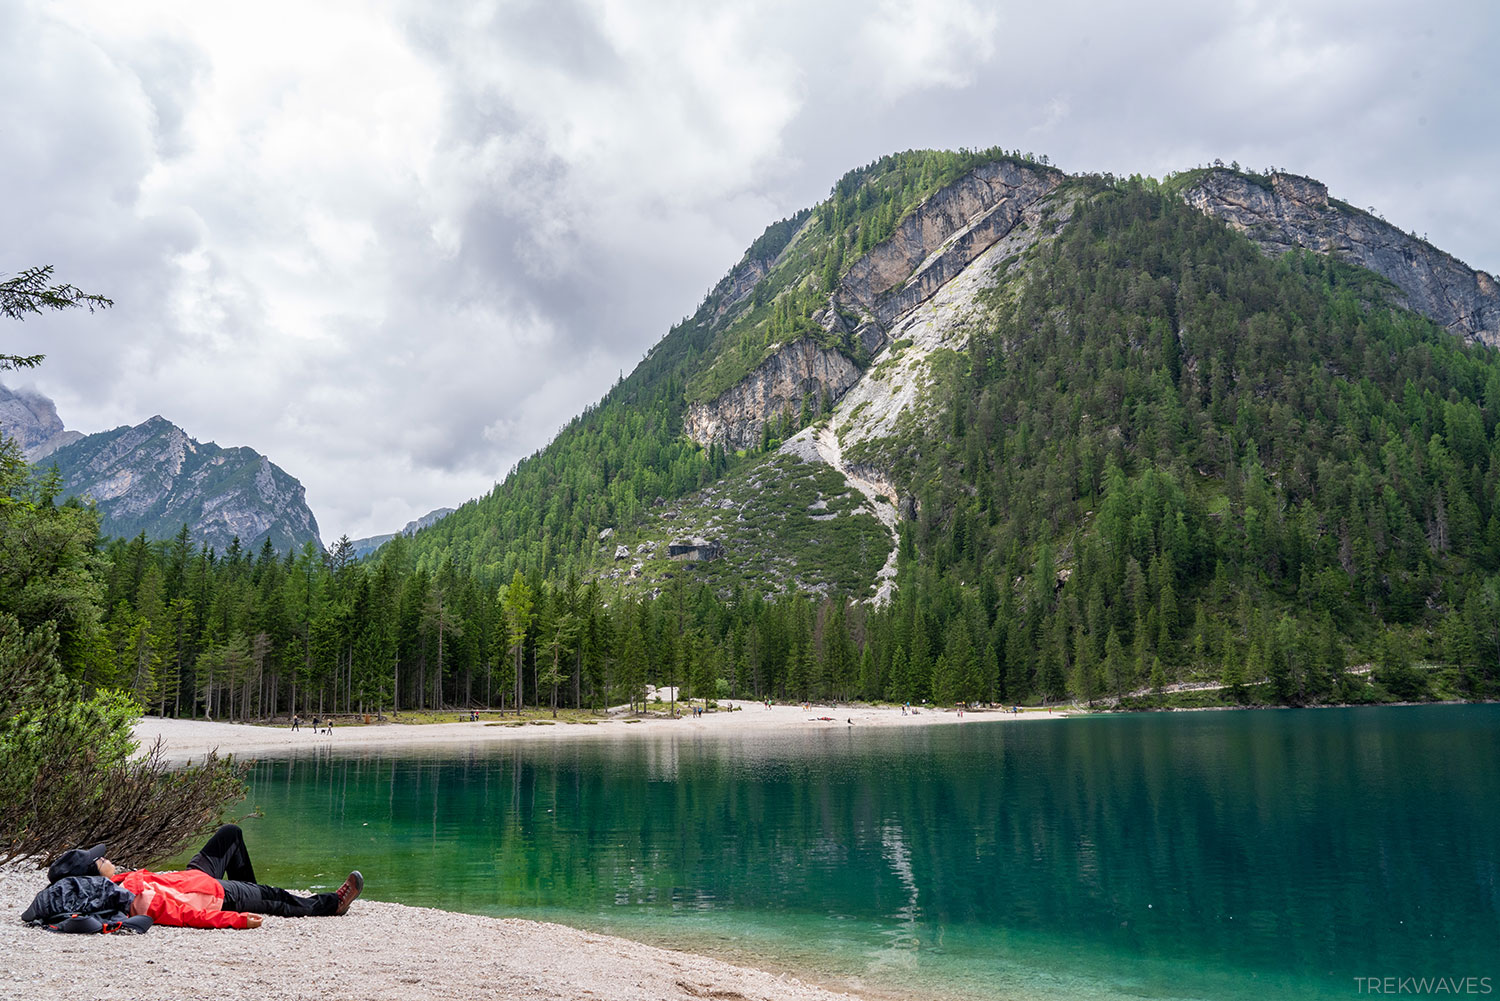
Besides the loop around the lake, there are many other hiking trails in the area, and staying at Camping Olympia (located 20mins from the lake) for a few days to explore them all would be amazing.
If you don’t feel like hiking when you arrive at Lago di Braies, renting one of the stylish wooden rowboats to cruise the vibrant waters of this lake is a great alternative.
4. Seceda to Col-Raiser
- Start & finish: Seceda
- Distance: 7.1 km
- Elevation gain: 145m
- Time: Few hours
- Difficulty: Medium
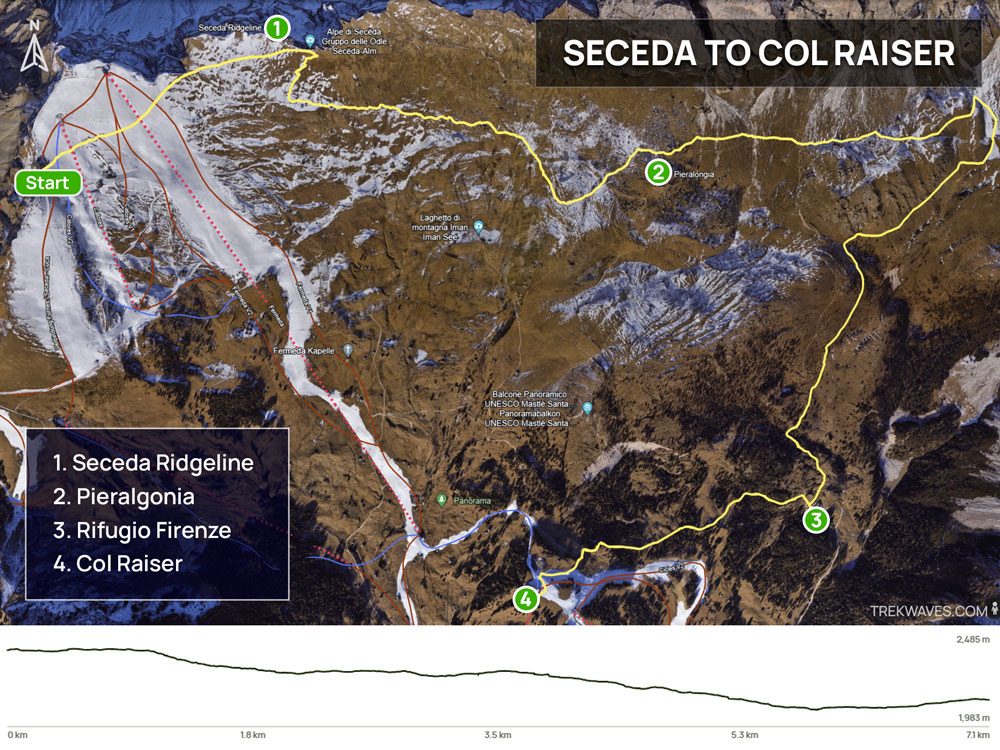
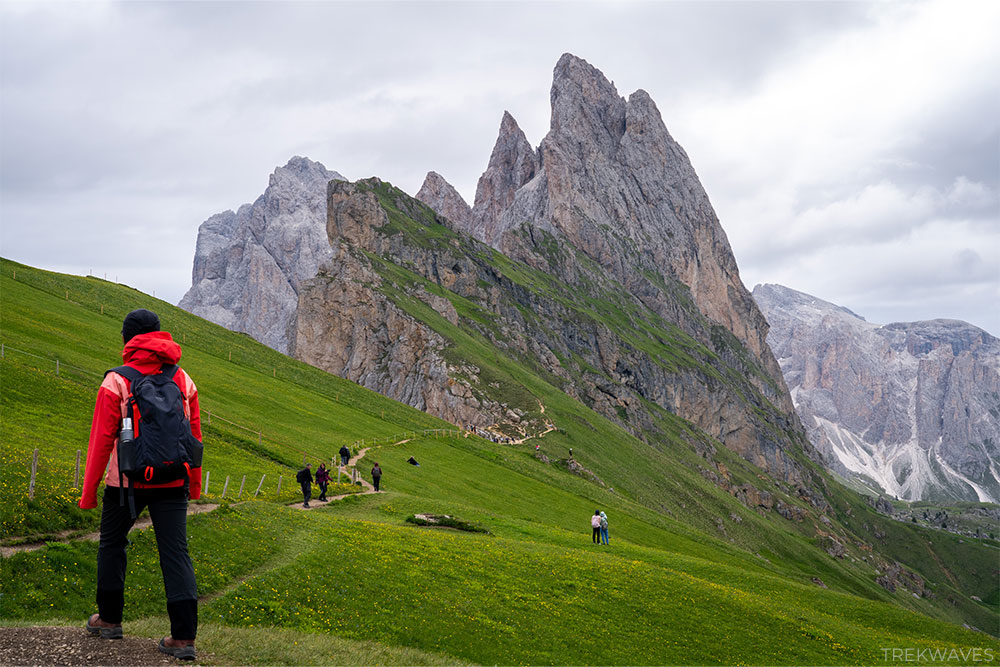
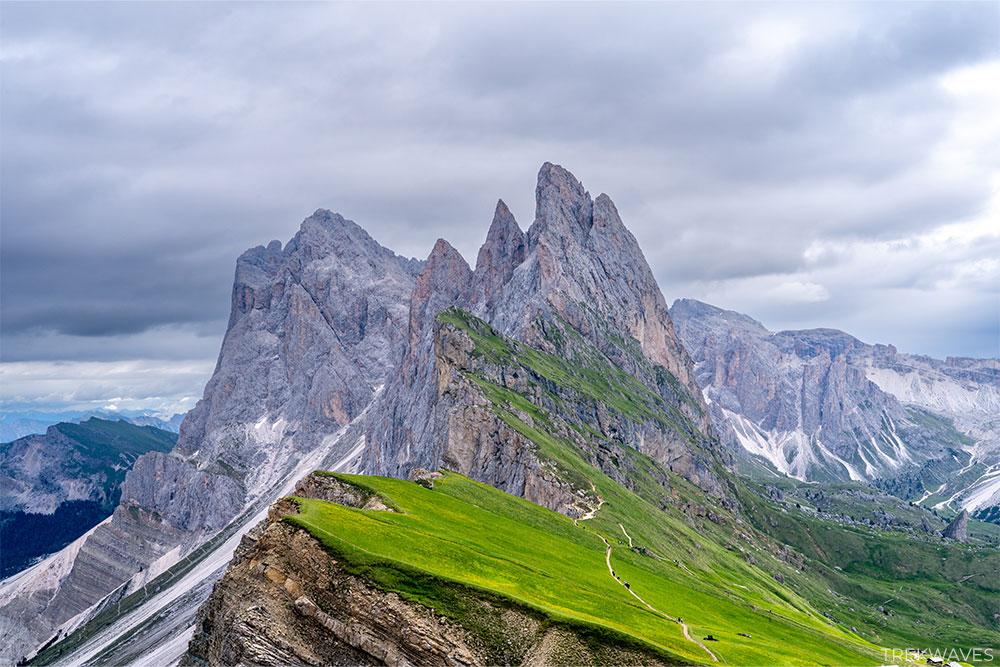
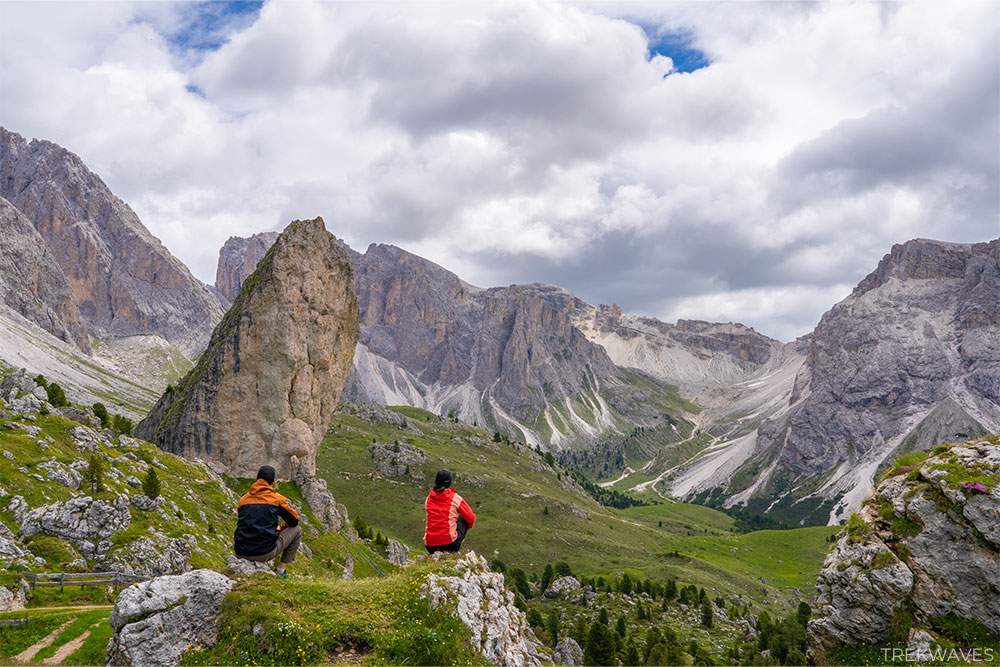
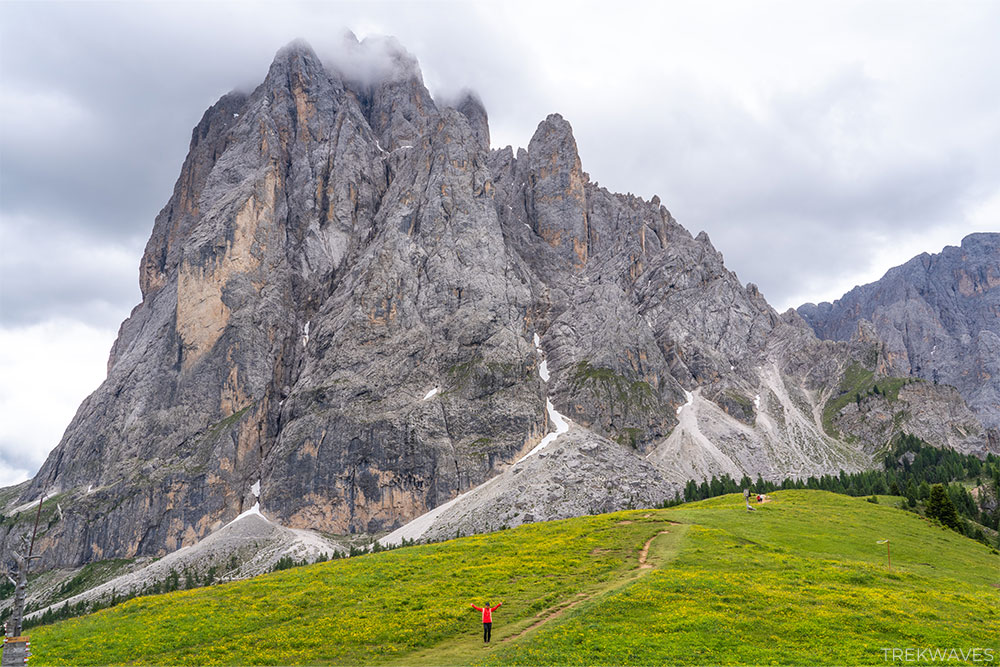
Heading southwest from Fanes-Sennes-Braies Natural Park to Ortisei and Puez-Geisler Nature Park, you’ll come across one of the most iconic sights in the Dolomites: the impressive Seceda with its saw-toothed Fermeda Towers.
For an amazing hike, I’d suggest walking along the Seceda Ridgeline to Col Raiser, passing by Pieralgonia and Rifugio Firenze.
To start this hike, you’ll have to catch a gondola from Ortisei to Furnes, followed by a cable car to Seceda.
If cable cars aren’t your thing, you can opt for a demanding 7.6 km hike to Seceda summit that features a 1,264-meter elevation gain.
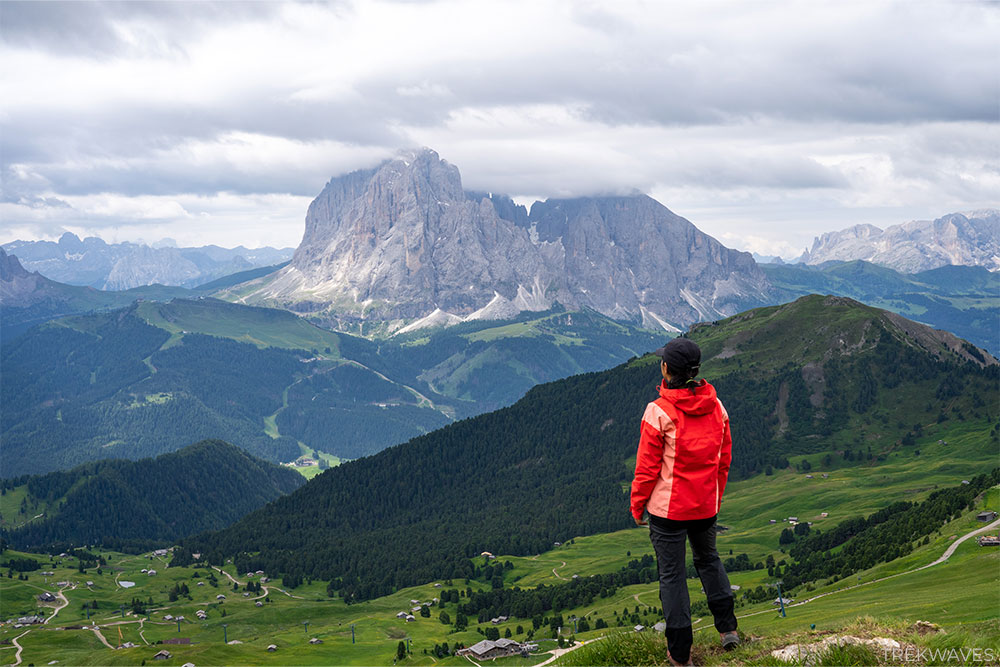
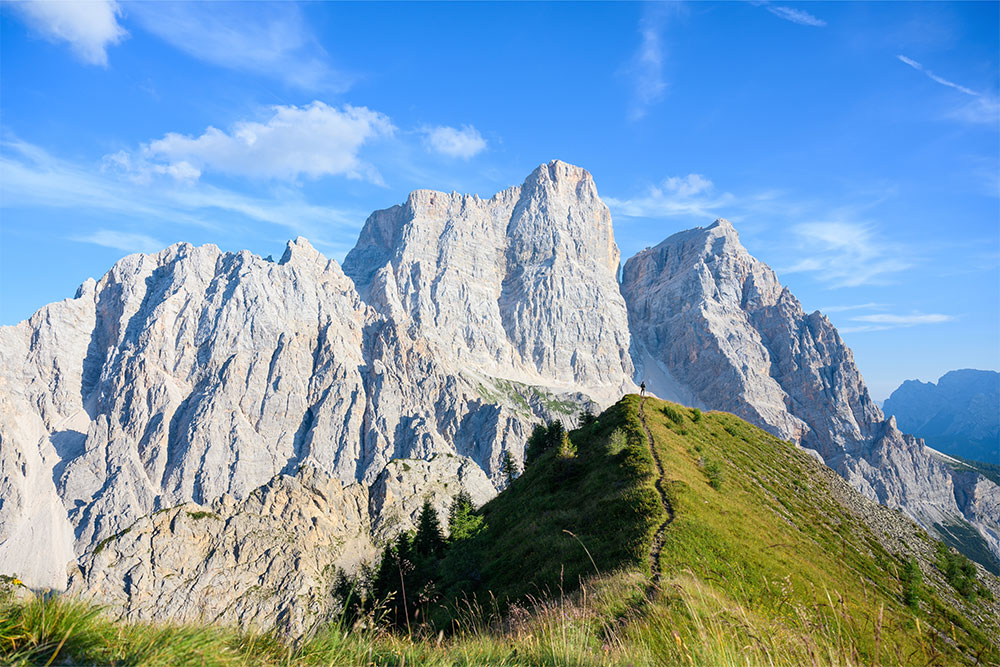
From the Seceda cable car station, you’ll be greeted with impressive views of the Puez Odle Nature Park to the east and the majestic Sassolungo, Sassopiatto, Gruppo Sella and Marmolada to the south.
Before starting your hike along the Seceda Ridgeline, I highly recommend taking a 10-15 minute uphill walk to the famous viewpoint, which offers a perfect vantage point to see all of the Seceda Ridgeline peaks.
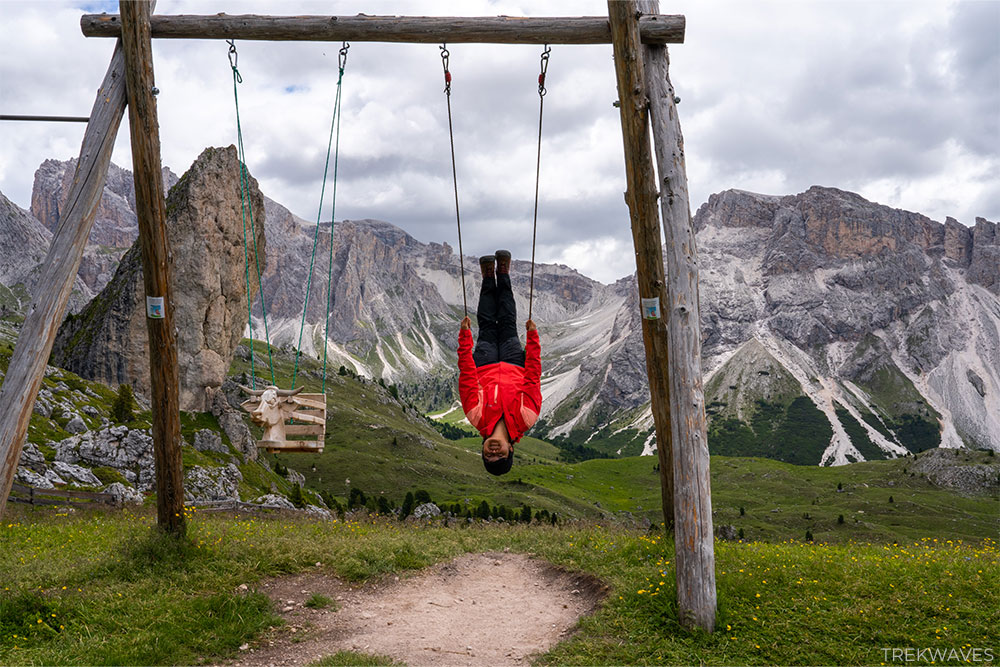
From the Seceda Viewpoint, follow hiking trail 2B along the ridgeline to the stunning Pieralgonia mountain pasture.
Here, you can stop at the Pieralgonia hut for a snack or take a swing and soak in the breathtaking views around you.
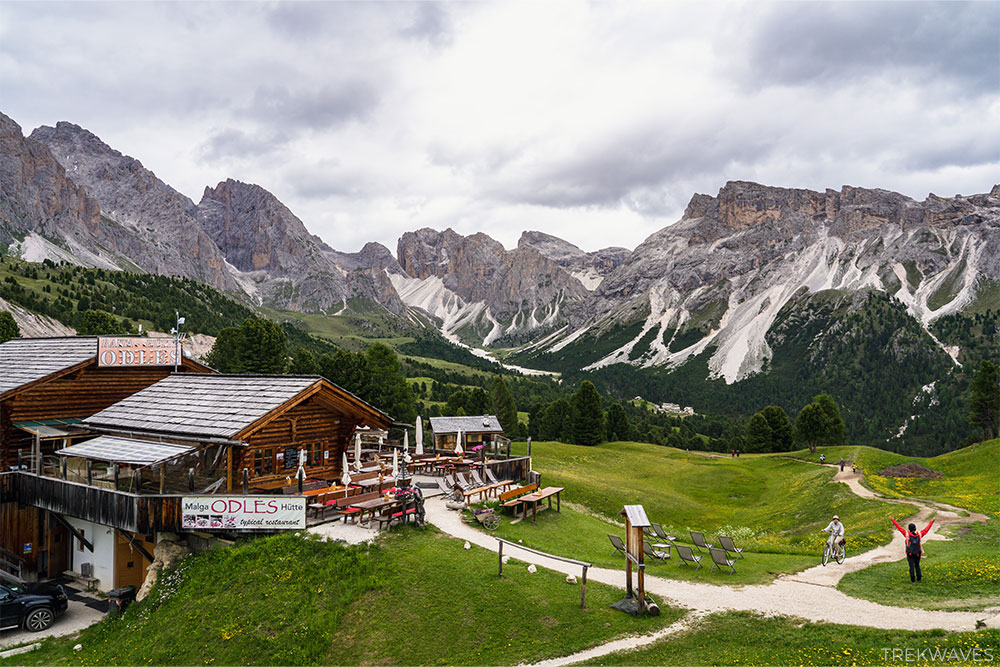
From Pieralgonia, you can head down to Col Raiser on either the shorter 13B trail or the longer 2B trail, both routes passing through Rifugio Firenze and Malga Odles hut.
Having bought 3-day Gardena Cards, we descended down from Col Raiser to St. Christina by a cable car.
We then caught two more cable cars to Monte De Seura and went on a short hike along trail 526 to the base of Sassolungo.
Alternatively, you can do a loop hike by following trail 2, which will take you back to the Seceda cable car station.
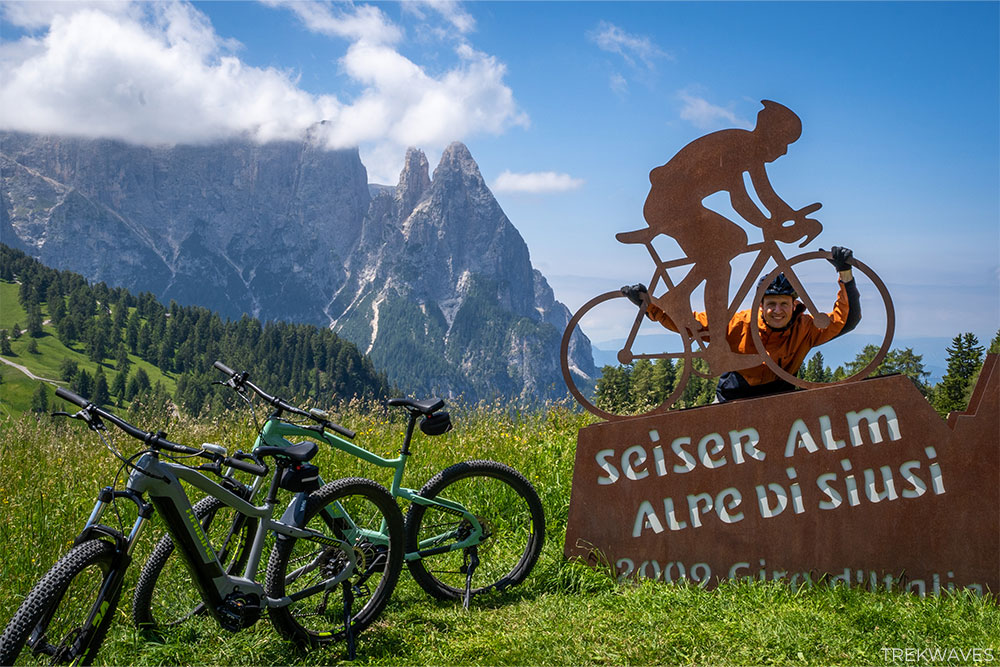
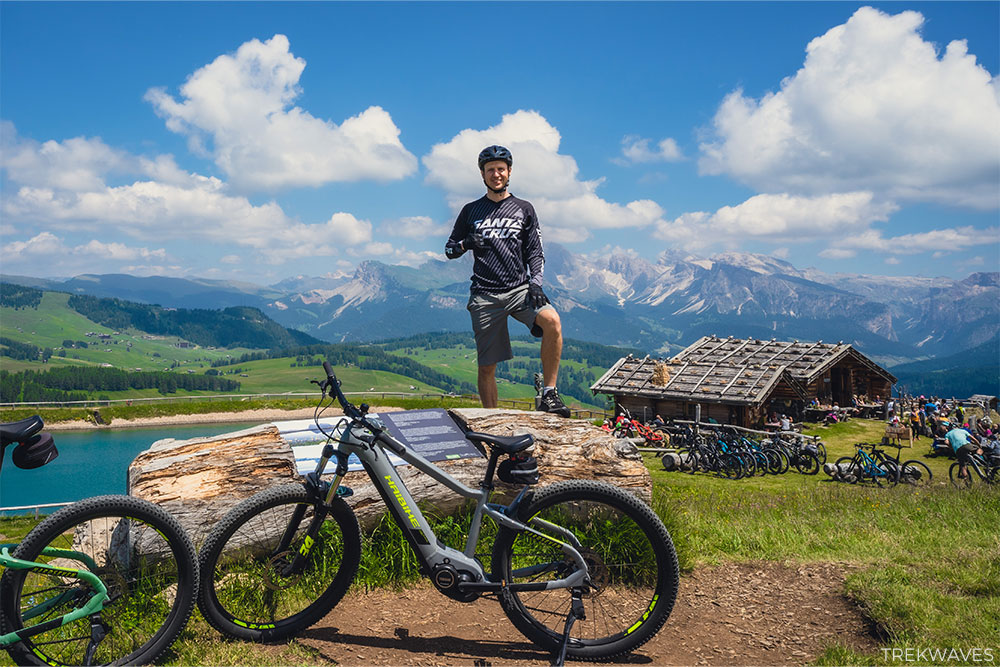
5. Alpe di Siusi (Seiser Elm) Hut Tour
- Start & finish: Mont Sëuc
- Distance: +40km
- Elevation gain: 1,487m
- Time: Whole day
- Difficulty: Medium / Hard

There are many wonderful hikes in Alpe di Siusi, but after heading up to Mont Sëuc from Ortisei, you’ll quickly realise that most trails on the plateau are very exposed and the distances to the area’s main highlights are considerable.
Moreover, hiking in this area involves walking along paved roads, which can be quite dull for those who love trekking.
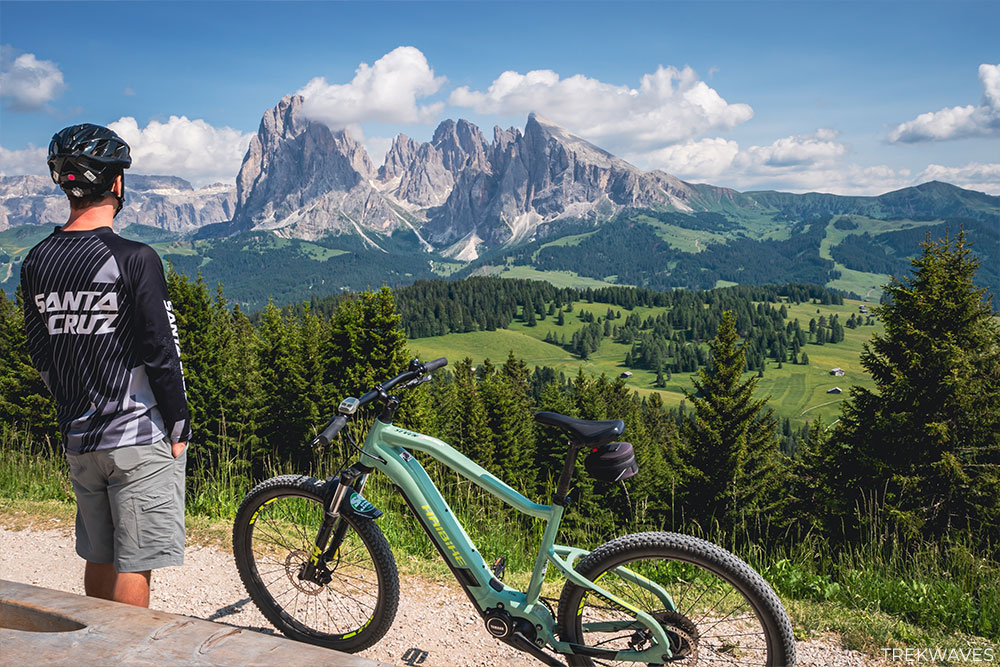
Therefore, I believe renting an e-bike for the day is the best way to explore the entire area, especially if you have limited time.
This is exactly what we did: we rented two electric mountain bikes for the whole day from the Sport Gardena bike shop, which is not far from the Seiser Alm cable car station.
If you purchased one of the Val Gardena multi-day lift passes, you’ll just need to pay €5 to take the bike on the cable car.
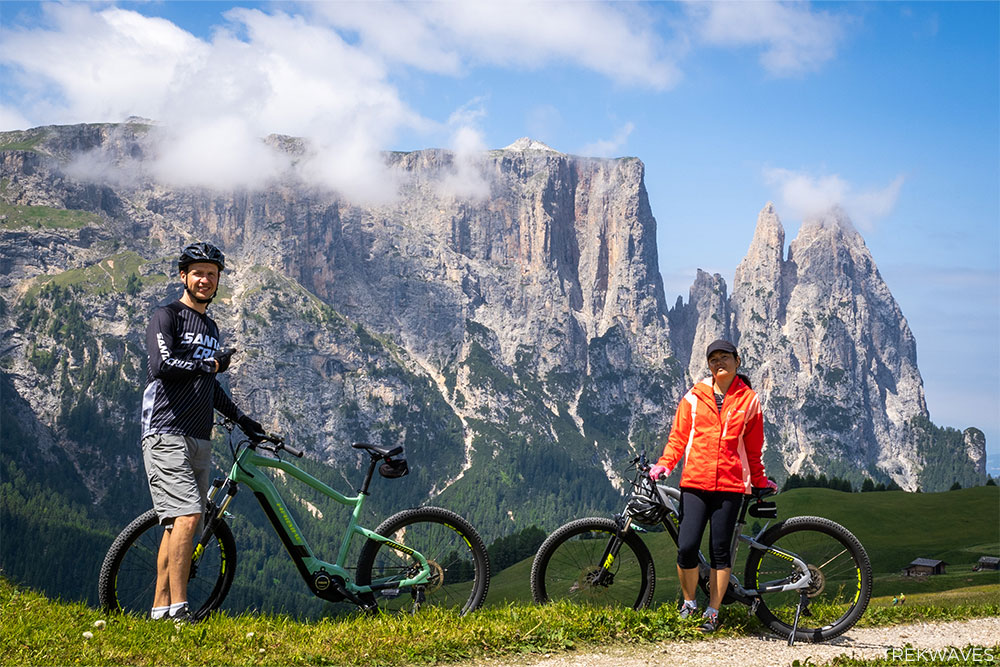
When you get to the top of Mont Sëuc cable car station, you’ll be greeted by expansive views of the plateau, with the mountain peaks of Sassolungo, Sassopiatto, and the Rosengarten group visible on the horizon.
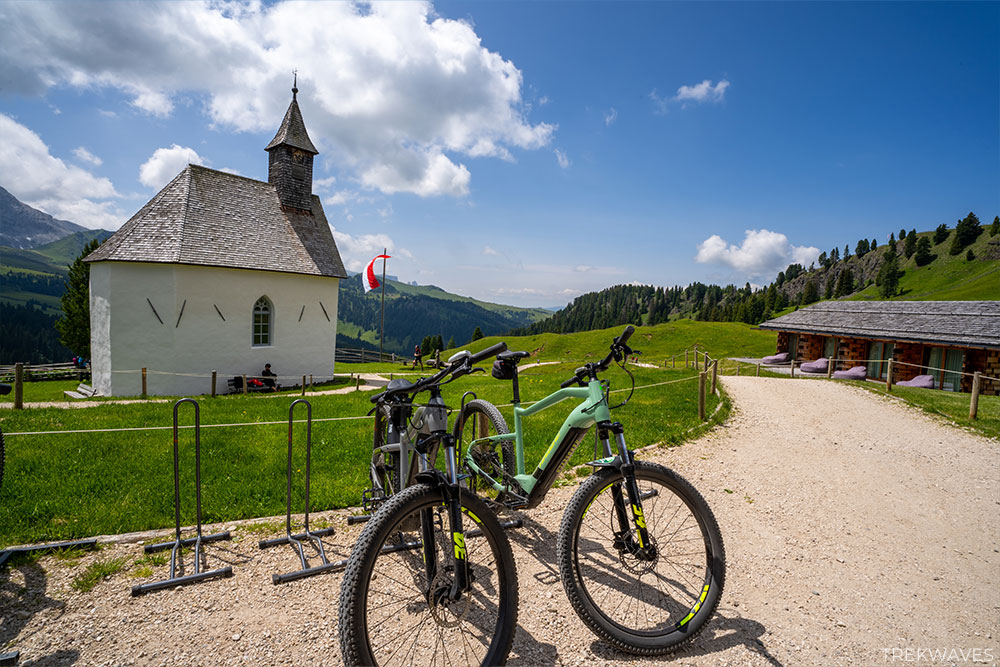
Our ride began with us heading west towards Compatsch village, and then further towards the jagged peaks of the Sciliar (Schlern) Group, which are part of Parco Naturale Sciliar – Catinaccio.
After that, we headed back to Compatsch and rode south from there to start our incredible Alpe di Siusi hut tour, with Edelweiss Hütte as our first stop.
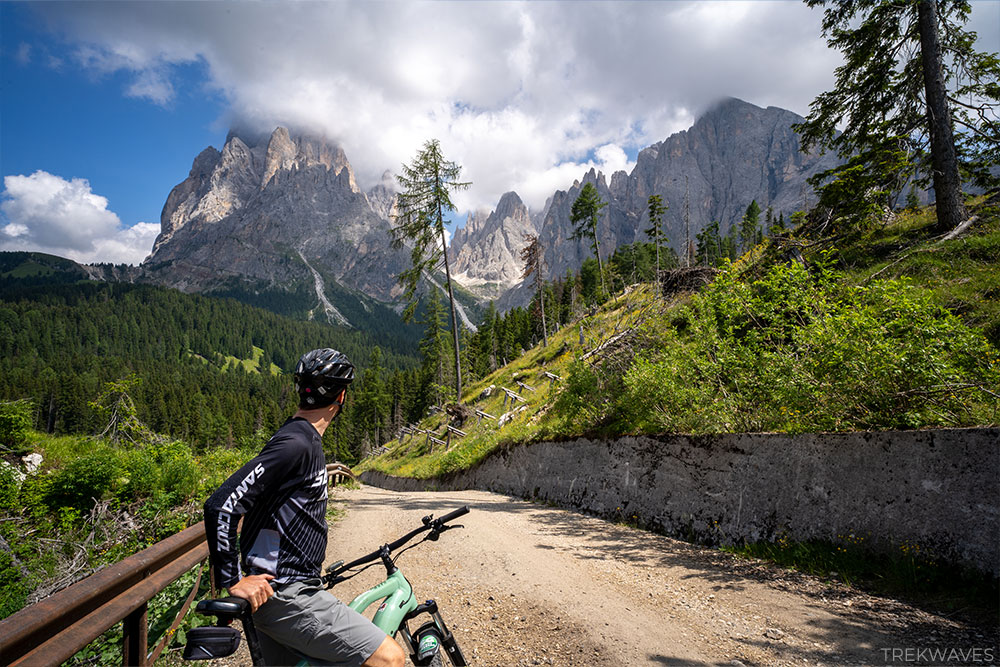
Beyond this point, the trail becomes much more interesting. As you get closer to the Rosengarten group rock formations, expect a steep downhill section followed by a 250-meter climb ending around Rifugio Zallinger.
Leaving Rifugio Zallinger, you’ll first ride north with the stunning Sassolungo and Sassopiato as your backdrop, before going west along Monte Pana towards Saltria.
Exploring the alpine meadows of Alpe di Siusi on a bike was incredible, and I highly recommend it to anyone with a bit of experience riding mountain bikes on loose gravel roads.
It’s an excellent way to see the entire plateau in a single day without spending days on multi-day, hut-to-hut hikes.
Add To Your Dolomites Trip: Bonus Hikes
Although there are countless incredible hikes in the Dolomites that could easily fill another month of writing blog articles, I’ve chosen to share with you 7 bonus trails that I originally shortlisted after thorough research:
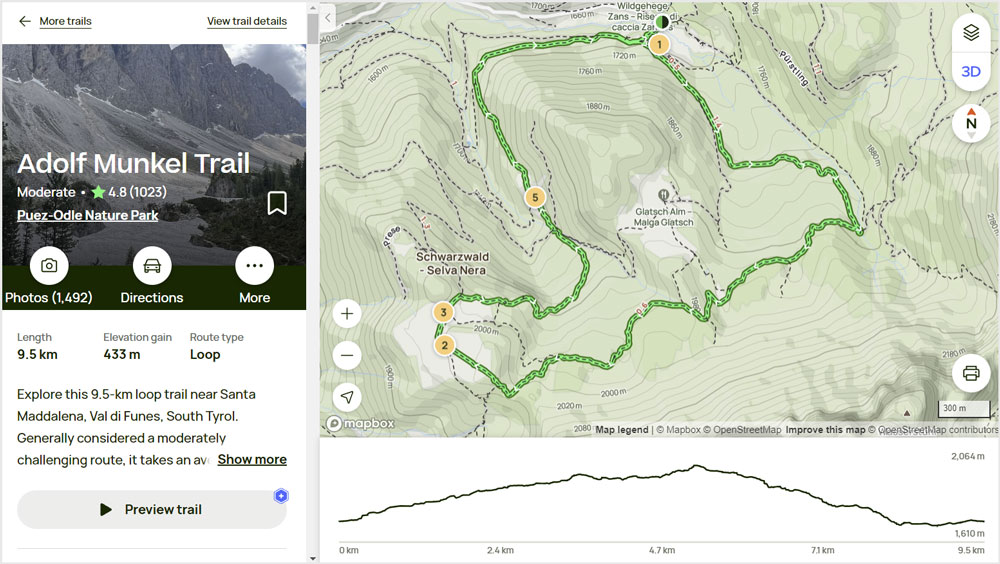
1. Adolf Munkel Trail
- Start & finish: Rifugio Zannes
- Distance: 9.5km
- Elevation gain: 433m
Located northwest of Ortisei and about an hour’s drive away, the Adolf Munkel Trail is great to explore if you have a car (although the public transport is also an option to reach the starting point).
Not too far from the Adolf Munkel trailhead is one of the most iconic photography spots in the Dolomites: the church of St. Magdalena in Val di Funes.
It can be a great place to stop for sunset photos after finishing the Adolf Munkel trek.
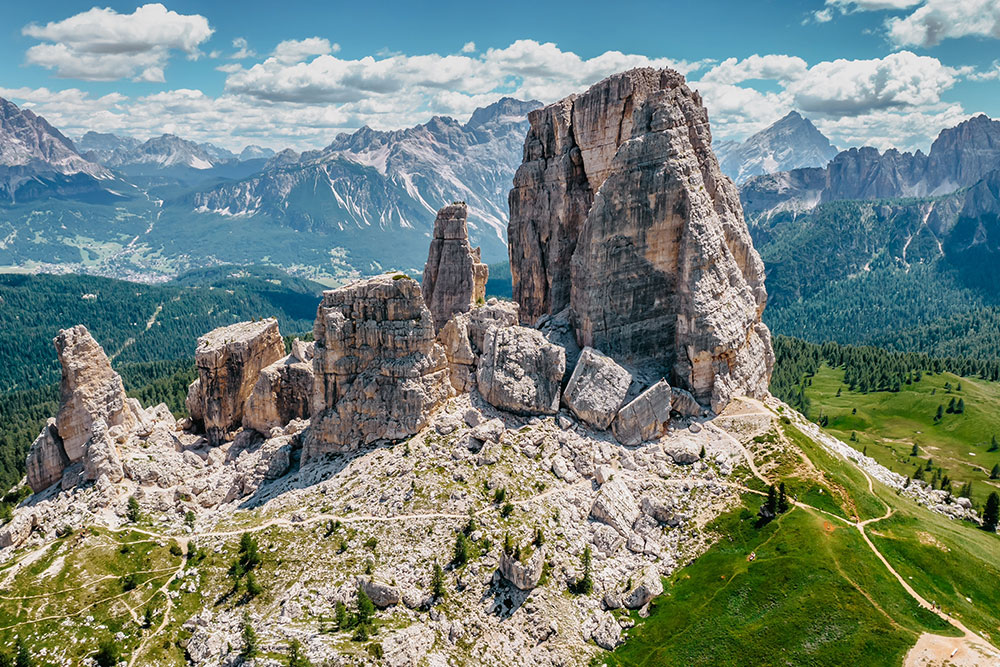
2. Cinque Torri via Baita Bai de Dones
- Start & finish: Baita Bai de Dones
- Distance: 7.1km
- Elevation gain: 417m
Although Cinque Torri, with its five distinctive rock pillars, was on our itinerary, the rainy weather in that area of the Dolomites led us to explore the northern parts of South Tyrol, where it was sunny.
Apart from the stunning rock formations, Cinque Torri is also famous for its World War 1 bunkers and trenches, built amidst the rocky towers during the conflict between the Italians and Austro-Hungarians.
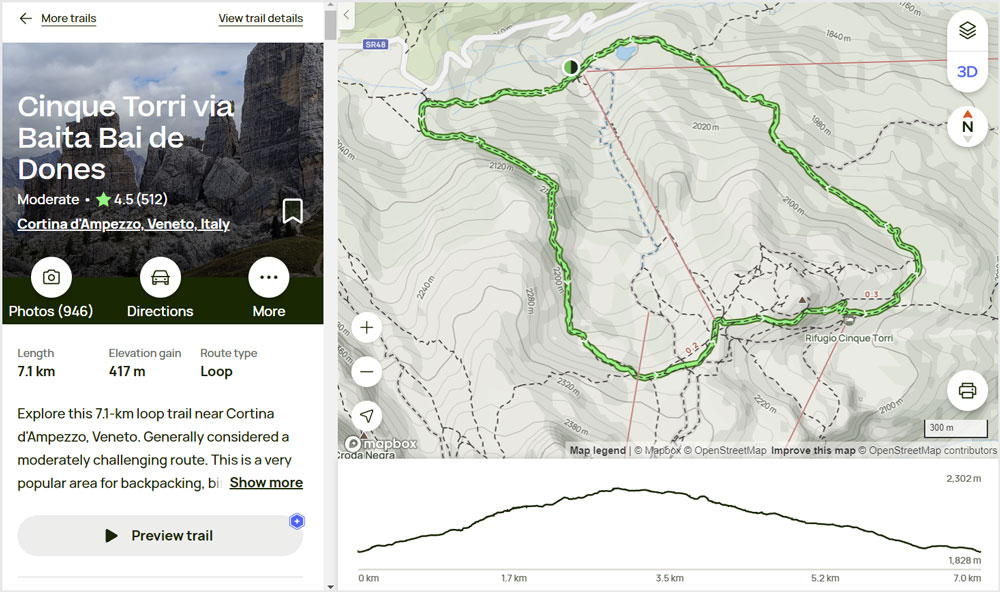
This area has numerous fantastic hiking trails, and the one I’m suggesting is the most reviewed on AllTrails.
However, if you’re short on time or prefer not to do the suggested 7.1 km loop, you can definitely find shorter walks in the area or take advantage of the cable cars.
3. Lago di Anterselva (Lake Antholz) Loop
- Start & finish: Biathlon-Treff Restaurant Bar
- Distance: 4.3km
- Elevation gain: 94m
This scenic loop trail around Lake Antholz in the northern parts of South Tyrol served as our backup plan when rainy weather prevented us from going to Cinque Torri.
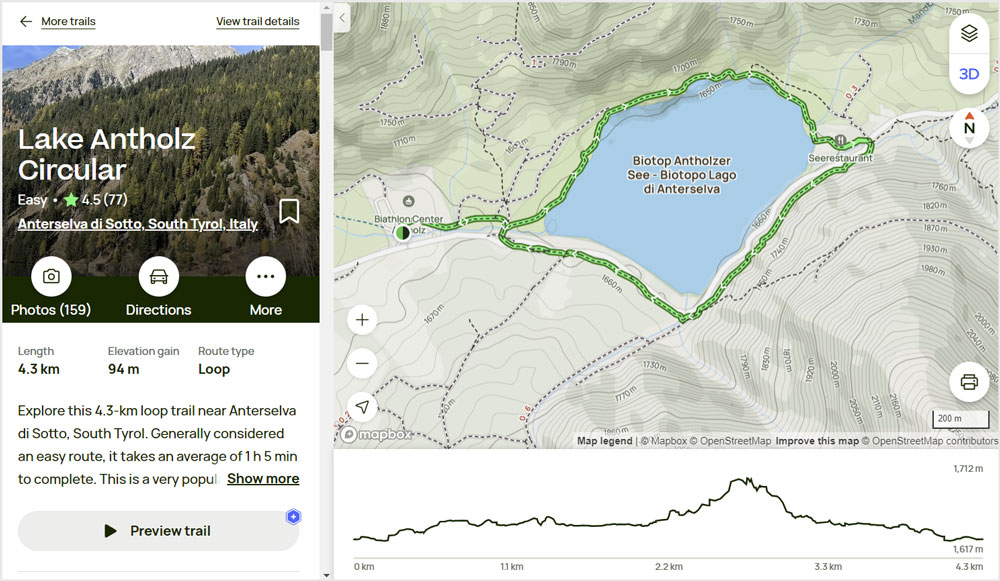
This lake, with its turquoise waters, is a natural gem of the Kronplatz holiday region. Covering an area of 44 hectares, Lago di Anterselva is the third largest natural lake in South Tyrol.
There’s a small beach near the Platzl am See restaurant where you can enjoy a lunch break or go for a refreshing swim.

4. Col de la Puina
- Start & finish: 32040 Borca di Cadore
- Distance: 7.4km
- Elevation gain: 568m
While planning our trip to the Dolomites, I came across a Bruno Pisani YouTube video featuring the breathtaking view from the summit of Col de la Puina.
I was really impressed with this amazing spot, and this trek immediately went to the top of my list of ‘must-do hikes’ in Dolomites.
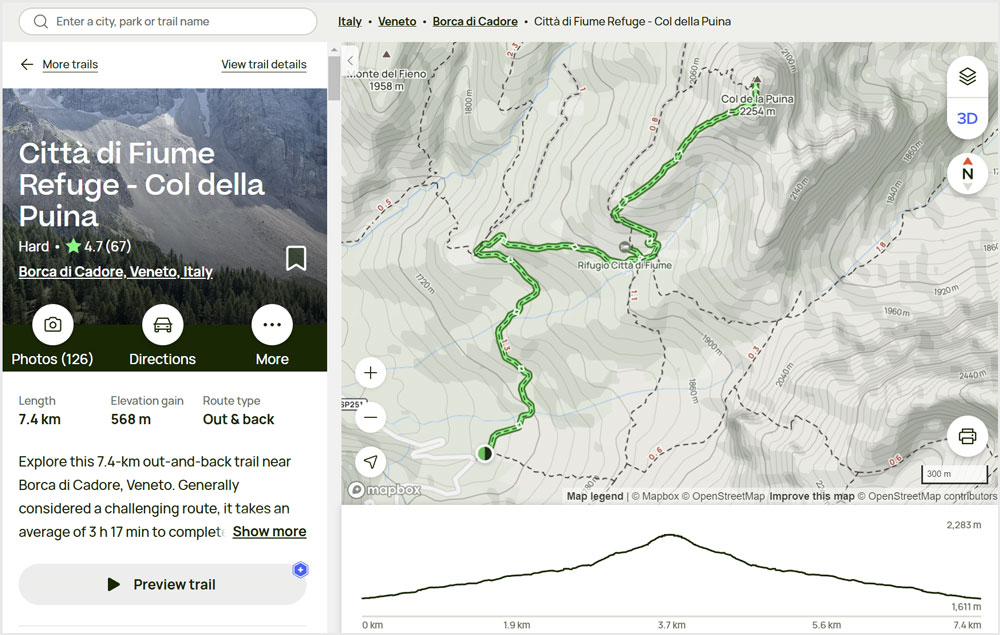
Regrettably, due to time constraints, we had to cut it from our itinerary and missed the opportunity to stand before the massive rock formations of Pelmo Cima.
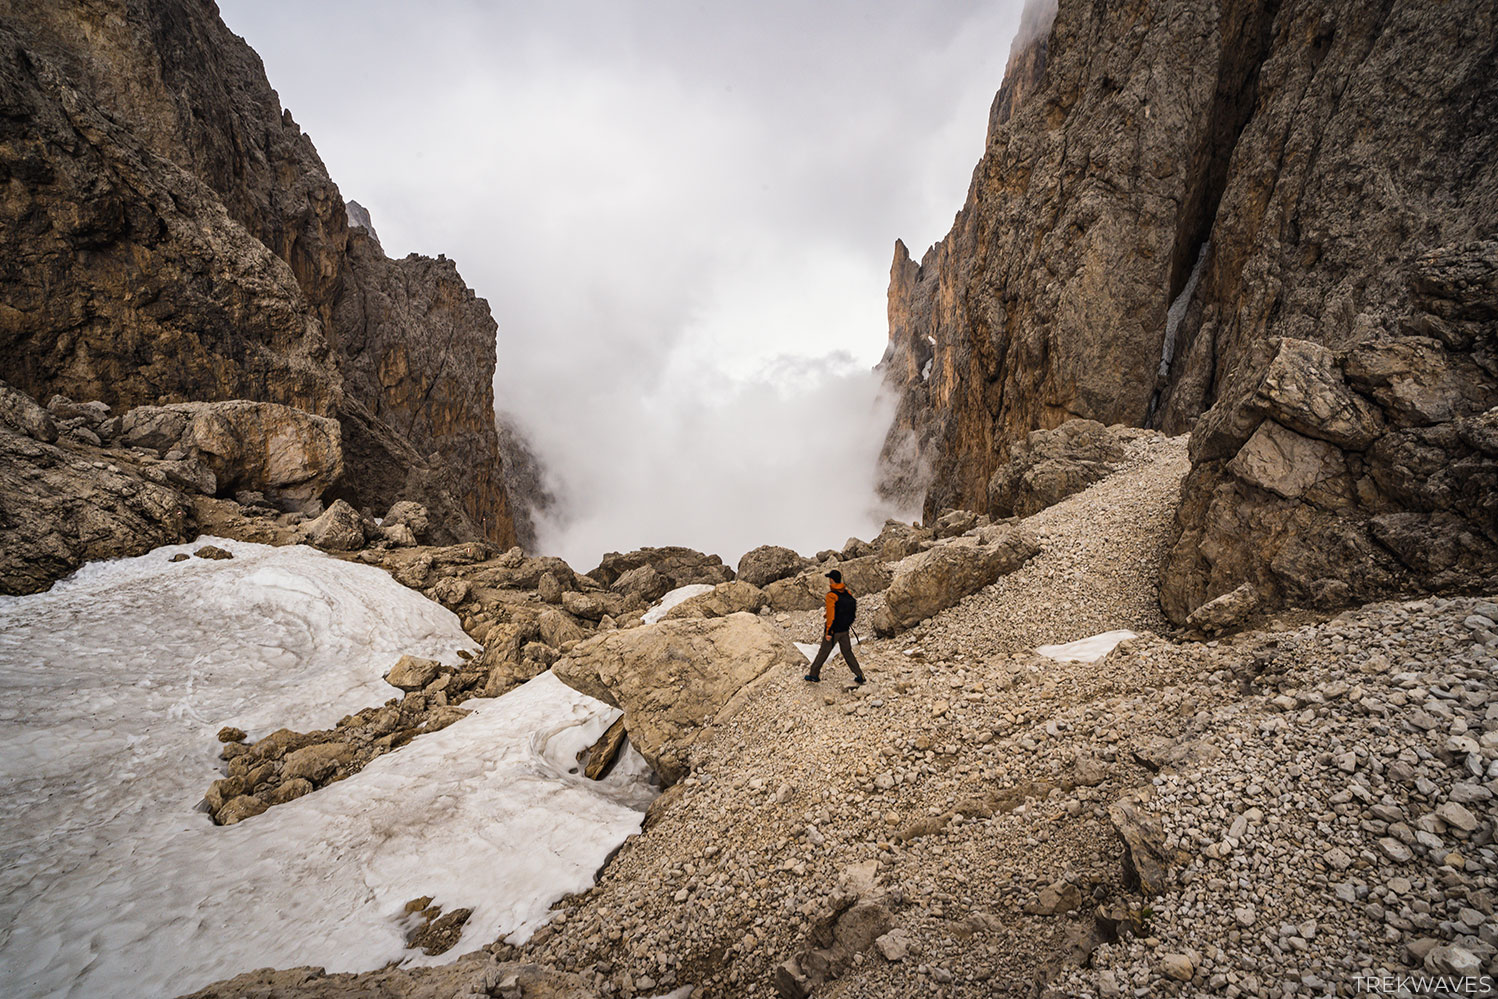
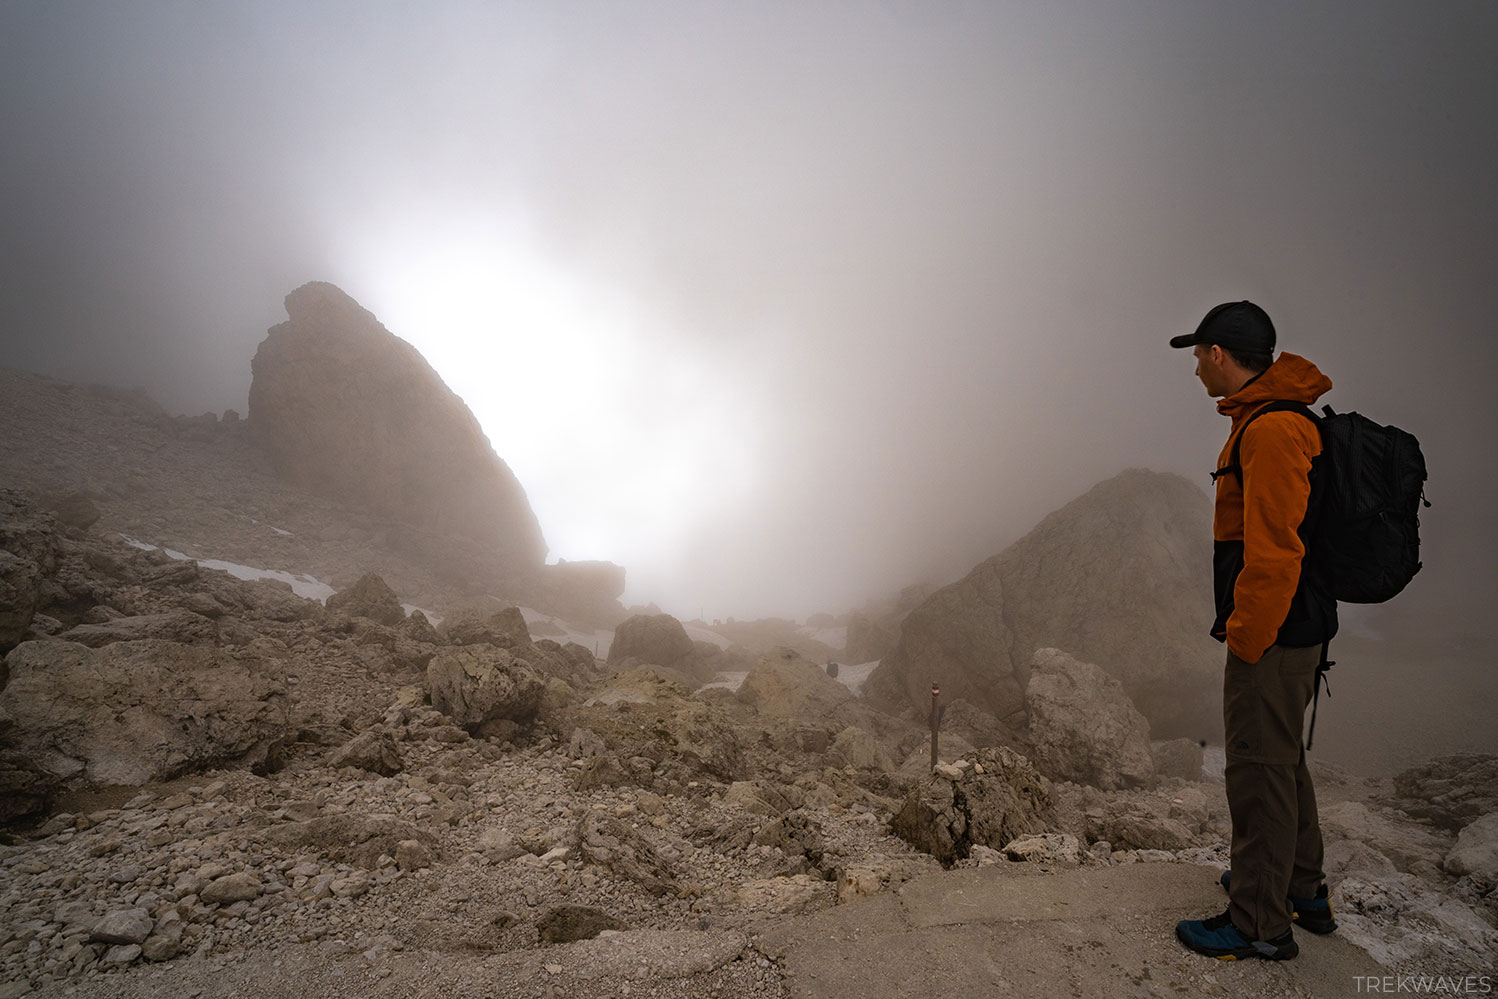
5. Sassolungo Group Loop
- Start & finish: Behind Hotel Passo Sella Dolomiti
- Distance: 16.4km
- Elevation gain: 851m
This incredible hike around the Val Gardena most photographed landmark allows you to circle the three peaks of the Sassolungo mountain group: Punta Grohmann, Sassopiatto, and Sassolungo.
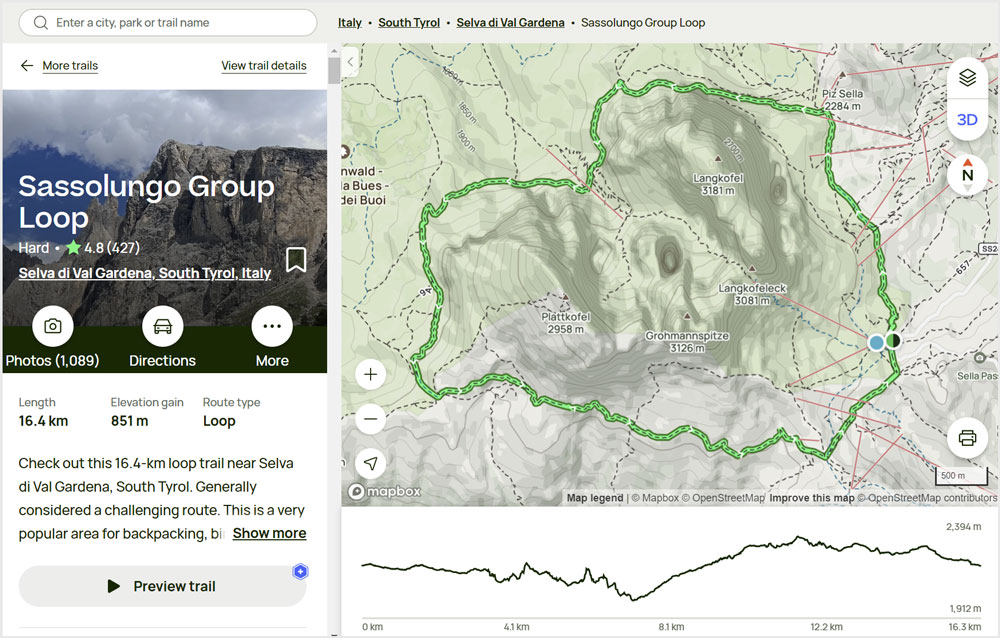
We initially intended to do this hike, but after purchasing 3-day Val Gardena lift passes, we decided to use the cable car network to get from Selva di Val Gardena to Passo Sella, hiking only between the stations, beginning at Ciampinoi cable car station.
One thing you should definitely consider before starting this loop hike is to take a ride on the famous Telecabin Forcella del Sassolungo, often called the ‘Coffin Gondola.’
These tiny cable cars from the 1960s take around 10 minutes to reach the top of Forcella Sassolungo and are designed to hold just 2 people standing.
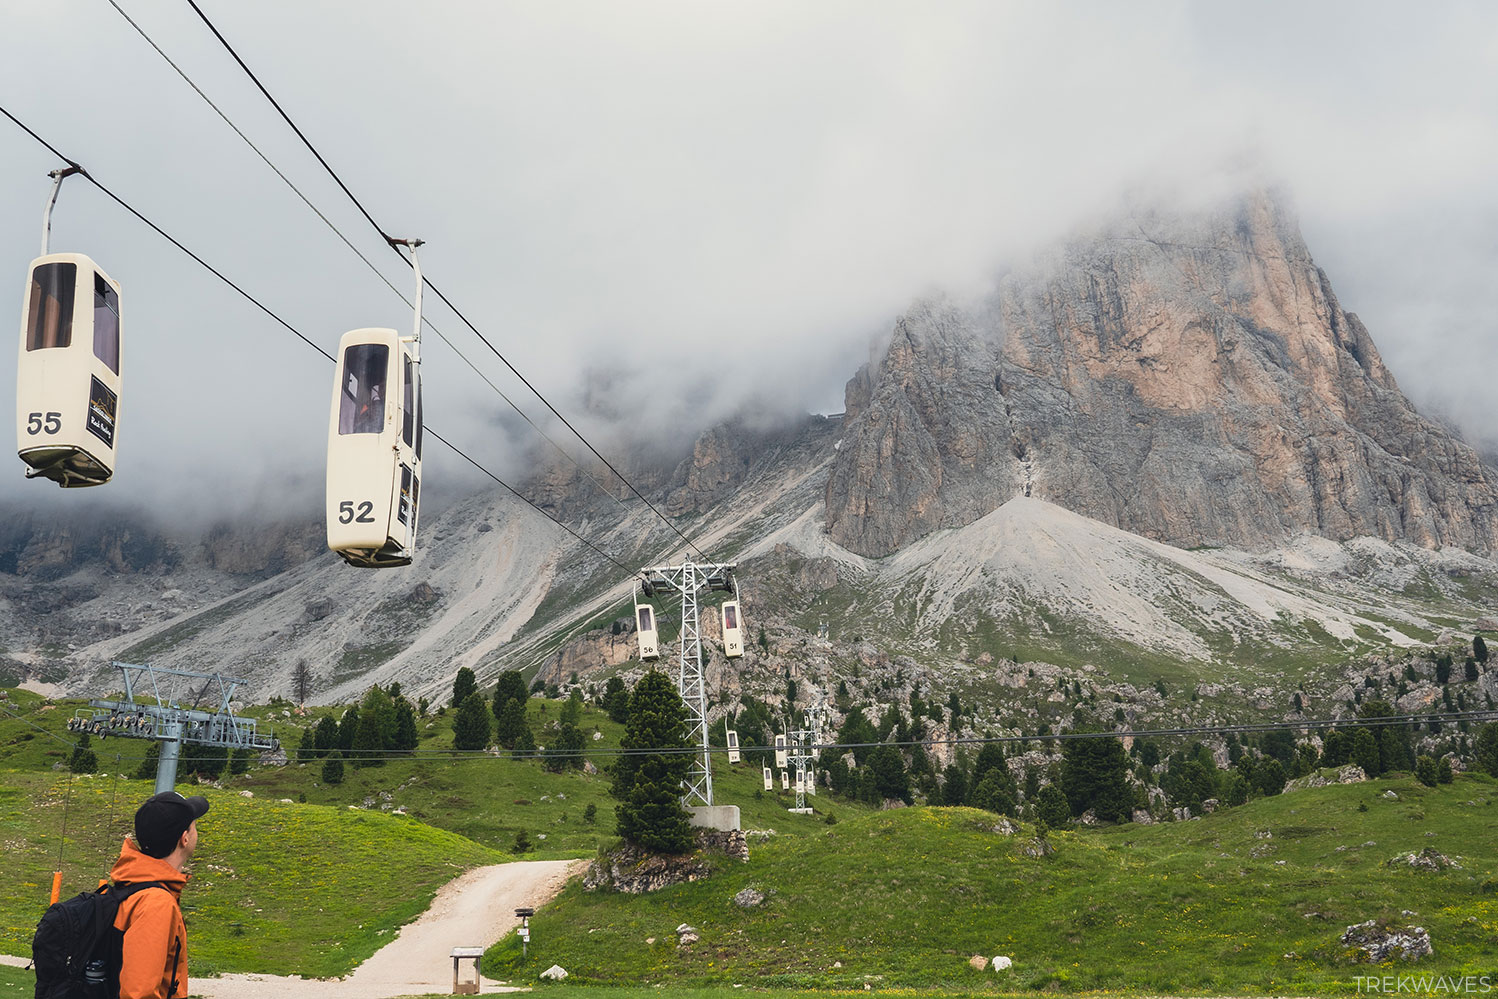
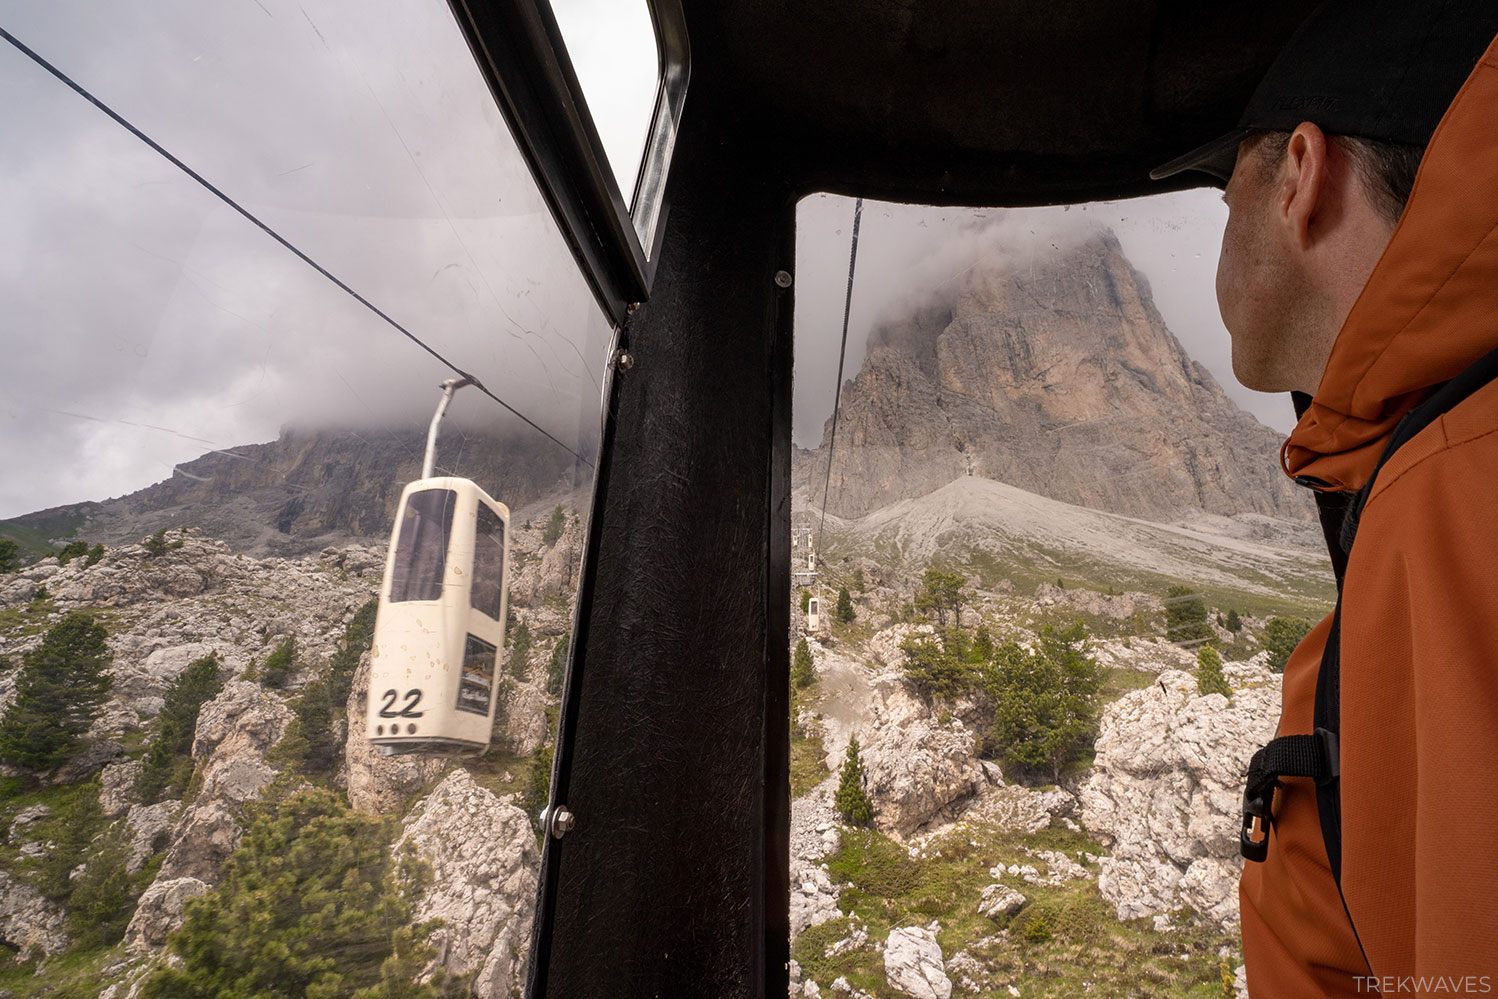

The ride to the top of Forcella del Sassolungo is a once-in-a-lifetime experience as the coffin lifts squeak and sway with the wind, and the views along the way are incredible!
6. Croda da Lago Circuit with Lago Fedèra
- Start & finish: Pian Del Pantan
- Distance: 12.6km
- Elevation gain: 908m
This trail begins 11 km southwest of Cortina d’Ampezzo, winding around the jagged rocks of the Croda da Lago mountain range and leading you to the beautiful Lago Fedèra.
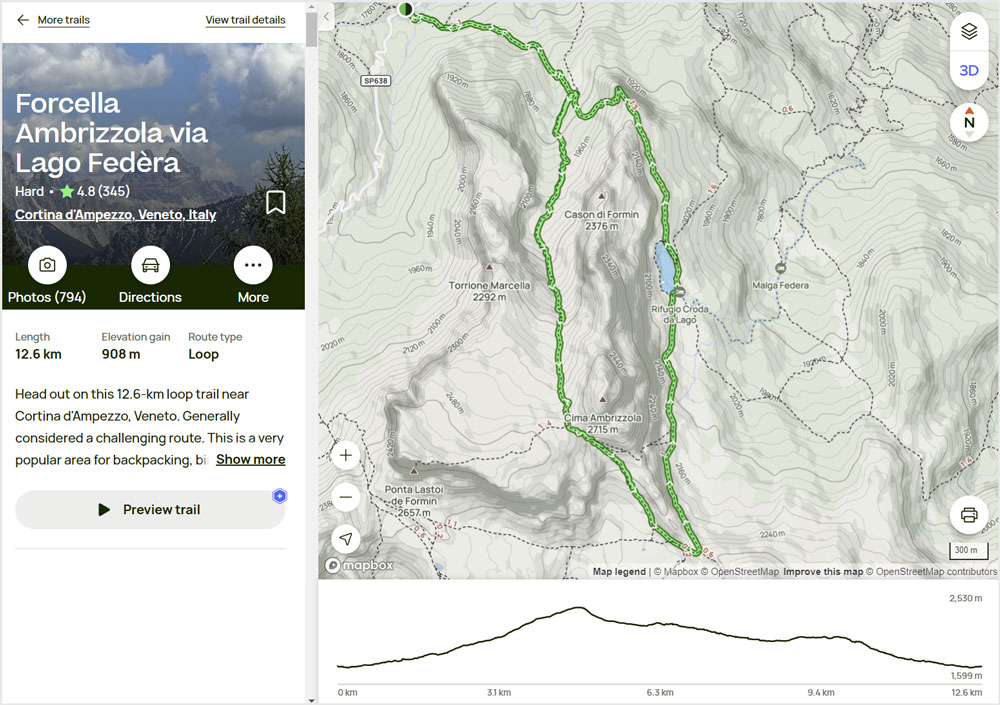
The larch trees that encircle Lago Fedèra create a stunning backdrop, making this hike a great choice for autumn.
7. Piz Boè
- Start & finish: Rifugio Maria (or Rifugio Forcella Pordoi)
- Distance: 6.6km
- Elevation gain: 405m
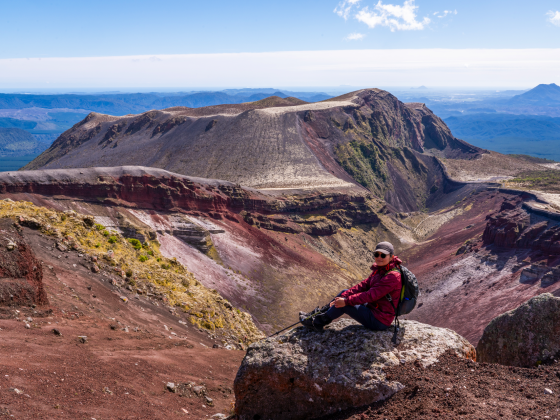
Piz Boè, with an elevation of 3,152 meters, is the tallest mountain in the Sella Group of the Dolomites, known for being one of the most accessible 3,000-meter summits to hike.
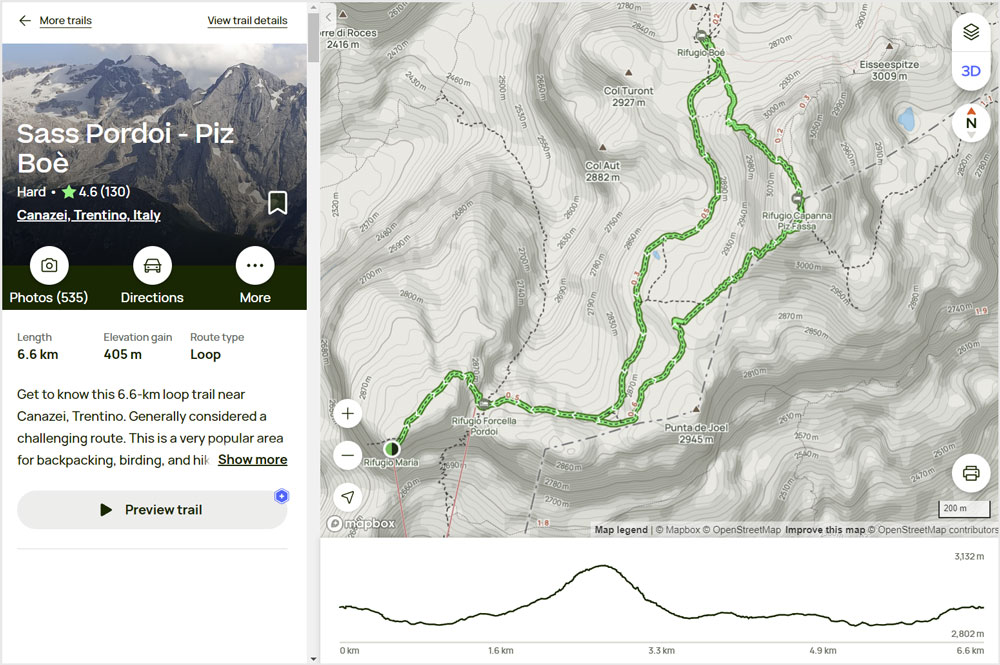
The easiest way to reach the summit is by starting your hike from the top of the Sass Pordoi cable car station.
To earn bragging rights for conquering a 3,000-meter summit in the Dolomites, hop on the cable car departing from Passo Pordoi.
Dolomites Trip Summary and Reflections
To sum up our week-long trip in the Dolomites, I can confidently say it’s a true ‘hiker’s paradise’ with epic views in every direction.
Looking back, I don’t think I’d change anything about our itinerary.
I’m really pleased with how much we managed to do in such a short time, although I wish we could have stayed another week to further explore the beauty of these incredible mountains.
II hope you find these trip planning tips and hiking ideas useful for your first visit to the Dolomites.
If it’s not going to be your first visit, I’d love to hear about your personal favourite trails in the comments section!
Found It Helpful? Pin It for Later!

2 comments
Thanks for all the tips. We are not driving so would you recommend Cortina or ORTESEI.
Ortisei should be much easier to get around without the car. But ultimately, it’s up to you what you want to see the most… Tre Cime di Lavaredo and Cadini di Misurina are amazing so if you can get to Cortina just for 1 day towards the beginning or end of your trip that would be ideal 🙂